Hybrid Viewfinder and Rear Screen
The biggest difference between the X-Pro series of cameras and the rest of the X-series bodies is the unique hybrid viewfinder. In the same finder, Fuji packs a rangefinder-style optical viewfinder (OVF) and a high-resolution electronic viewfinder (EVF). Let’s touch on the electronic viewfinder briefly before we dive into the more unique OVF.
The X-Pro 2’s EVF features the same high-resolution 2.38 million dot panel featured on the X-T10, with almost identical magnification. While the size isn’t anything special, the optics provide good eye relief for me as a glasses wearer, and the sharpness, brightness and clarity are outstanding. The finder on the X-T1 is superior due to its notably higher magnification, but otherwise, I’d put the X-Pro 2 in 2nd place among Fuji EVFs. In low light, when set to high performance mode, the EVF shows very good refresh and almost no lag. When switching to the EVF, you’ll get a very nice experience.Fuji displays the EVF by physically moving a panel to block the light from the OVF, in which case the projected electronic display becomes very visible and clear. Oddly, this panel stays down until you raise the camera to your eye, at which point the eye sensor tells the camera to raise the barrier and have it click into place. It happens quickly, but the sound of the mechanism switching is slightly annoying.
As nice as the EVF is, the OVF is the main reason for a lot of people to consider the X-Pro 2. Switching between the OVF and EVF is as simple as pulling the front lever on the camera. The OVF has two magnifications and will switch automatically between each depending on the lens you have mounted. The wide-angle optics cover lenses from 14mm (which fills the entire viewfinder) to 27mm, while the higher magnification is used for 35mm and longer focal lengths. The actual frame captured is denoted by bright frame lines that adjust based on focal length and focus distance. If you are using one lens and are curious about how another lens would frame the scene, you can press the button on the lever to bring up a bright frame preview of focal lengths in the magnification you are currently using . The image below shows the preview and field of view at the higher magnification for longer focal lengths. You can see that the 35mm frame fills most of the optical finder, while the 90mm frame is just a small portion in the center. If you want to preview the frames at the wider magnification, simply pull the viewfinder lever and hold it for a few seconds, and it’ll switch. It will stay in that position until you switch it back, turn off the camera or attach a different lens.
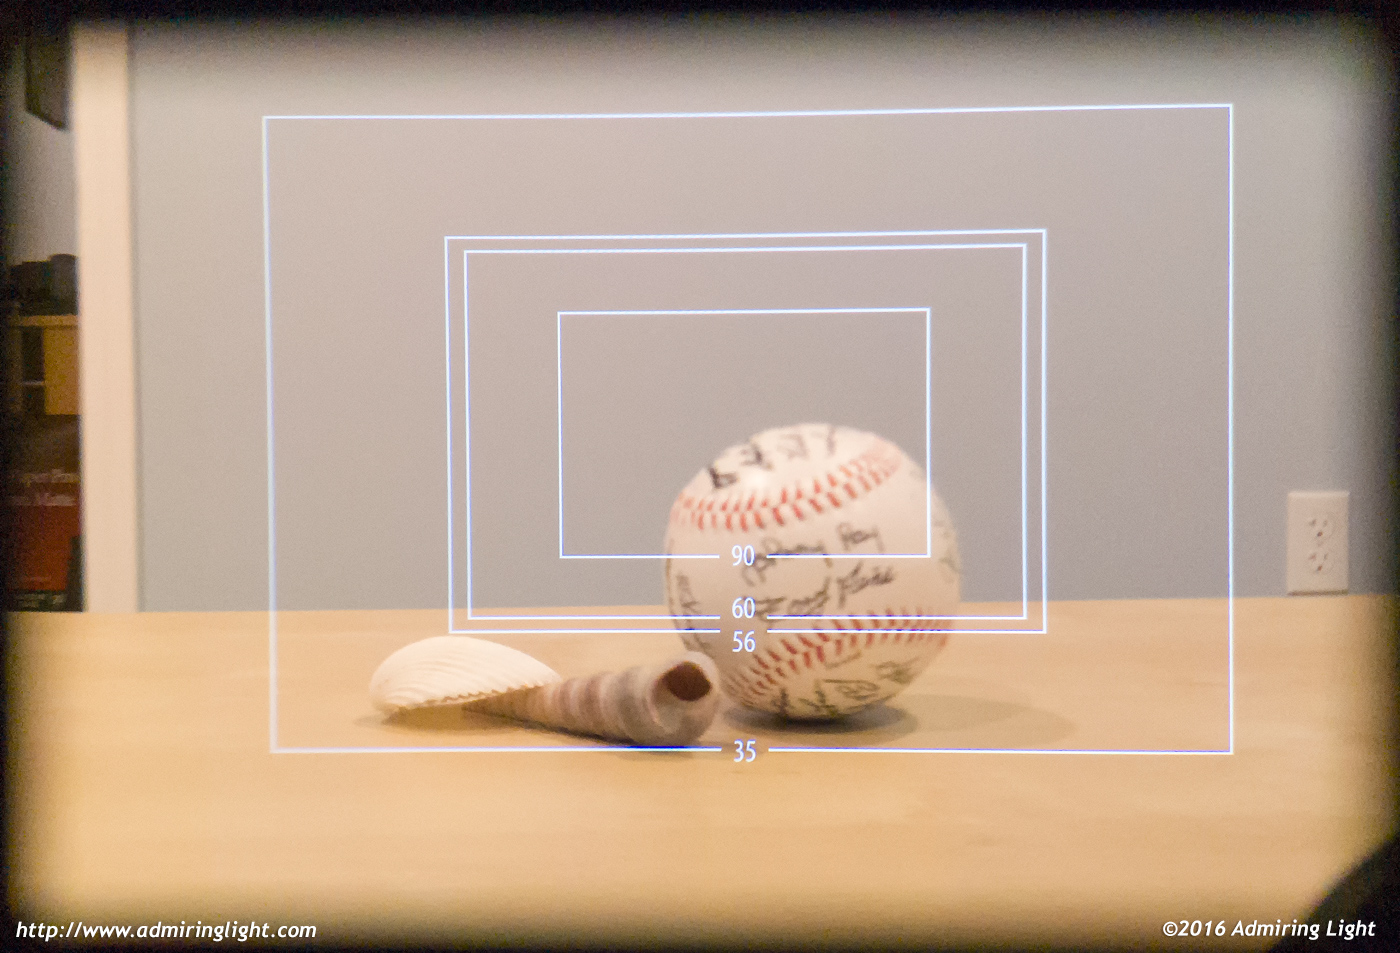
Composing with the OVF is more akin to a rangefinder experience than an SLR or mirrorless camera, as, with the exception of the 14mm frame lines, you can see not only the area captured by the camera, but also the area outside the frame. This is great for street shooters who can use this extra info to better time a person walking into the frame, or to see elements converge before they enter the frame. The frame lines adjust based on focus position, and attempt to compensate for parallax, though at very close focus distances, this can be somewhat off.
One issue that parallax can cause is with focus point placement. By default, the camera comes with the ability to simply select your focus point and shoot. You’ll see an overlay in green on the OVF just like you would on the EVF, that shows the position of the focus point. This position is quite accurate when focused close to infinity, but the actual position of the focus point when focusing closer is down and to the right. If you’re shooting for eyes with shallow depth of field, this can be a challenge…as you won’t see confirmation in the viewfinder of accurate focus. To address this problem, Fuji has added two features, both of which are visible in the shot below.
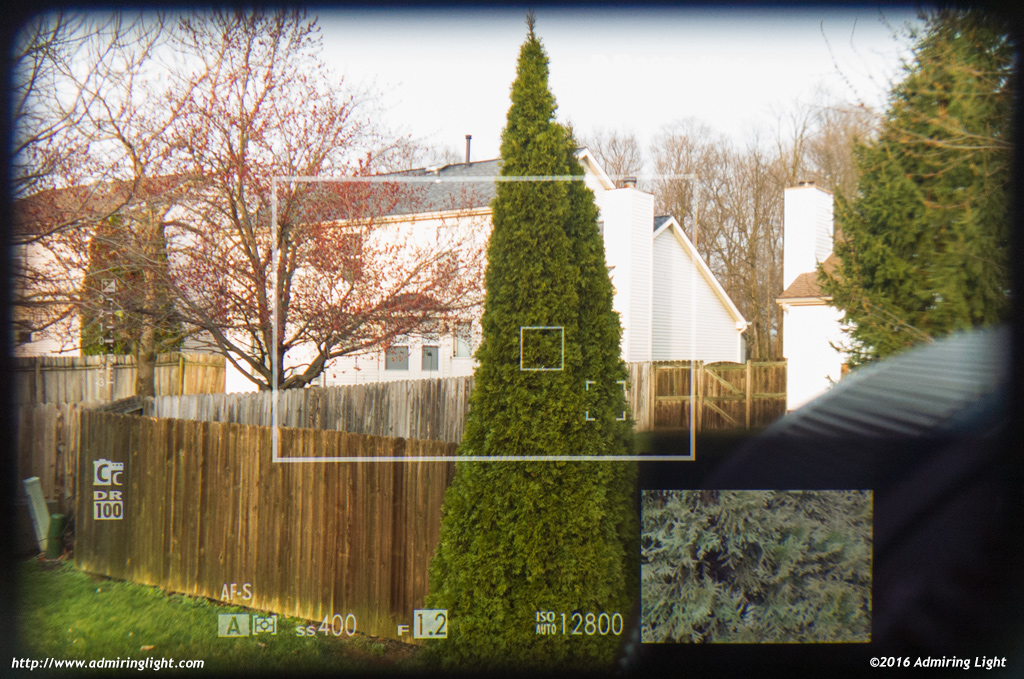
The shot above shows the viewfinder with the XF 56mm f/1.2 attached. The solid square indicates the selected focus point. The broken square below is a guide to show where the focus point will be when focused at its closest focus distance. At intermediate distances, the actual point will be somewhere between the two. The two squares helps give an idea of where the actual focus point is going to fall. For extreme precision, however, the X-Pro 2, like Fuji’s X100T, has the ability to overlay a magnified EVF patch in the lower right corner, which shows a magnified view of the focus point. If you see your subject in the magnified patch, your focus point is dead on it. The patch can also be used with Fuji’s focus aids, which still include focus peaking and their unique digital split-prism focusing. To bring the focus patch up, you simply push away from your hand on the viewfinder lever when the OVF is activated. It’s a great little feature than can really help when shooting people using the OVF.
While the hybrid viewfinder is the main reason for the X-Pro 2 in the Fuji lineup, the question becomes: is it a reason for you to get one? For some shooters, it will be fantastic. Street shooters especially, I think would like having the OVF capabilities. I personally found it great when walking around the city in broad daylight: it’s bright, clear and beautiful. However, the OVF is also quite limited. It’s really only good to use with the prime lenses from 18mm to 60mm. While 90mm and 14mm lenses will work, and zooms will get framelines to 135mm, it becomes difficult to compose with these focal lengths. Beyond them, you have to use the EVF in order to frame your subject. Then there’s dimmer light. Anyone who has extensively used EVFs in dimmer light recently can attest that they make seeing in lower light conditions significantly brighter and easier to view than an optical finder, and the same is true here. While the OVF will work fine indoors, it’s also dim and flat (as youx expect), while the EVF is quite bright. I also very much like (and am accustomed to) seeing the final image as it’s going to be shot, where the EVF shines. I used the OVF a lot during my time with the camera, but for my shooting: I prefer the EVF in the vast majority of situations.
The rear screen on the X-Pro 2 is a very high-resolution 1.6 million dot 3 inch display, and it is very bright, crisp and clear, with excellent contrast. It’s the best screen on any Fuji camera with regards to quality, but it’s also fixed in place. As one who uses the tilt screen on most of my other cameras, there were times I felt a bit frustrated that I couldn’t shoot low to the ground without difficulty. Luckily, WiFi remote shooting can take the pressure off if you really need to shoot low.
Autofocus and Performance
The autofocus system in the X-Pro 2 is largely similar to the AF system in the X-T1 (on firmware 4) and the X-T10, but the new X-Trans CMOS III sensor features a much larger phase-detection capable area, plus some firmware tweaks and other improvements that help speed things up. The X-Pro 2’s phase detect autofocus (PDAF) points cover over half the sensor, and the majority of the camera’s 273 autofocus points. When in the PDAF area, I found speed in most lighting situations to be very similar to what I achieve with the PDAF points on my X-E2 or X-T1, but when light levels drop, the X-Pro 2’s better low light focus acquisition helps lock focus faster and more surely. The faster processing on the X-Pro 2 also adds a slight benefit to speed when using the outer contrast detect (CDAF) points over earlier Fuji cameras.
The final result is single point autofocus that is quite quick with most lenses, though falling a bit short of the ultra-fast Panasonic and Olympus bodies. I do feel Fuji’s strides in autofocus speed are considerable over the past few years, though, and for most any situation, I feel the speed is excellent.

The camera allows you to set up focus point selection for precision placement by selecting one of all 273 AF points, but I feel most people will opt for the much more manageable 77 point grid. The 77 point grid still covers the majority of the frame and is dense enough to allow for very precise focus placement, without dealing with the clutter of hundreds of points.
The wider phase-detect area on the X-Pro 2 also allows it to be a bit better for continuous autofocus duty. As with earlier Fuji cameras, the zone AF selection, where a group of points can be selected, really allows the camera to track movement quite well. While still not up to DSLR standards in the continuous AF department, I’ve always had a very good success rate with my Fuji cameras, and the X-Pro 2 is no different. However, I also didn’t notice a dramatic improvement over earlier bodies, save for the wider phase-detection area.

The new processor in the X-Pro 2, which Fuji dubs the ‘X-processor Pro’, keeps data flowing smoothly and the camera responsive at all times. X-Pro 1 shooters who have waited to upgrade will be amazed at the speed. The X-Pro 2 is a camera that writes quickly, processes quickly, and moves between options quickly. I never found myself waiting on the camera, even after a large burst of photos. Speaking of burst, the X-Pro 2 can rattle off 8 frames per second and shoot around 30 RAW images or over 80 JPEGs before slowing down. It’s a quick camera that responds exactly how you’d want a camera to respond.
Key Features
Normally I split this section into its own page, but I’m doing a condensed version for the X-Pro 2 for a simple reason: the big features on this camera, when compared to the X-T1 and other X-Series cameras, lie in the viewfinder and the upgraded controls, both of which I’ve covered in-depth. The rest of the feature list reads just like that on the X-T1 or X-T10. The X-Pro 2 has fully featured Wi-Fi capabilities, including remote control, image transfer and geotagging. It has the same excellent intervalometer, the same great built-in RAW conversion and the same electronic shutter capabilities. If you want a more detailed summary of these features, check out the Key Features part of my X-T10 review: the way they operate on the X-Pro 2 is unchanged.

There are a few things of note that aren’t covered there, however. First up: Dual card slots. As I alluded to when discussing the focus stick, the X-Pro 2 is the first Fuji body (and the first mirrorless interchangeable lens camera) to feature dual SD card slots. The X-Pro 2’s two slots can be configured to write data in one of three ways.
- The camera writes the same data to both cards, creating an instant backup of data
- The camera will write data to the card in slot 1 until it’s full, and will then continue to card 2
- The camera will write RAW images to card 1 and JPEG images to card 2
The entire time I shot with the camera, I chose to shoot with the camera set with the third option, which was outstanding. I could offload RAW files when I downloaded to my computer, but had already generated JPEG images for quick sharing, or if I wanted to take a look at the camera’s output for a particular image, without having to take up my primary card’s space with JPEGs. Pros will really love this feature, and a lot of serious amateurs will also find great use for it. I hope the same dual card slots find their way into the X-T2 when it comes out.
Bracketing
Finally, Fuji has taken the leash off the auto exposure bracketing and allowed for greater than 3 shots at + or – 1 stop of exposure latitude. On the down side, they’ve only expanded it to 3 shots at + or – 2 stops of exposure. While this is often all that is needed for quality HDR shooting, I just don’t understand why, when making the change, they couldn’t have allowed for 5 shots at 2 stop intervals, or 3 shots at 3 stops intervals. Is it that hard to program? Good on Fuji for finally making the change, but unfortunately, it’s still lacking compared to the competition.
Shutter
Finally, this sounds ridiculous, but I had to briefly mention the mechanical shutter. The new mechanical shutter goes to 1/8000s, which is excellent, especially given the faster glass that Fuji has in its lineup, but the best part: it has the most satisfying sound on any camera I’ve ever used. It’s hard to describe, but it’s simply beautiful. A soft, yet distinct snap that just makes me want to shoot.





Leave a Reply