Last night, I got ready for bed and was ready to turn off the light when I remembered that last night was the night of the so-called ‘supermoon.’ That is, when the moon is full at its perigee (the closest point of its orbit). When these factors combine, the moon appears 12-14% larger and brighter in the sky compared to a typical full moon. It’s not a huge difference, but it can be noticeable.
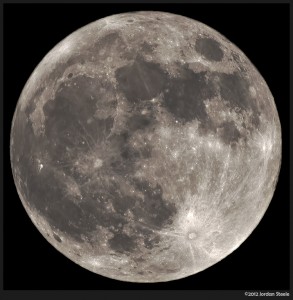
Luckily, the sky was clear last night, and I quickly put some better clothes on and went out in my front yard to take some shots. I ended up with the shot to the left, which is the best moon shot I’ve ever been able to get, though it pales in comparison to some shots I’ve seen from talented astrophotographers who have telescopes to adapt to their cameras. Click on it to see the image full size.
So, while this year’s supermoon has come and gone, you can still take pictures of the moon at any time (and let’s face it, it’ll still be pretty bright and mostly full tonight as well). Here’s what you need to get decent moon photos.
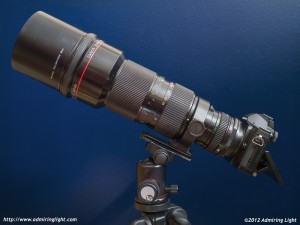
1) You need the longest lens you can get. The moon might appear large in the sky, but it’s rather small, about 0.5 degrees in the sky…which means you need a lens with a focal length of around 3000mm to fill the frame with the moon on a 35mm film camera. Needless to say, they don’ t make camera lenses this long for the general public. In fact, the longest SLR lens made is the Canon 1200mm f/5.6L, of which there are only about a dozen or so. What that means is you will either need to adapt a telescope, or you’ll just need to crop heavily. I used an old manual focus Canon FD 50-300mm f/4.5L at 300mm, which on my Olympus E-M5 has a field of view equivalent to a 600mm lens on a full frame camera. Long, yes, but the shot above is still near a 100% crop of my final image.
2) Expose for daylight. You generally shoot the moon for detail like above at night (though at moonrise and dusk makes for great landscape photos incorporating the moon into the composition. Though you’re shooting at night, remember that the moon is illuminated by direct sunlight, and therefore the exposure is close to that of shooting in bright daylight. The shot above is actually a 3-shot HDR (which I then manually aligned to compensate for travel in the sky), but the average exposure I was using was ISO 200, f/8 and 1/320 second.

3) Use a steady tripod. Because you’re using daylight exposure, you can handhold shots of the moon, especially if you’re using an autofocus lens and don’t need precision manual focus, but even then, with really long lenses, it’s best to have a sturdy tripod. My tripod is an Induro CX213 carbon fiber tripod with a PhotoClam ballhead. I of course used the lens’ built in collar for the mounting point. I tilted the screen of my E-M5 to make focusing and framing easy on my back due to the tilt of the lens, so I didn’t need to hunch over. Even with this steady setup, I could still see big vibrations in the magnified view any time I touched the camera. I manually focused using 10x live view on the LCD and tripped the shutter using the self timer to avoid any vibration from pressing the button. The built in IS on the E-M5 was also active to counter any vibrations from the shutter. The picture on the right shows the setup used for the shot above.
So, go give it a try! Unfortunately, this is a type of shot you really need the gear to get, but if you have a long lens and use good technique, you can get decent moon shots.


Leave a Reply