
Table of Contents
The Controller
The included controller is a grey plastic-clad controller that feels very much like a modern video game controller, with two analog joysticks to control forward and lateral movement, altitude and yaw. Which stick operates which control is user-configurable, in one of three modes. The most common configuration for UAV pilots is Mode 2, where the left stick controls elevation and yaw, and the right stick controls forward and lateral movements. I fly the Air 2S using Mode 3, which is the same as Mode 2, but has the sticks swapped. This feels more natural to me, coming from a video game background, as it most closely resembles the controls in most games played with a gamepad. Mode 1 mixes the controls a bit, with the left stick taking forward and back movements, as well as yaw, while the right stick does up and down and left and right.
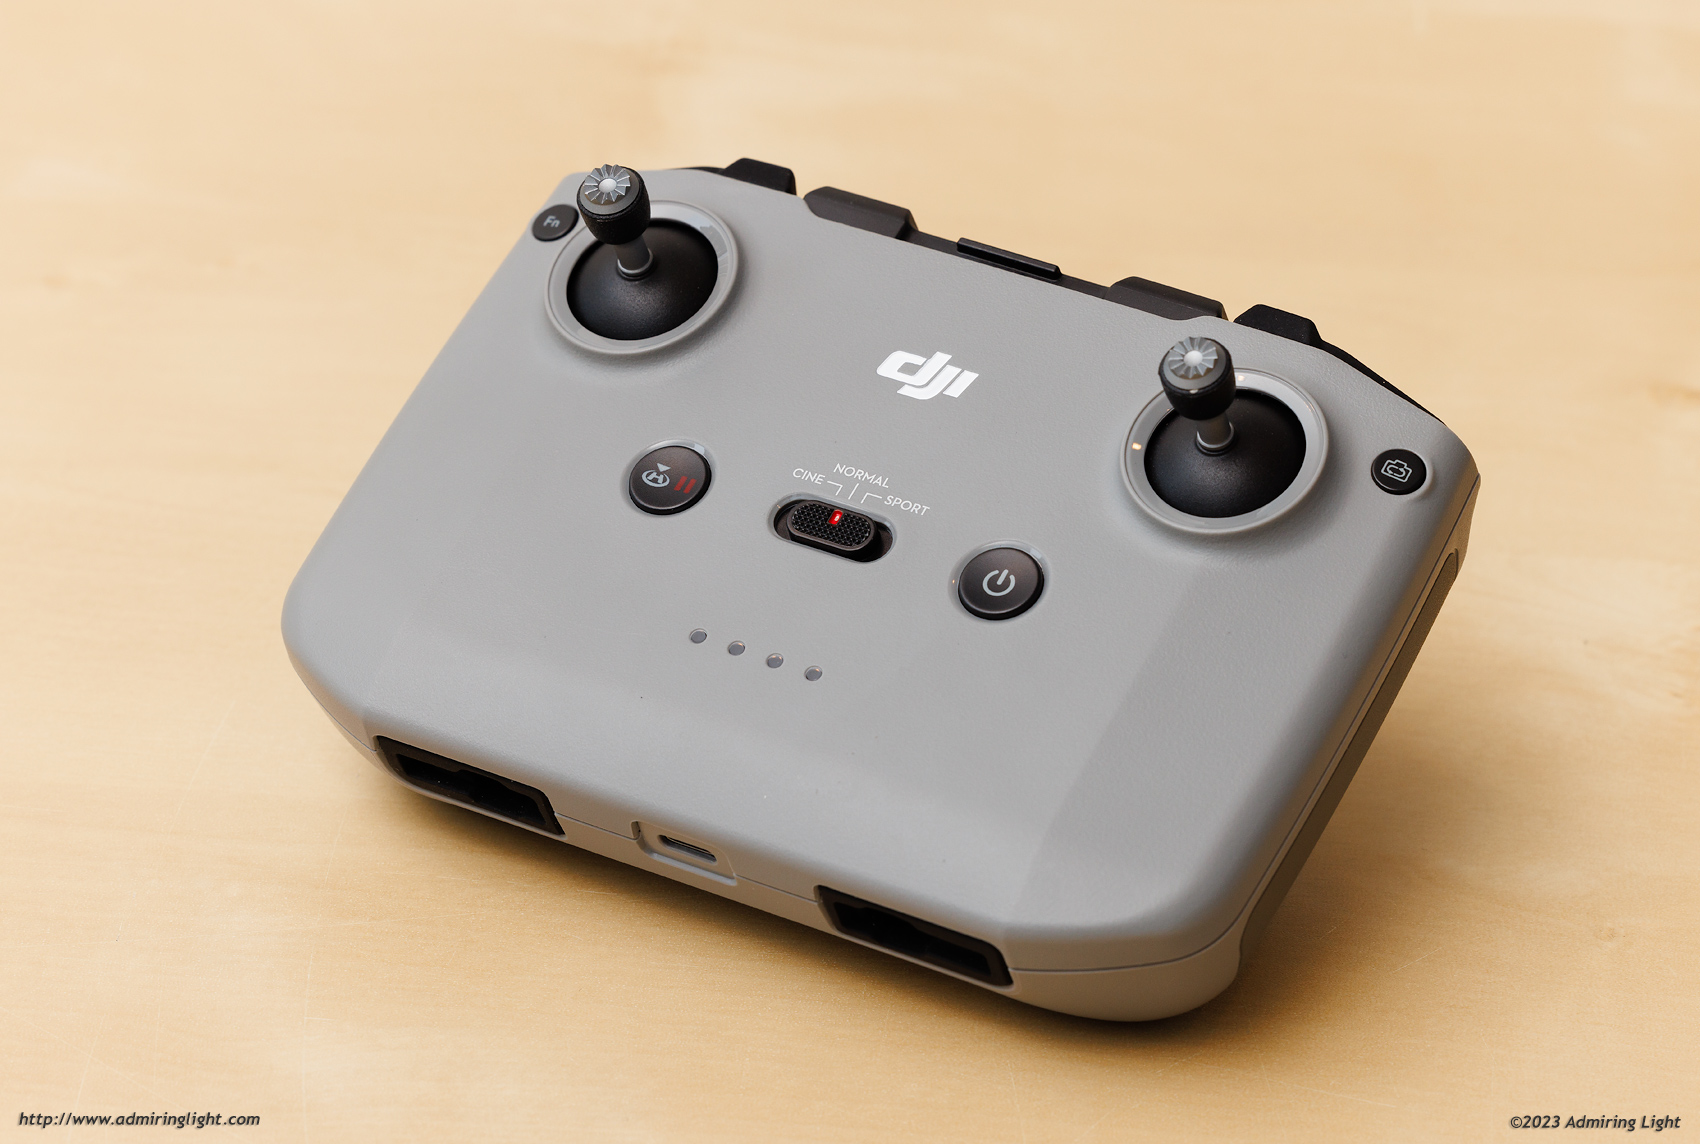
I find the control sticks to feel quite nice in usage, with a good weight and feel. The sticks are removable for storage, and there are included spot in the base of the controller to store them when not in use.
Below the control sticks are two prominent buttons and a sliding switch. The sliding switch sets the flight mode of the aircraft, and on the Air 2S this consists of Cine, Normal and Sport modes.
Normal mode provides reasonable flight speed, relatively responsive control changes, and allows the obstacle avoidance systems to work. The top speed of the drone in Normal mode is approximately 34 MPH (54 km/hr). For still photography, I fly in Normal mode most of the time.
Cine mode slows the stick response down, allowing for slower travel and smoother direction changes, which can be important for video shooting, or simply for finer control in tight spaces.
Sport mode turns off obstacle avoidance, ramps up the top speed of the drone and allows you the highest degree of speed and maneuverability. I typically only use sport mode if I need to go fast, which is pretty rare. I don’t do video work in tight spaces where the speed and lack of obstacle avoidance allows more freedom. The top speed of the Air 2S in sport mode is 42 MPH (68 km/hr).

Flanking the mode switch are the Return to Home button and Power button. Return to Home does exactly what it sounds like – it calls the drone back from wherever it is and lands it at the same spot you took off from. While executing a return to home, it first goes to a pre-defined altitude (which hopefully you’ve thoughtfully set), to avoid any potential obstacles on the return flight.
At the top corners are two buttons – a programmable Fn button (which I have set to reset gimbal position, which toggles between looking straight ahead and straight down), and a button that switches the camera between stills and video shooting modes. On the right shoulder is the shutter button. In stills, it takes a photo, while in video it starts and stops recording.
At the left shoulder is a toggle dial, which angles the camera up or down. By default, the camera will only shoot between level and straight down, but a software setting allows tilting the gimbal up by up to 10 degrees (though you may occasionally get a propeller in the shot when looking up).
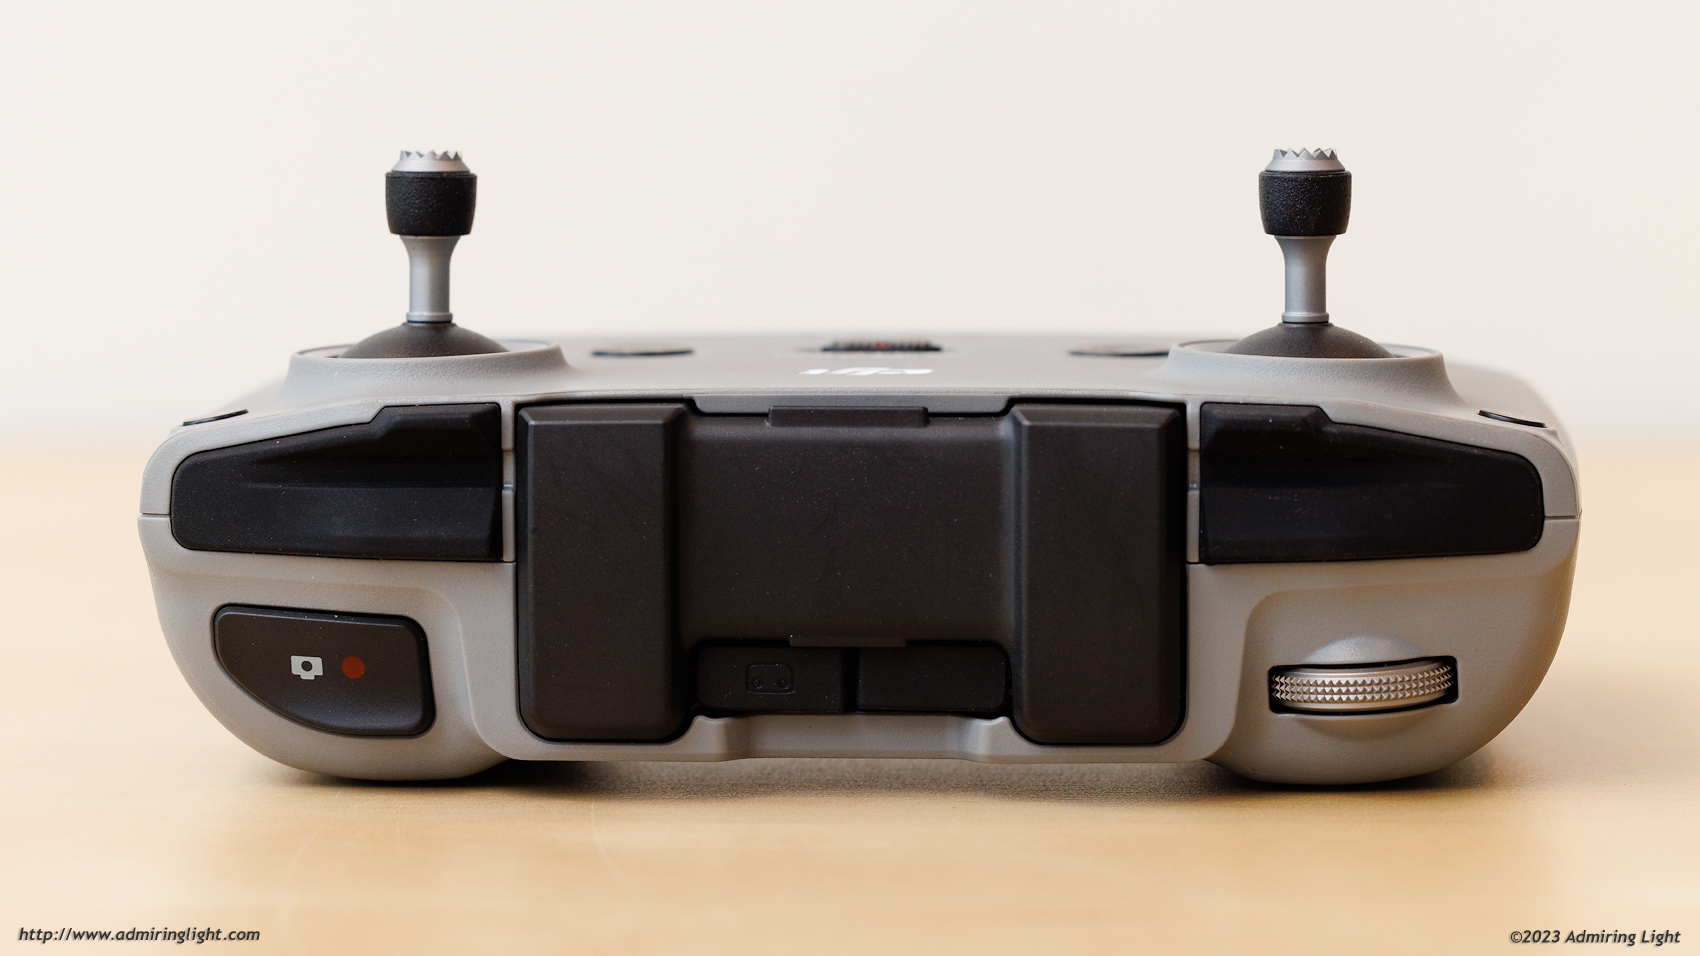
The top of the controller features the cradle for a smartphone, which extends (and features the antenna), to hold essentially any size standard smartphone, from small to large. A short cable is included, which physically connects to your smartphone port to allow for direct communication between the phone and the controller. DJI includes three short cables, allowing for connection to Android or iOS devices using USB-C, Lightning, or Micro USB. Simply use the cable that matches your device.
In all, the controller feels good in the hand, and the controls are responsive and tactile. I also found the controller relatively intuitive to use, and rather quick to get accustomed to.
Software
The DJI Software has a lot of available options, and it takes some time to become familiar with all of the features and options. I’m not going to go super in-depth on the software, but instead will give a brief overview of the major sections available to you.
When you first hit the Go Fly button, you are brought to the main interface for the drone. This generally shows the view from the drone camera, you current height, speed and distance from the operator, as well as your current camera settings, basic camera controls, an overview map of the current aircraft location, the path it has flown, and a vector to your location in red.
In the upper right of the interface is a set of icons and numbers denoting important information on current aircraft status. From left to right, this includes the current aircraft battery level in a circle with percentage remaining inside, the estimated flight time remaining on the battery given current conditions, the signal strength between the controller and the aircraft, the status of vertical proximity detection, and the currently connected number of GPS satellites.
The last number might seem a little odd, but precise positioning of the aircraft is dependent on solid GPS signals. You can fly the drone without any GPS satellites connected, but you are entirely on your own for maintaining position. The software requires you to manually override for liftoff if fewer than 8 satellites are detected, and warns you if it’s between 8 and 11. When more than 12 are connected, the aircraft considers it to have excellent GPS position data. Typically, when I’ve flown, I am connected to between 18 and 24 satellites once I get into the air.
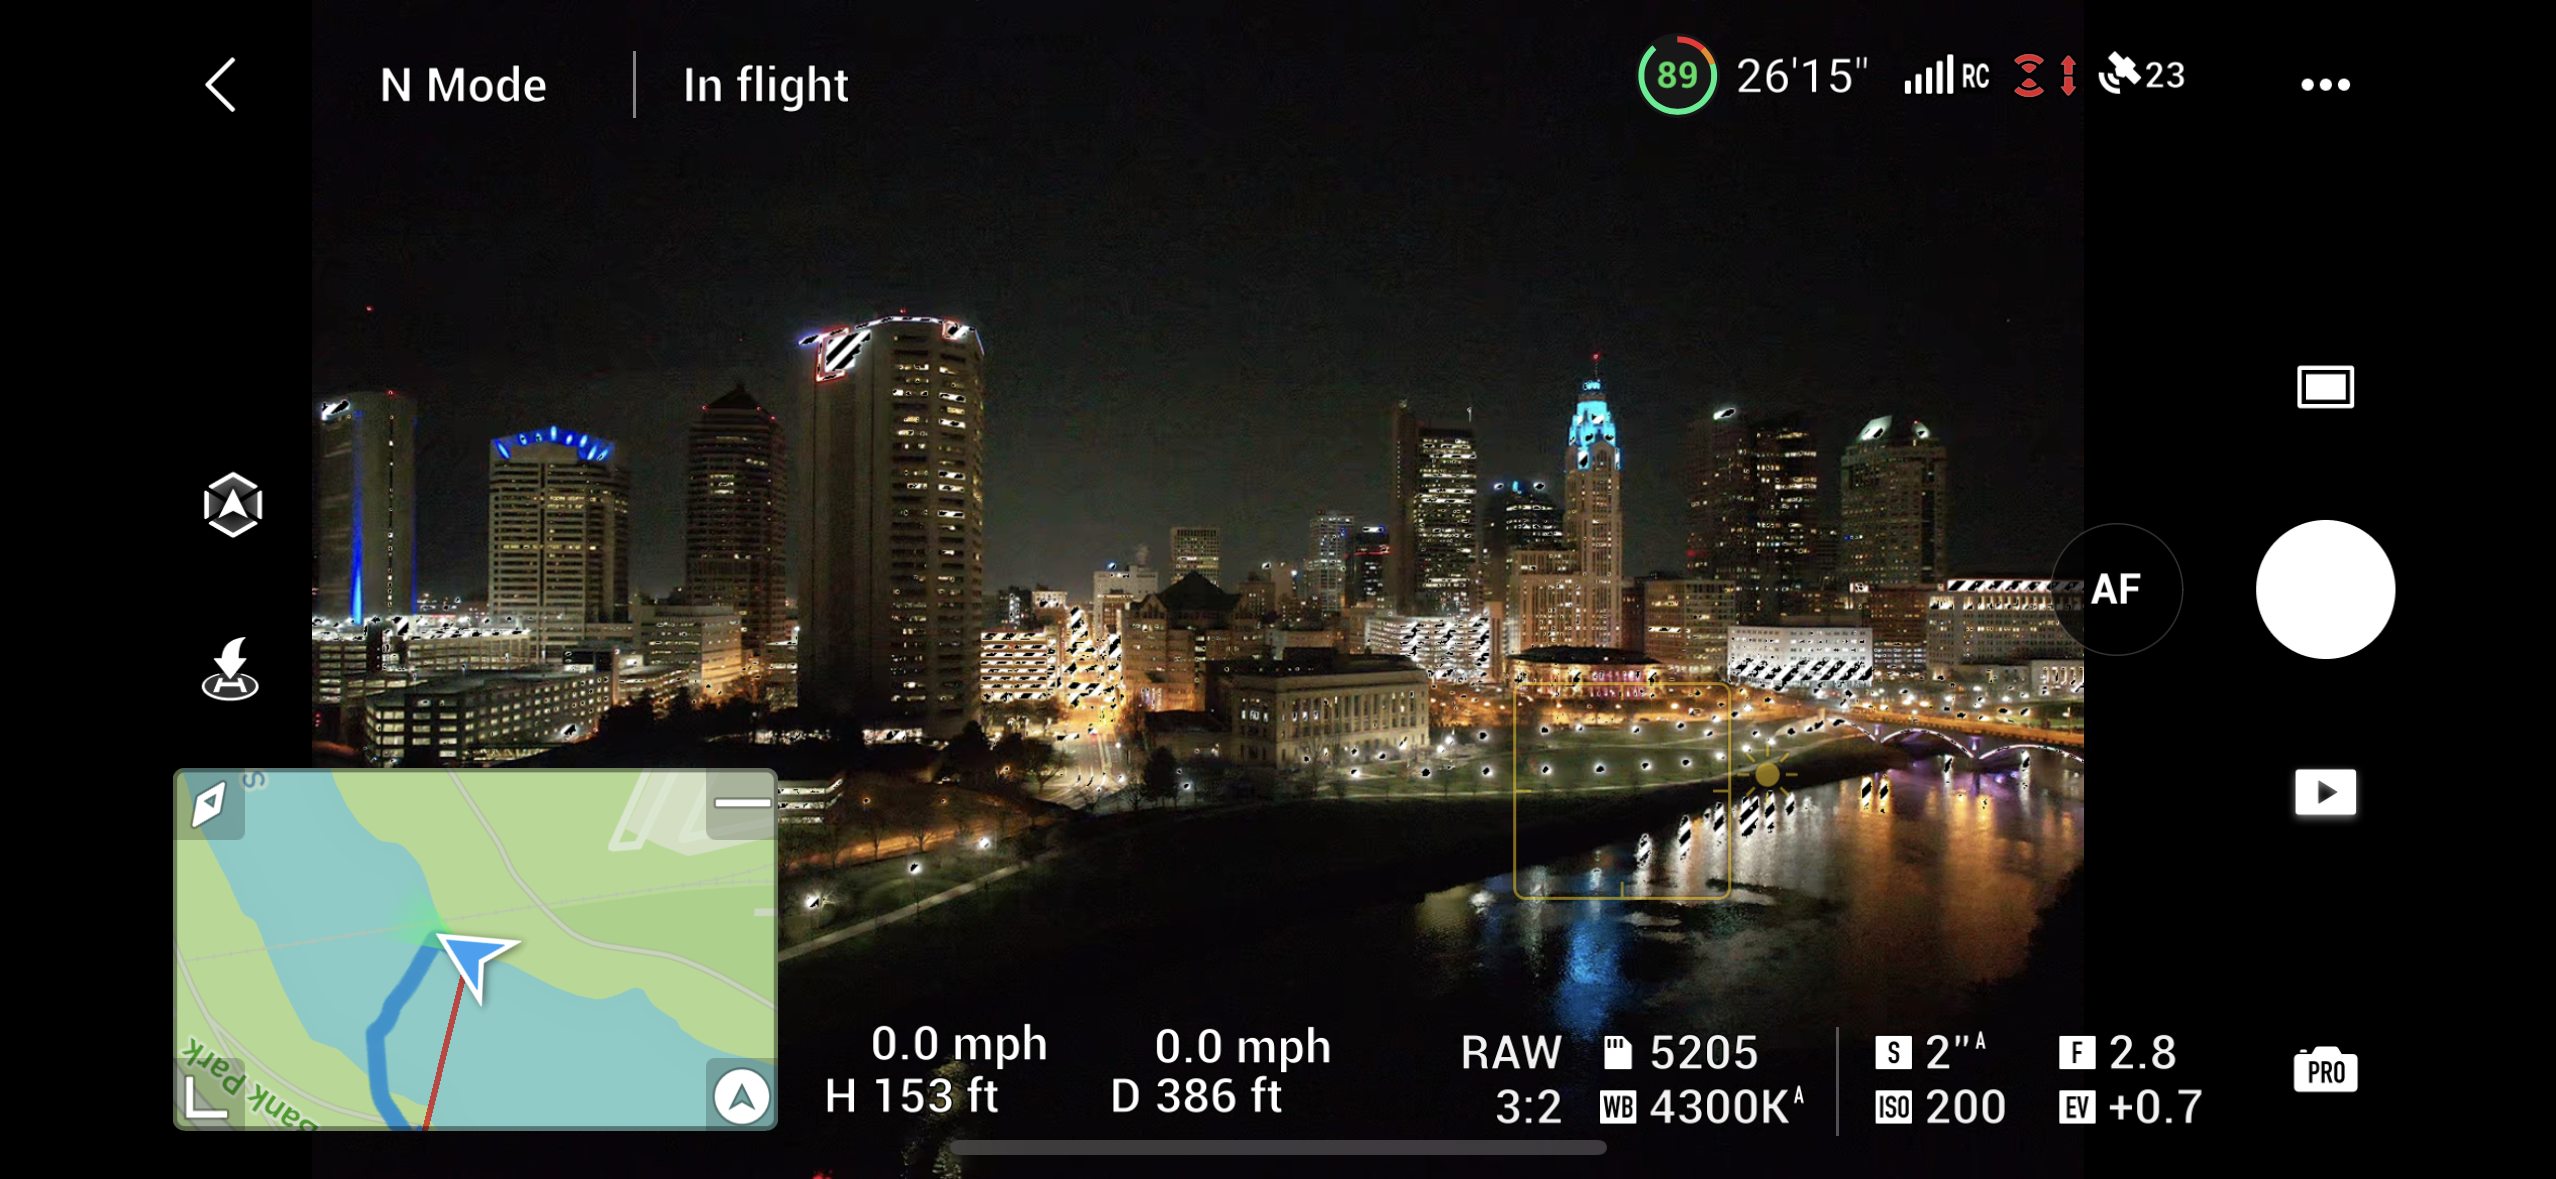
Camera controls are located on the right side of the interface (much like a smartphone camera), with the ability to change from Auto to Pro mode and set exposure settings by tapping on the icon in the lower right. This generally works quite well, though with manual exposure, I sometimes have to change a setting to get the metering to properly update.
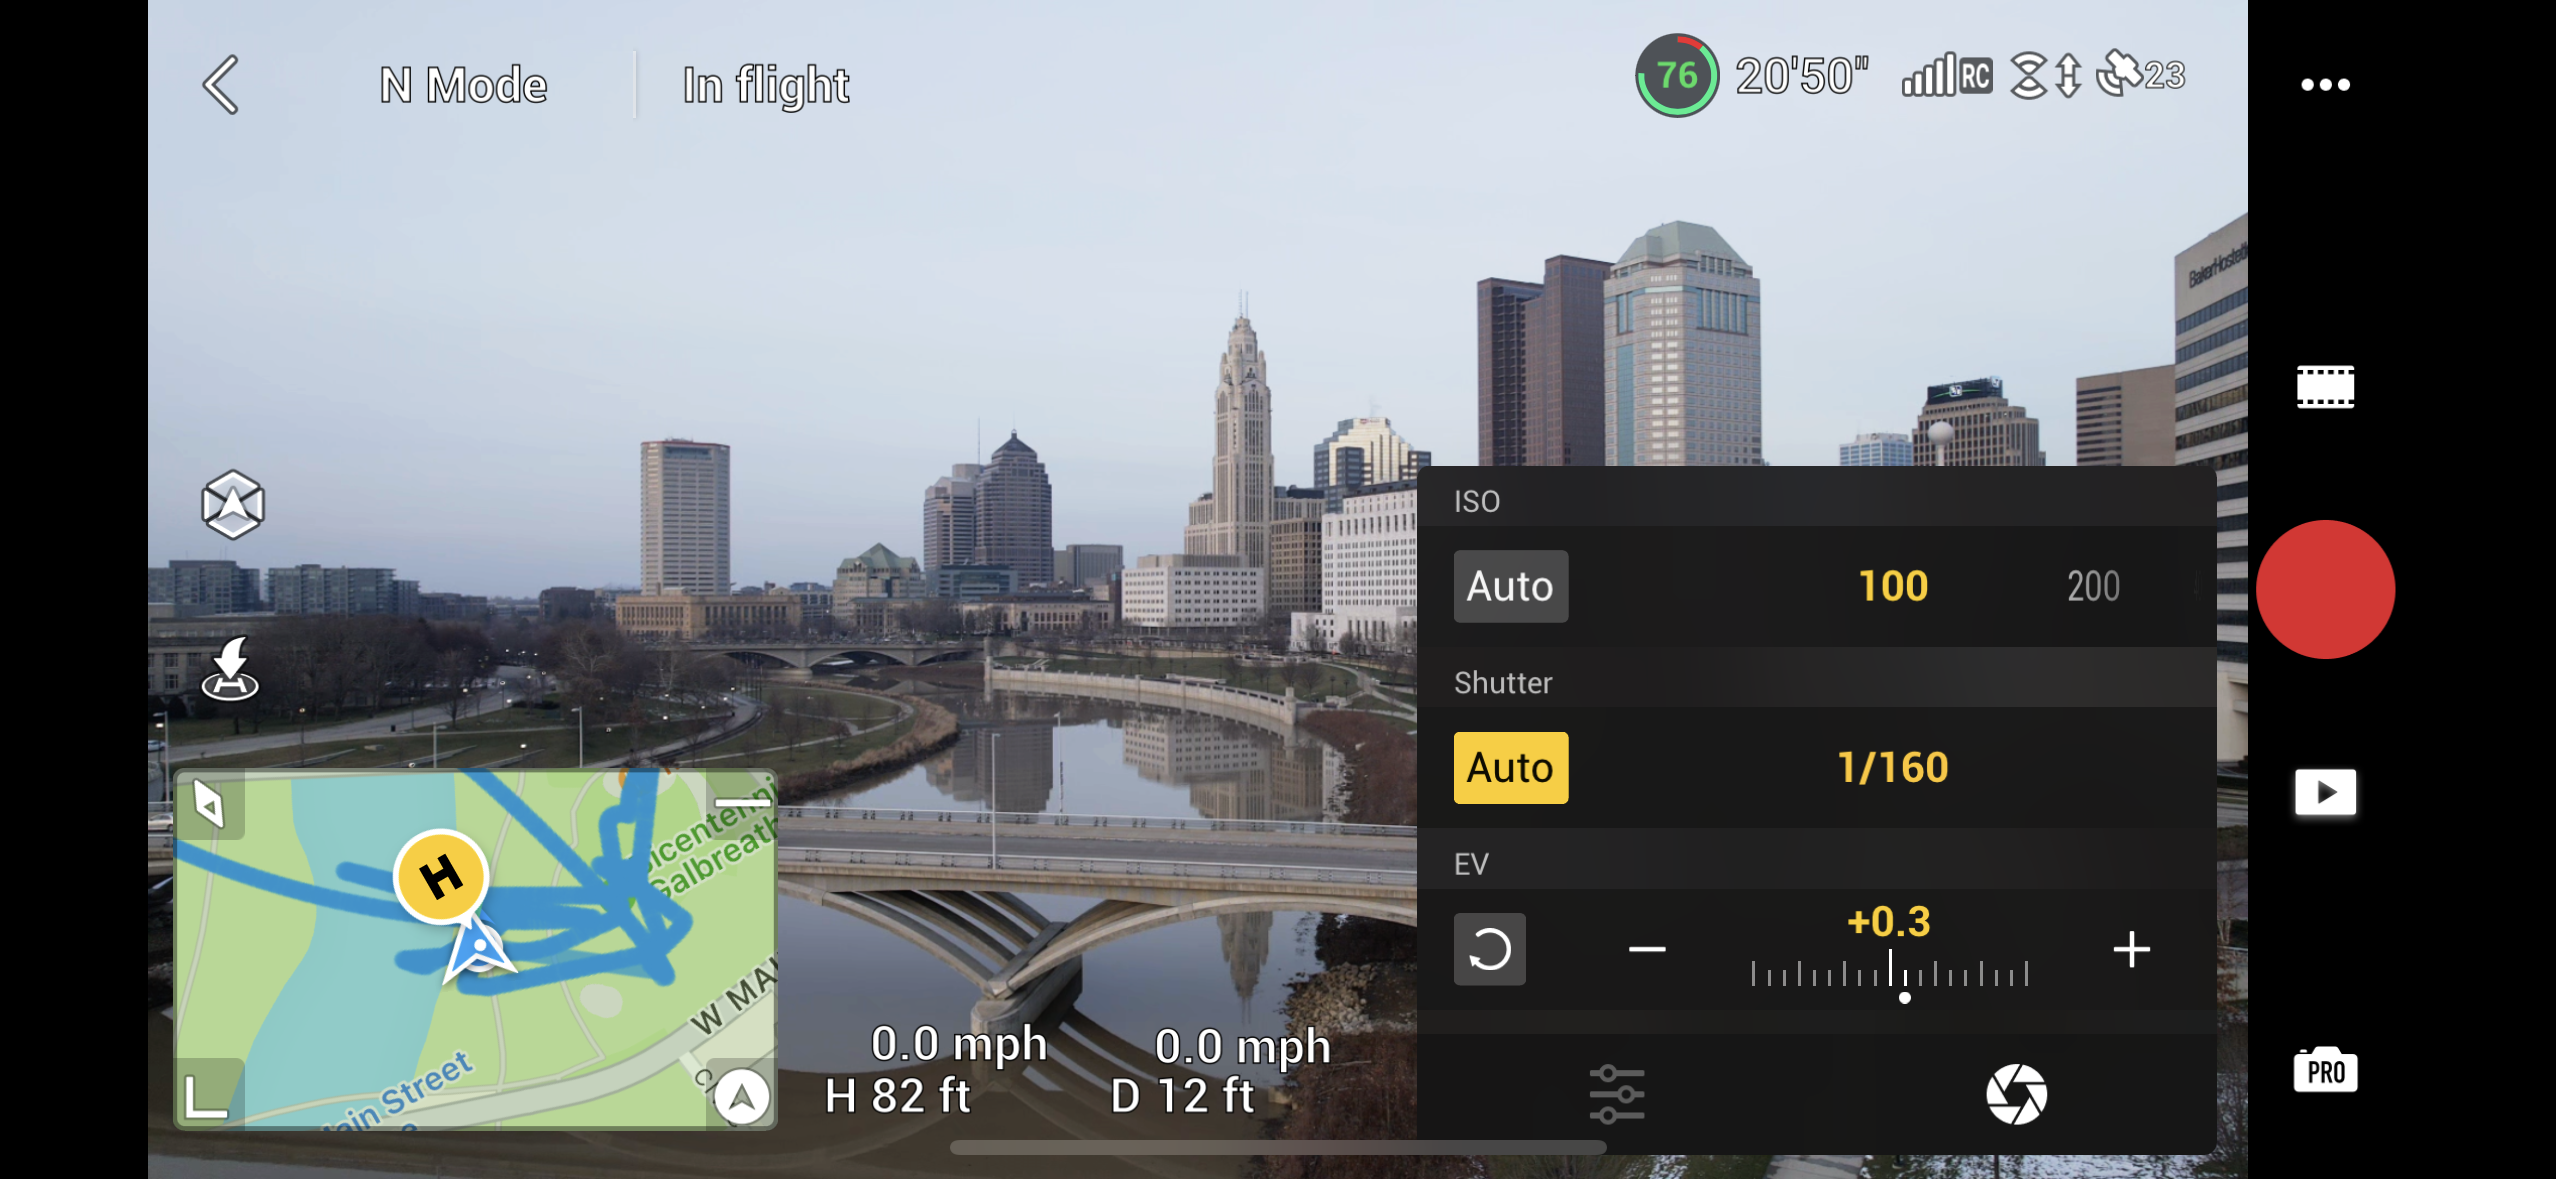
The inset map in the lower left corner can be magnified and manipulated to get a precise bead on the location of the drone, and can be switched to a simple compass if you prefer, though I find the map to be infinitely more helpful.
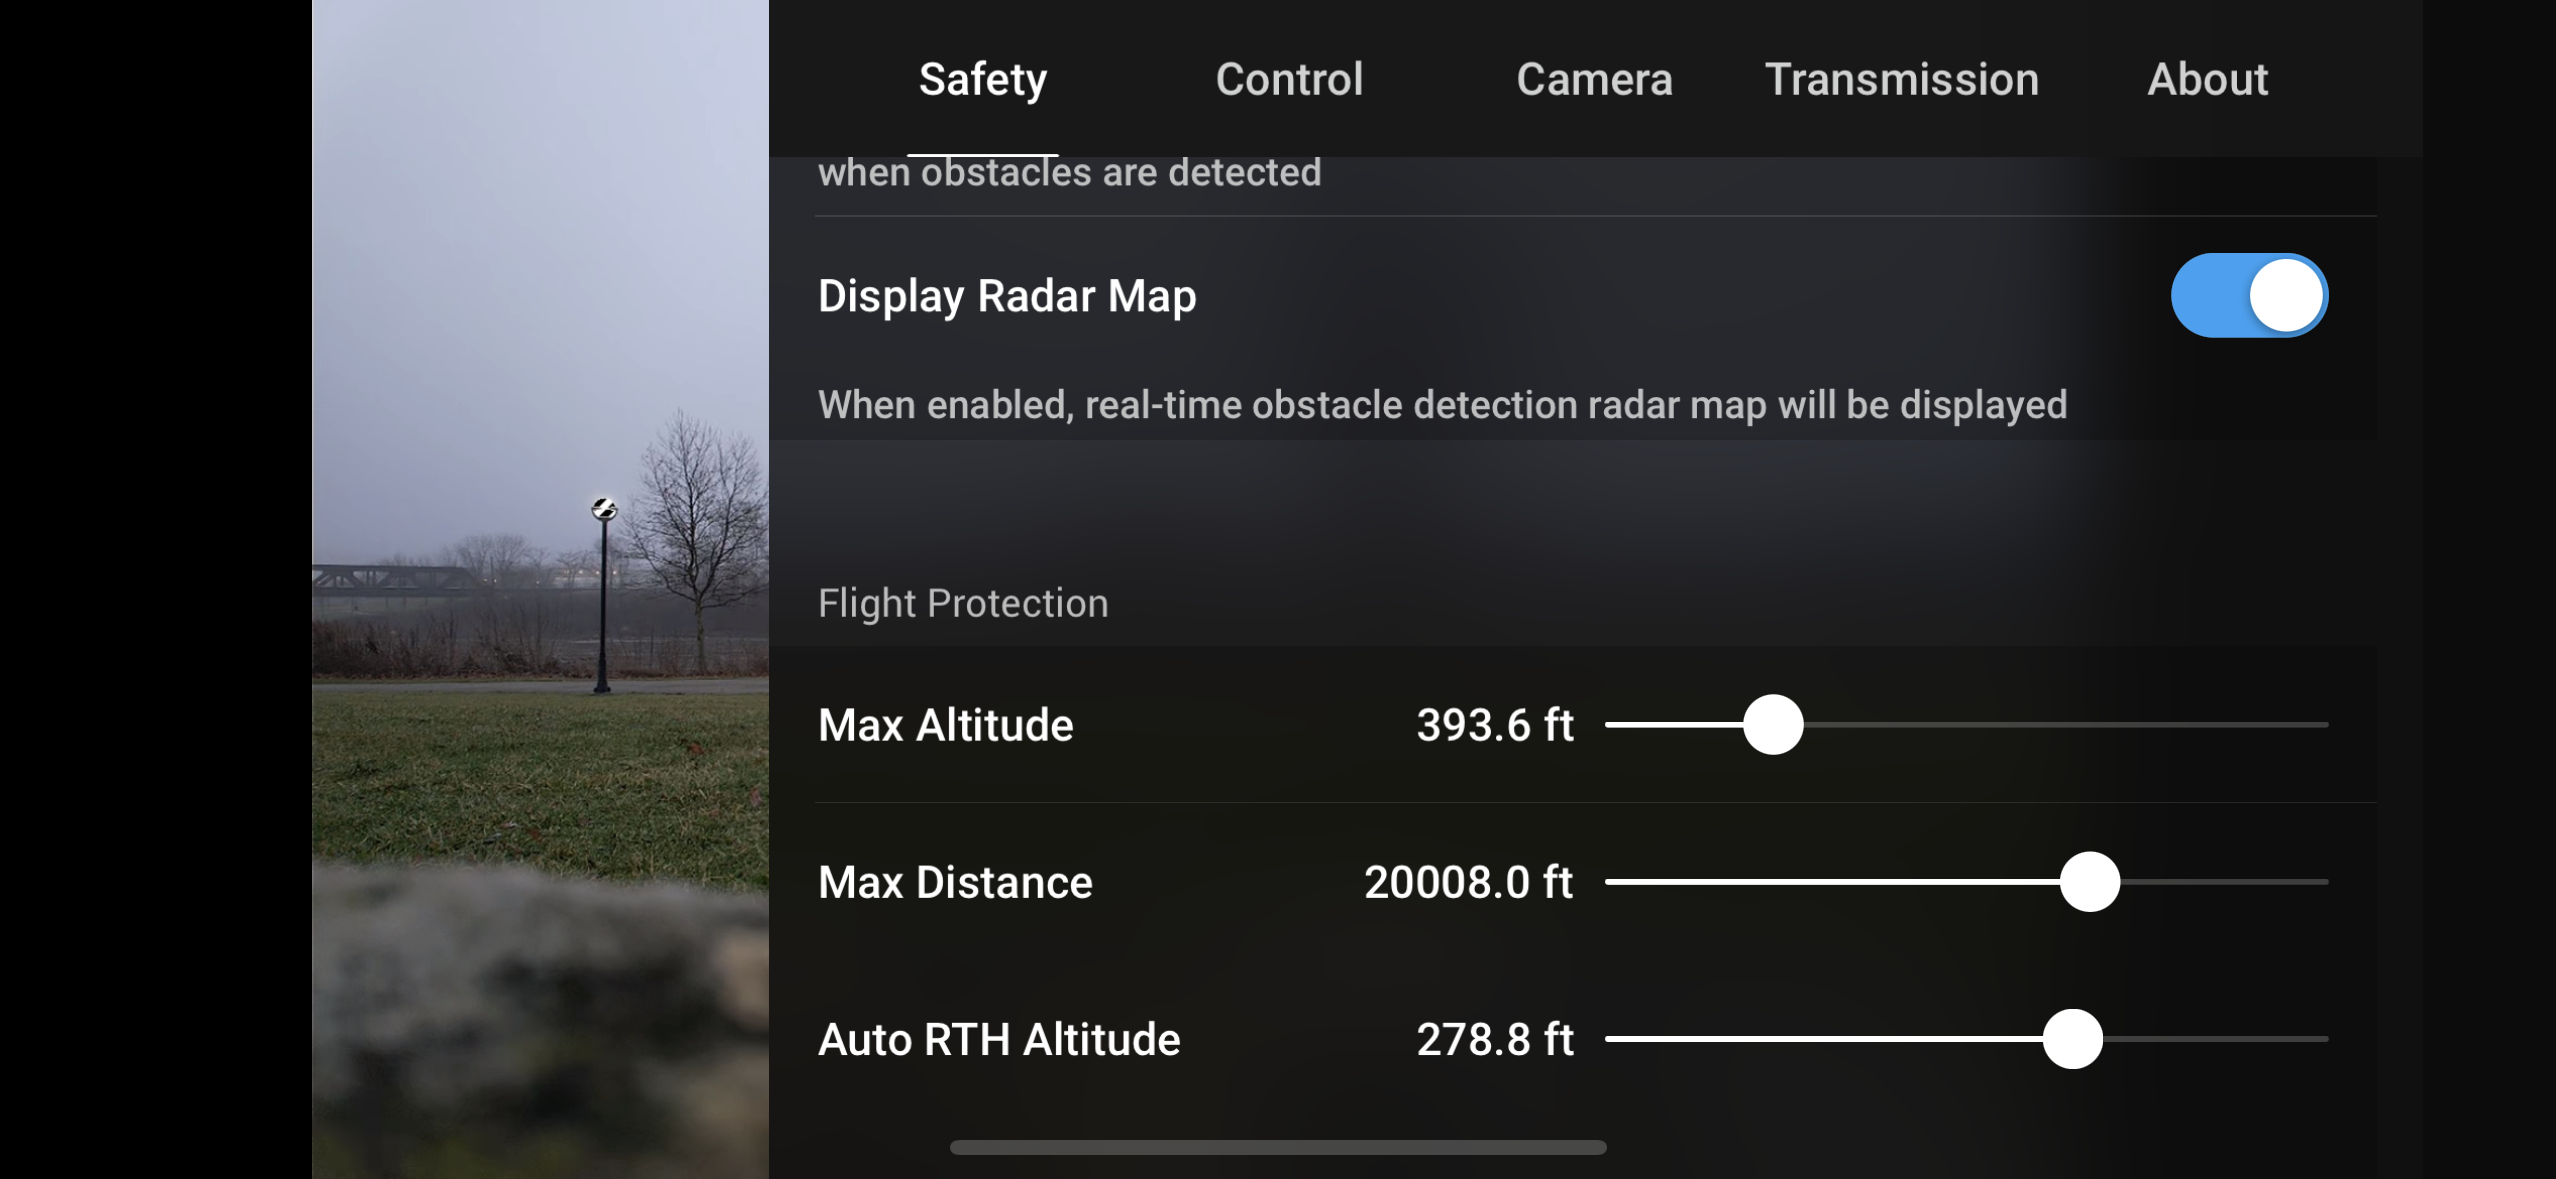
Pressing the three dots in upper right corner brings you to the wide range of options in the software, including things like setting your maximum altitude, extended gimbal controls, the mode of the gimbal when turning (keeping the horizion level during turns, or fixing it so it acts like an FPV drone, and shows the banking), and many more features.
While airspace and clearance are things that a separate app should be used for, the DJI app will also occasionally give warnings if you are near controlled airspace, and if you are inside a known controlled area, it will ask you to confirm that you’ve received proper LAANC clearance, and will sometimes lock down the drone until you’ve requested an unlock with DJI for the controlled airspace.
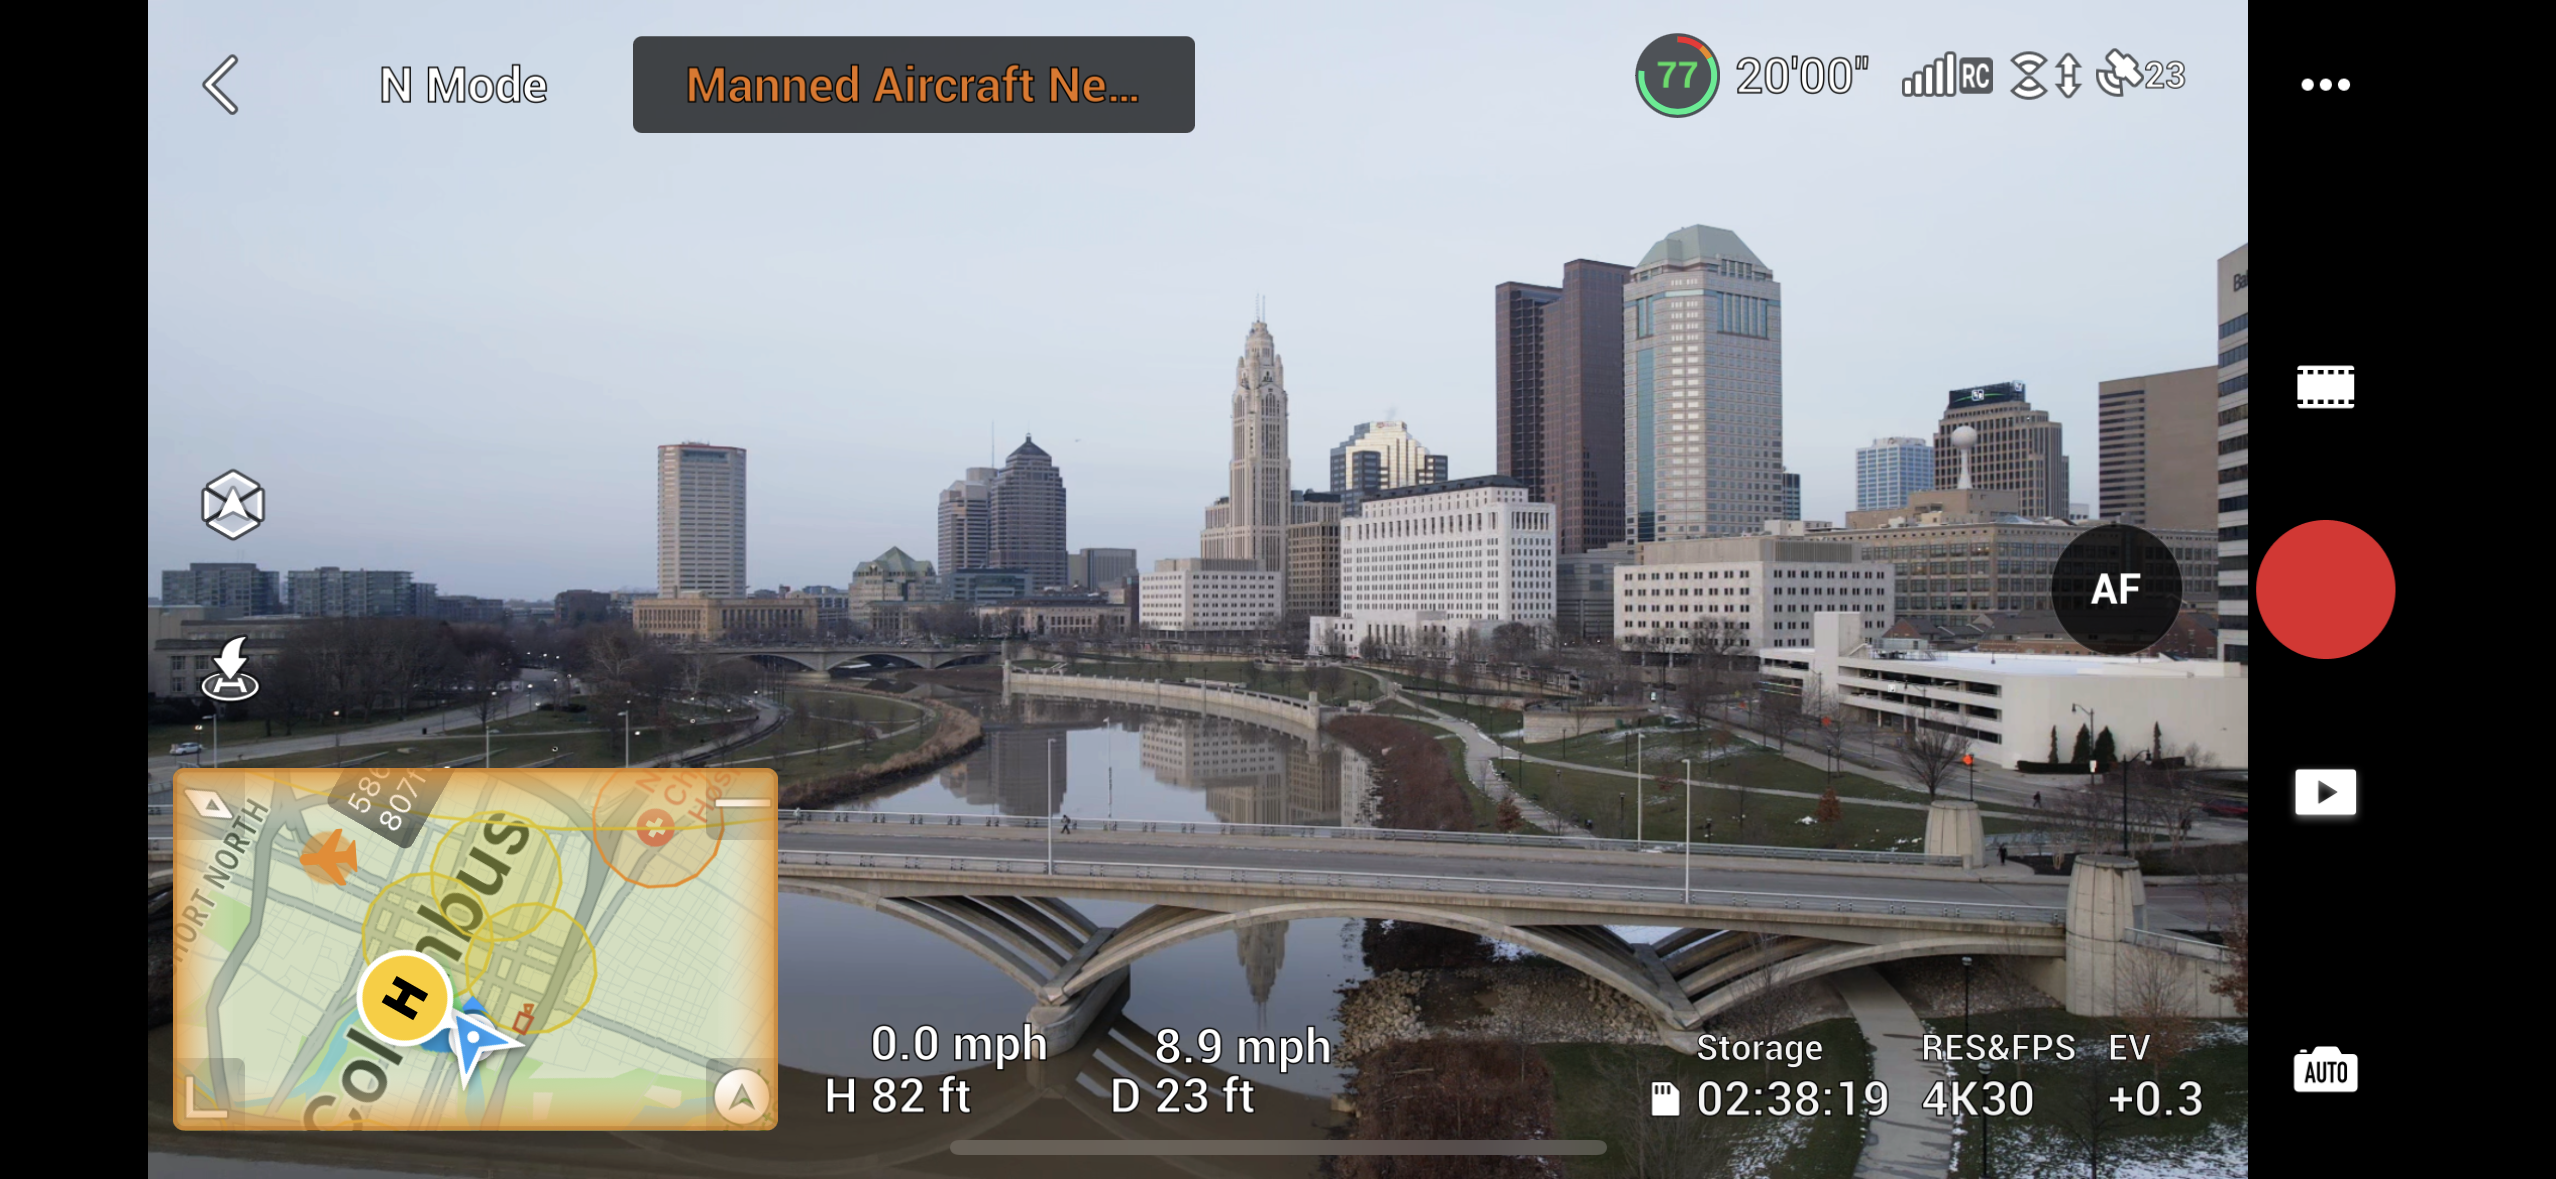
However, of these warning type features, the one that is most useful for pilots is the warning that you get when a manned aircraft is flying at low altitude relatively close to your drone. While you will typically be flying below the height of manned aircraft, it serves as a useful warning to drop altitude and make absolutely sure you are not going to be a hazard to any manned aircraft. The screenshot below shows the warning coming in, and the apprixmate location of a helicopter that was flying a path quite close to my location. I kept my altitude under 100 feet, ensuring that I was well clear of the incoming chopper.
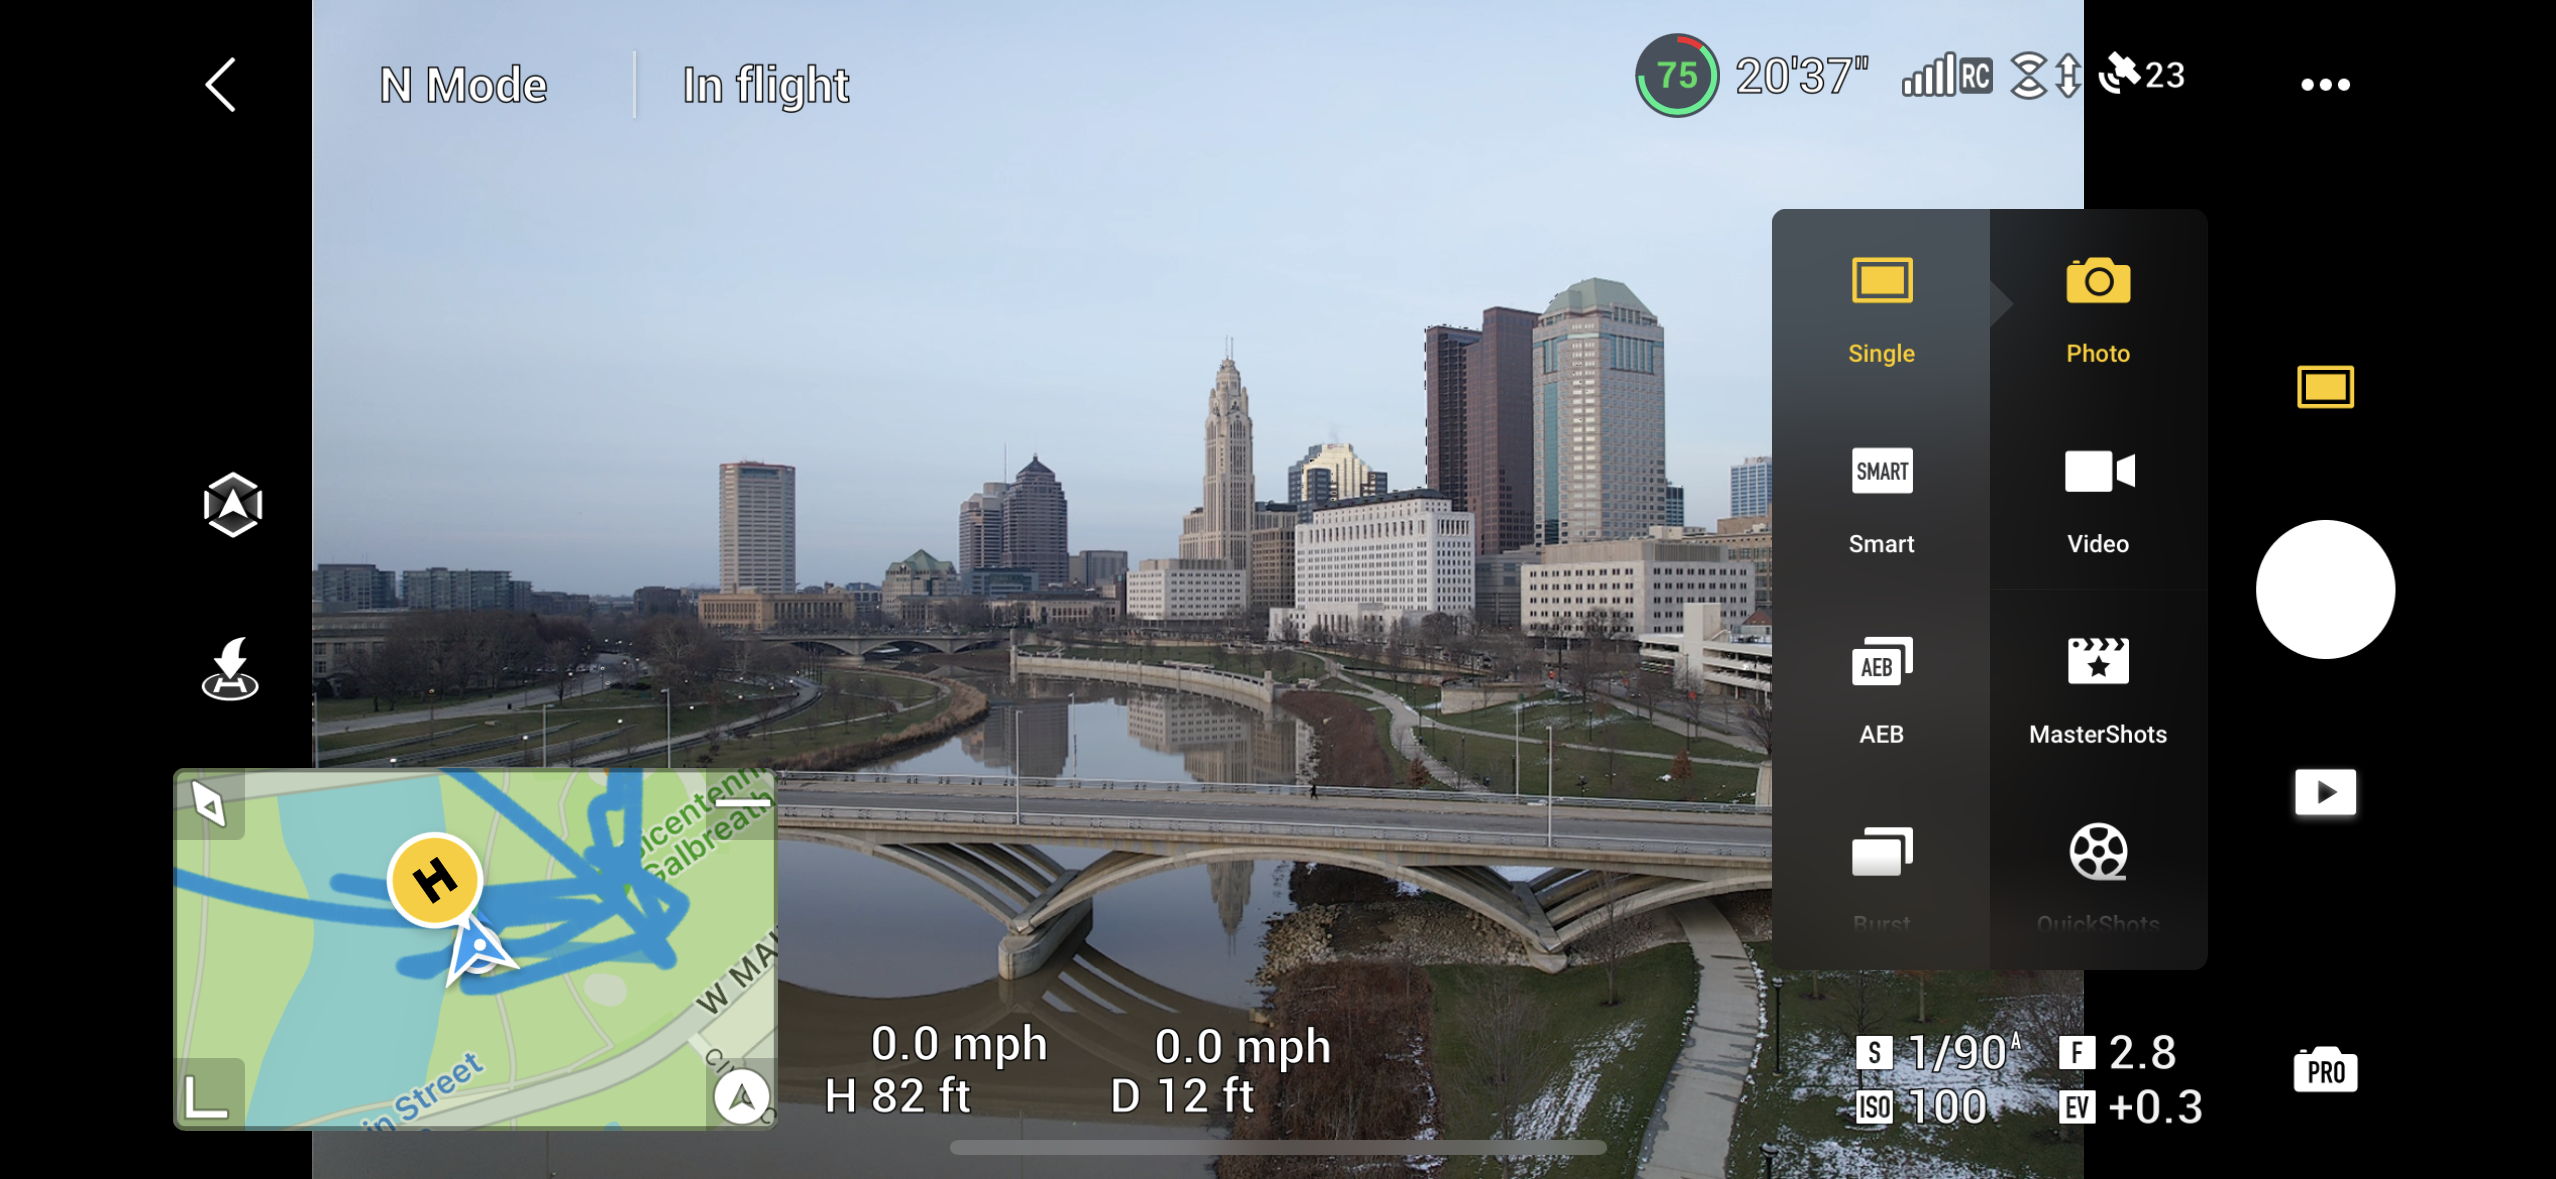
For video shooters, there are many features that can help in making dramatic cinematic shots, such as the ability to highlight and lock the camera view to a specific object, or to track and follow a moving subject, or even fully automated shots like circling a subject. These are found in the ‘Master Shots’ section of the camera settings. As one who shoots limited video, I’ve only tried these out a few times, but what I’ve tried works quite well.
For photography, the special modes consist single shots and burst modes, along with autoexposure bracketing, panorama mode and Smart Photo. The autoexposure bracketing can do up to 5 shots, bracketed in very small half stop steps, meaning your final bracket only adds about a stop of highlight and a stop of shadow information. I wish I could set this to +/- 2 stops for 3 or 5 photos for truly wide HDR merging later in post.
If you want wider HDR processing in camera, though, the SmartPhoto process essentially does what modern smartphones do. It takes multiple images, merges them to HDR, emphasizes certain subjects through scene recognition and adjusts the light. It works fairly decently, but I tend to use it only minimally because I prefer to shoot RAW files and process in post. The automatic panorama mode will take many photos in a grid, by moving the aircraft and gimbal, and can even stitch multi-row panoramas. In theory, it’s great, but I’ve found the final stitched result to often have some alignment issues. Unfortunately, it doesn’t save the individual photos for stitching in better software later, so if you want to do that, you can manually shift the view to capture your panorama.
Flying
When I got my Air 2S, I had never flown a remote controlled aircraft before. I do, however, play a lot of video games, and to be honest, it’s good training. Once setting the controls how I liked them, I found control of the Air 2S to be generally rather intuitive, though there is definitely a learning curve.
The drone can move quite fast, even in normal mode, and it took a few hours of flying before I really felt comfortable. The longest learning curve came when flying the aircraft back towards me, as the controls are reversed (as they always are oriented to provide motion relative to the front of the aircraft). Still, a little bit of practice, and I quickly settled in. The nicest thing is that the DJI software, GPS and other flight systems combine to give you a platform that is extremely stable and predictable.
Due to the GPS positioning, the aircraft will maintain position with excellent accuracy. If you, for instance, fly the drone 200 feet away and raise it 300 feet in the air, it will just sit there, in exactly the same spot, until you move it or the batteries die (at which point it will attempt an auto return to home or forced landing). Even in a 25 MPH wind, the drone will stay locked in the same spot, automatically countering the wind to maintain a fixed position. For stills photography, this is invaluable. Not only does this allow for relatively long exposures in calmer (and even moderate) winds, but it means that you can roughly position the aircraft and then just fine tune your exact position to get the composition you want.
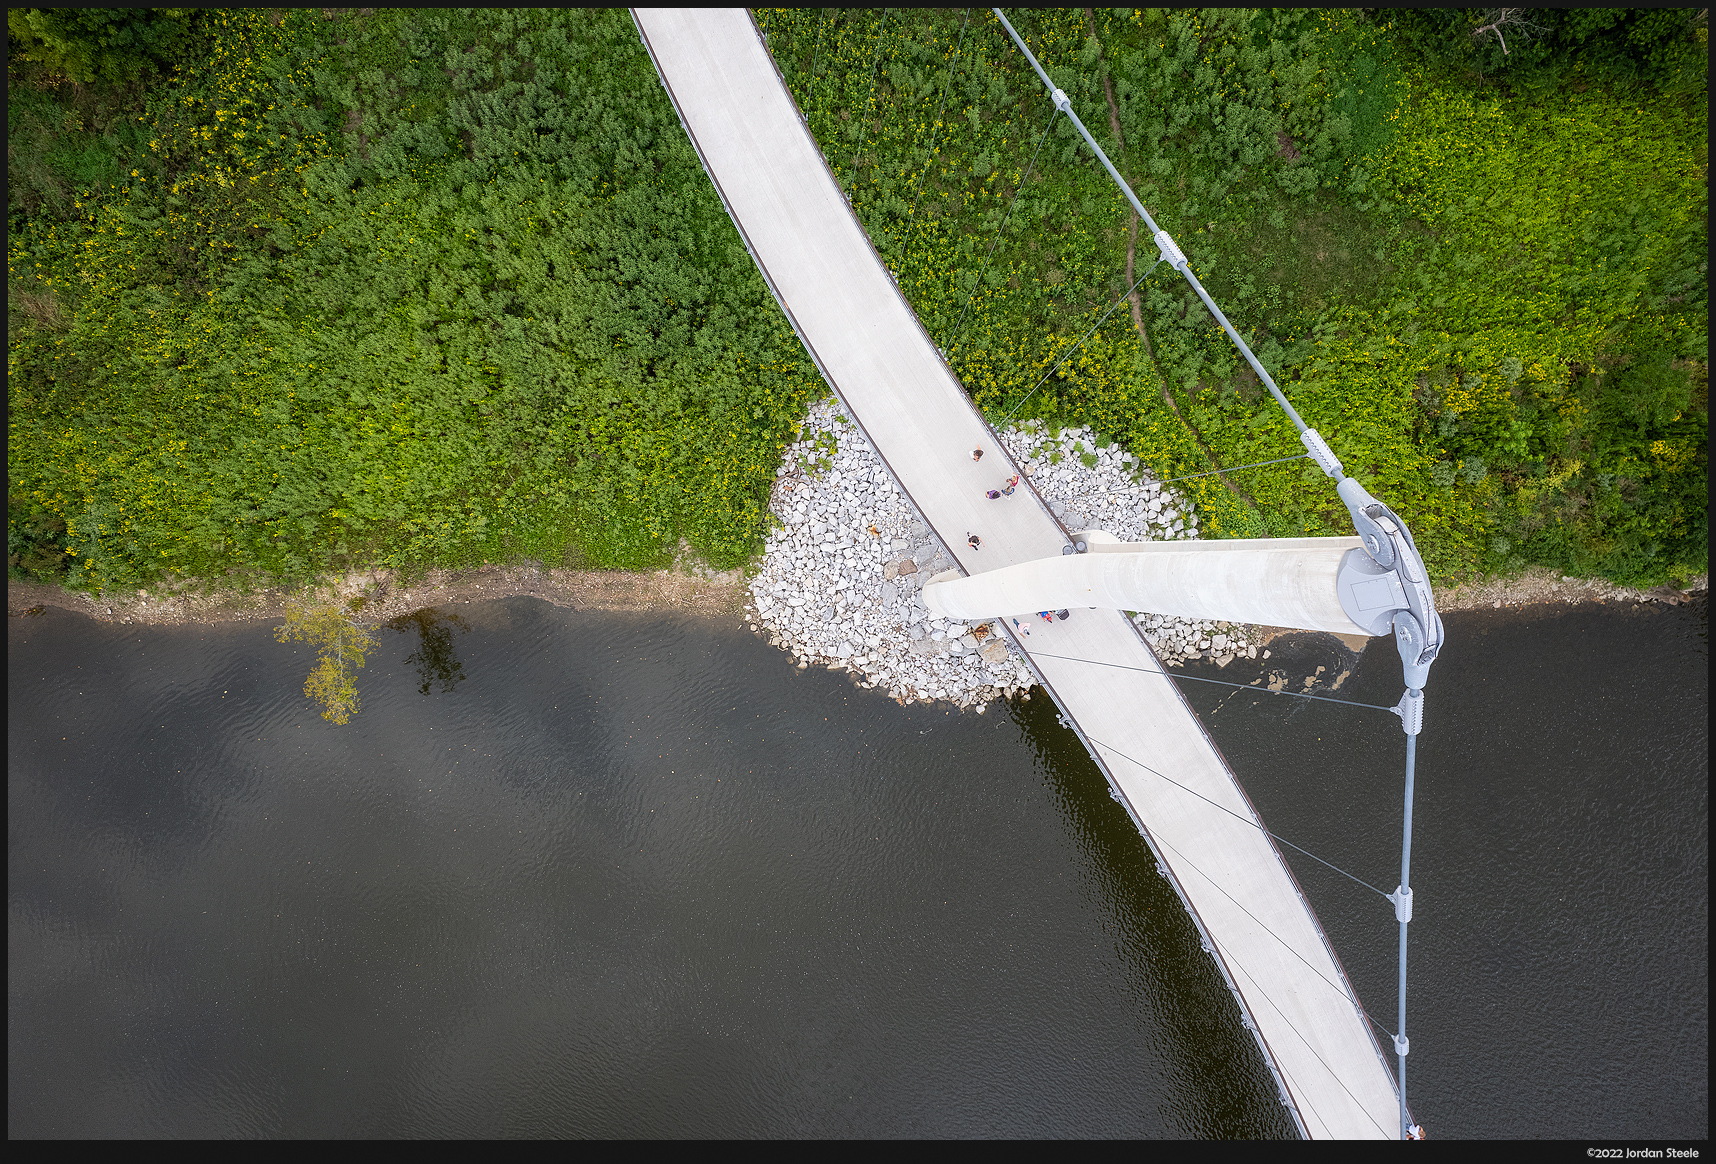
As a long-time photographer, the thing that was immediately apparent within minutes of flying was just how much freedom a camera drone gives you with regards to framing, height, and even lateral movement. It opens a new world of compositional possibilities. Of course, going up high and surveying things from a bird’s eye view is one of the primary draws, but I have found the Air2S to be just as useful for taking lower shots that are simply inaccessible otherwise.
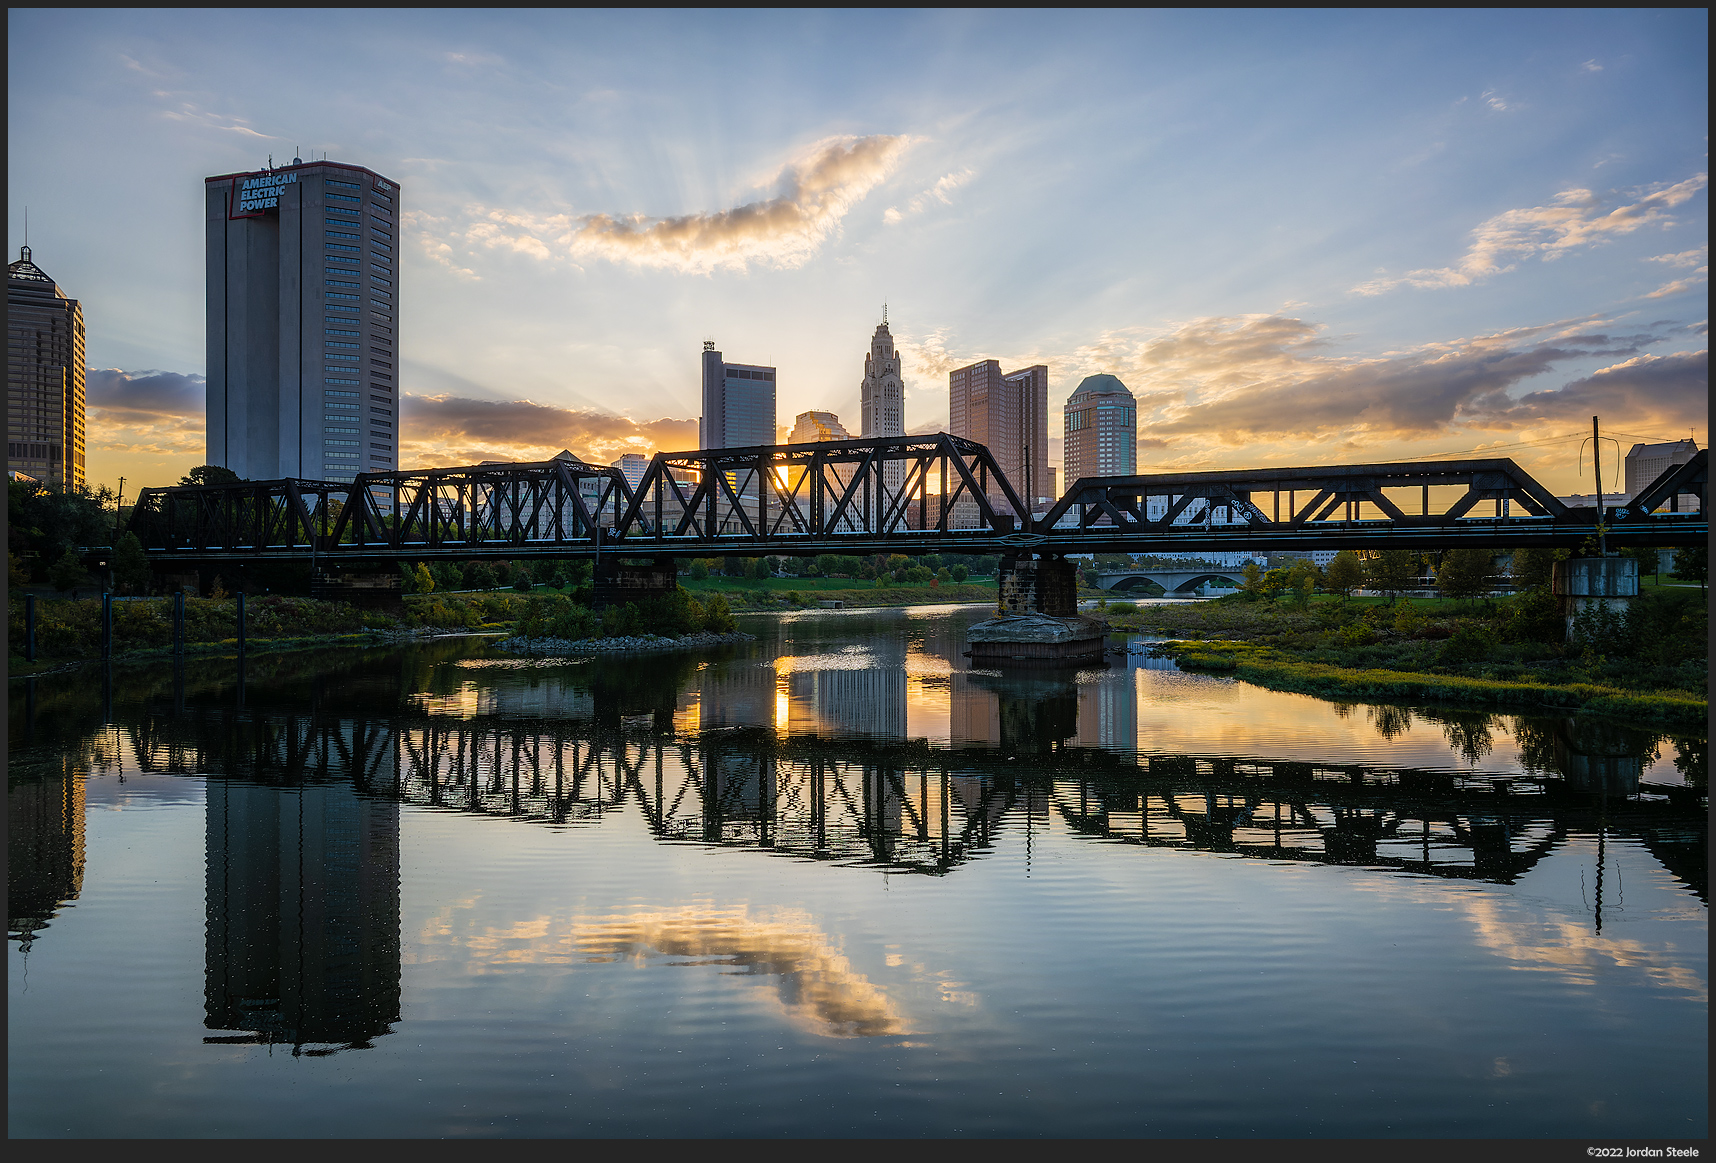
My home city of Columbus, Ohio, sits at the confluence of two rivers, and the Scioto River runs right through downtown, giving some wonderful views of the city skyline along the riverfront. I’ve taken many shots along the river at various locations, but with the Air2S, I can take a shot from essentially anywhere on the river. The shot above was taken with the Air2S hovering about 15 feet above the surface, halfway between the two banks of the river. It’s a shot that would have previously required renting a boat to get, and even then, I’d be limited to just what was available at water level. With no such restrictions, the compositional possibilities are dramatically increased.
Honestly, the biggest restriction on compositional freedom with a drone is legal in nature. It is important before you start flying to make sure you are fully informed and up-to-date on the laws regarding drone usage where you live and shoot. In the United States, recreational flyers are permitted to operate relatively freely, but there are still a number of restrictions that must be followed for legal drone operation. In addition to Federal regulations, state and local laws may prohibit drone usage entirely or without advance authorization in certain areas.
Anyone operating a drone that weighs more than 250g (which includes the Air2S), must register the drone with the Federal Aviation Administration (FAA). You must also read up on federal UAV laws and take the TRUST test for safe operation of UAVs. When out flying, you must carry a copy of your aircraft registration and your TRUST certificate with you at all times (these are the FAA docs labeled in the photo of my case). If flying in controlled airspace, you will need to secure a LAANC authorization before flying (as I had to obtain for the shot above). I’m not going to go through all the legal requirements for drone pilots, but if you venture into aerial photography with a drone, you need to know and follow the laws in your area, and in any area where you shoot.
Leave a Reply