High Resolution Mode
After the OM-D E-M5 Mark II, the Pen-F is the second Olympus camera to feature their sensor-shift High Resolution Mode (henceforth referred to in this article as HR mode). The HR mode takes advantage of the precise control afforded by the excellent in-body image stabilizing system to precisely shift the sensor to capture significantly more data than is generally available with the native 20 megapixel sensor. It does this by taking 8 discrete photos and merging them into a single file. First, the camera takes a shot, then shifts the sensor to the side one pixel, then down, then to the other side. This doesn’t add any direct resolution, but instead shifts the Bayer color filter array around such that red, green and blue values are captured for every pixel location, rather than requiring interpolation. This alone increases detail since color interpolation isn’t required like it is for almost all digital cameras. It then follows by shifting the sensor up and to the side, placing the pixel array exactly halfway between pixels both horizontally and vertically. It then completes the shifting to capture full color information at all of THOSE locations.

The result? A true 80 megapixel RAW file with RGB color information at every one of the 80 megapixels. Because of diffraction effects, there’s not really a full 80 megapixels of detail here, but it’s still excellent. Olympus manages expectations by outputting a 50 megapixel JPEG image, which captures essentially all the actual extra detail offered by this mode. It works very well, but there are a few caveats.
First, the camera must be completely still, so you are limited to tripod mounted shooting, and if it’s windy, I wouldn’t try it. Second, the scene itself must be still. Objects that move will leave diagonal line artifacts in the final image. If you’re photographing moving water or skies with long exposures, this is less of an issue (as you can easily blur out any visible artifacts), but for sharpness in your image, you’ll need to shoot still scenes on a rock solid tripod. See below for an example. The full image above was captured using the HR mode, and as you can see in the 100% crop below, there’s really quite a lot of extra detail here that wouldn’t have been captured in a single shot. This is a crop of the 80 megapixel RAW, which shows some softness due to diffraction, but there’s at least 50 megapixels of true data here. I’t something to use sparingly, but when used well, it’s a great feature to have.

Image Stabilization
In-Body Image Stabilization
Of course, one of the best reasons to choose Olympus bodies for your MIcro 4/3 kit is the excellent in-body Image stabilization (IBIS). The Pen-F inherits 5 Axis IBIS similar to those on the OM-D line of cameras, and like you’d expect, it works very well. In my experience, the IBIS system is generally useful for allowing an extra four stops of handholding at slower shutter speeds. With wider angle lenses, I’ve even been able to get sharp shots as slow as 1/2 second. The shot below, for instance, was taken at 1/4 second handheld and is very sharp.

However, the downside of the recent Olympus stabilizers are also present, and that is a tendency for shutter shock at shutter speeds between 1/60 and 1/200s. It’s not too big of a problem, though, as the Pen-F includes a fully electronic shutter that also can be utilized as a first-curtain electronic shutter to help eliminate shutter shock. Electronic first curtain is enabled by turning on ‘anti-shock’ with a 0 second delay. Of course, turning on silent mode with full electronic shutter will eliminate it completely.
Focus Bracketing
The Pen-F is the second camera to debut with focus bracketing (and the fourth to have it, after the E-M5 II and E-M1 had it added via firmware update). This is a great feature for creating focus stacks where depth of field is limited. If you aren’t familiar with focus stacking, it’s a process of taking many images, focused at different points in an image, and combining the in-focus parts into a single image. This is exceptionally useful for macro shooting due to the extremely shallow depth of field that occurs when shooting macro. When you want to get a lot of a macro subject in focus, often the solution is to stop down to very small apertures. This does get more of the subject in focus, but often it still isn’t enough, and you also incur significant loss of sharpness due to diffraction softening at very small apertures. The solution? Shoot many images at an optimal aperture and stack them.

In the past, a photographer has had to manually move the focus point bit by bit to create a good focus stack. Given the very small movements required and the sheer number of images for a quality macro focus stack, this can be very time consuming and is prone to error if you overshoot focus on a few images.
The Pen-F automates that process completely. You simply select focus bracketing, select a degree of movement (lower numbers move the point less than higher numbers) and select the number of exposures. You then focus at the closest point that you want in focus, click the shutter, and the camera takes a series of images moved precisely in exact increments, covering the number of shots you wish to shoot. Like the high-resolution mode, there are a few things to watch out for. First, this process uses the electronic shutter, I’d imagine to avoid shutter vibration and save actuations on the shutter mechanism, as you can blow through over a hundred frames in a single stack. This is great, though be careful if shooting under fluorescent lighting at certain shutter speeds, as banding can be induced due to the flicker of the lights. Second, and perhaps most obviously, this process will also, in most cases, require the use of a tripod. If you’re using a small number of images to focus stack a landscape, for instance, you could probably hand hold it and get a good result, as most stacking software can adjust for minor variations. For many images in macro shooting, though, I’d definitely shoot tripod mounted.
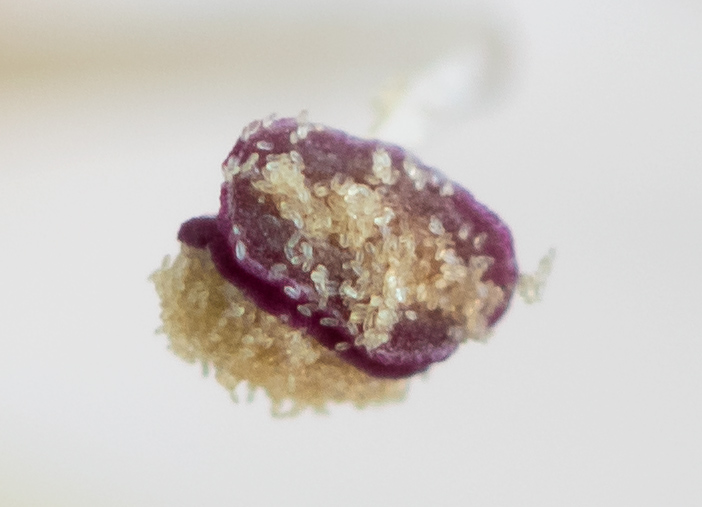
The image above shows a blossom, taken with my Olympus 60mm Macro lens at f/4. This provides for excellent sharpness, but given the very close focus distance, depth of field is extremely shallow as well. Even stopping down to f/16 will not get the whole blossom in focus, and it will also reduce sharpness due to diffraction. The shot below, however, shows a 40 image stack with Helicon Focus, with each image taken at f/4. The whole process of taking the images took only around 4 or 5 seconds; a massive improvement on manually adjusting focus between each frame.

Wi-Fi
As is the standard with mirrorless cameras nowadays, the Pen-F has fully featured Wi-Fi capabilities, on par with those in the E-M10 Mark II and E-M5 Mark II, including image transfer, geotagging and remote control. Let’s start with image transfer: The Pen-F has the ability to transfer JPEG images, either singularly or in bulk, to a mobile device, simply by connecting the camera to your phone or tablet and booting up the Olympus Image Share app. The camera can connect to your phone in a few different ways, but the easiest is via scanning a QR code displayed on the rear of the camera, which will then pass the WiFi network credentials to your phone or tablet. Once connected, you can browse the contents of the camera and pick which images you’d like to transfer.
If you are primarily a RAW shooter, Olympus also has you covered, as the Pen-F includes a rather full-featured, if somewhat confusing to operate, RAW converter. Simply select your image and choose RAW Data Edit. At this point, you can make adjustments to exposure, highlight and shadow tone, color, tone curve, art filters, etc, and create a JPEG image from those settings. Then you can transfer your developed JPEGs to your mobile device for sharing. One downside to the Olympus RAW converter is that after creation of the JPEG, the image review starts at the created JPEG, so if you’re converting multiple files from earlier in a shoot, you’ll spend quite a bit of time scrolling through images as you make your way back to the images you’d like to convert. Fuji had this same issue a while back, but changed this behavior last year via firmware update.

For geotagging, you’ll simply start a GPS log on your phone using the Image Share app. Prior to doing this, you’ll need to connect the camera at some point before to sync clocks, but this doesn’t need to be done frequently. After a shoot, connect the camera to your phone over Wi-Fi and the app will prompt you to merge the GPS data with the images on the camera.
The Pen-F can also utilize remote capture via Wi-Fi, with full live view and the ability to change camera settings remotely. The remote capture works well and allows for adjustment of aperture, shutter speed, ISO, focus point, and so on while viewing the live display. I found the remote shooting on the Pen-F to be fairly responsive with relatively low lag. When shooting remotely, the camera will transfer the completed image to your phone automatically, which is a nice touch.
Other Features of Note
There are quite a few long-standing Olympus features that are also present on this camera as well. Worth mentioning is the outstanding Live Time and Live Bulb features, which show a live developing preview of the image during long exposures. Also present is the Live Comp mode first introduced with the E-M5 Mark II, which allows you to take a reference exposure image, and then let the camera check for new areas of brightness over the course of subsequent exposures. Effectively, it allows you to expose for the background and then do subsequent longer exposures to composite into the frame, such as painting with light, or something as simple as fireworks.


Leave a Reply