

One of the great advantages of using a full frame DSLR or even larger formats such such as 645 or even 4×5 view cameras is that there is a shallow depth of field and extreme background blur component that can’t really be matched on smaller formats such as APS-C or Micro 4/3.
For portraits or isolated telephoto shots, the disadvantage is less pronounced. There are plenty of fast lenses available that can obliterate the background for tight portraits or detail type shots. However, it’s at the wider end, where a 35mm f/1.4 on full frame can provide a shallow depth of field with a wide field of view, and really make a subject stand out when used properly. On APS-C or Micro 4/3, these options really don’t exist. The only real option on Micro 4/3 is the newly announced Voigtlander 17mm f/0.95. This will give a field of view and depth of field equivalent to 35mm f/1.9 on full frame. While this certainly is sufficient for most people’s needs, the lens is expensive and quite large, and if you’re using a Micro 4/3 camera, it’s hard to do. For APS-C, you’re stuck using full frame 24mm f/1.4 lenses, which yield equivalent FOV and depth of field similar to a 35mm f/2.1. Close, but not quite what these larger formats can do.
However, if you own one of these smaller sensor cameras, but don’t have the cash (or the inclination) to move to a larger format, fear not! If that once in a lifetime shot appears, and you really want that look, there is a way to get that large sensor look provided you have a few tools at your disposal and a little bit of patience. Now, the shots in this article are certainly not once in a lifetime photos. But, I was simply searching for easy subjects on which to try this technique out, and they certainly worked just fine for that.
The Technique

The technique for this is rather simple. You simply choose your subject, then take multiple images to stitch together later. To elaborate, take the image at the right for instance. I wanted to get a normal, or slightly wider than normal view of this little fountain. I could have used my Leica 25mm f/1.4, which would have provided some background blur and a nice clean sharp shot. Most of the time this is what I would do. But let’s assume you really want that full frame look. The 25/1.4 just won’t cut it there. It’s equivalent in field of view and depth of field to a 50mm f/2.8 when shot wide open. I wanted 40-50mm at f/1.4-f/1.8 on full frame.
So, I instead mounted my Olympus 45mm f/1.8. I set the exposure to manual mode and the focus to manual (you can also use autofocus on your subject, then switch to manual focus to lock focus.) For this effect to work, the focus and exposure must stay consistent.
Next, I stood at the distance to the subject I wanted for the FINAL perspective I wanted. This is the most challenging part. I was using a 45mm lens, which is equivalent to a 90mm lens on full frame, but I wanted the shot to look like something with a 45mm lens on full frame. So, basically, I stood twice as close as I would if I were framing the shot normally with the 45mm lens. This can be tough to gauge. Basically, the wider you hope to go relative to the lens you are using for this effect, the closer you need to stand, and the more shots you need to take.
Then, I simply took many shots, making sure each frame had some overlap with the one adjacent to it, making three rows of shots. For this to work, you really need to try and expand the frame a fair bit. This will usually require between 10 and 20 shots. Unless you frame perfectly (which is possible with a tripod, but very difficult handheld), you will have to shoot wider than you want to allow room for cropping after the stitch. Key point: The camera MUST stay in the same location for all shots. That means you swivel around the optical axis for horizontal shots, and vertically, you have to pivot the camera up or down and then rotate around the axis again. If you shift the camera vertically or horizontally, you will change the perspective for each shot, and it will likely be impossible to properly stitch. Just remember: If you were using a wider lens for these shots, the camera would be in the same place, so it needs to stay in the same place for all the shots you’re using to make the wider view.
Then, you need to merge the photos into a single image. There are many panorama stitching software packages out there, but for these test shots, the one I found worked the best is also the cheapest! I used Microsoft ICE (Image Composite Editor), which does a very good job for most panorama stitching and is: FREE. Once stitched, I exported the file, opened it in Photoshop, cropped to get rid of the jagged stitching edges and voila!
The final image is equivalent in depth of field and field of view to using a 40mm f/1.6 lens…far shallower than is generally capable on Micro 4/3. And, you get an added bonus! The final image was over 100 megapixels, so you have a crazy level of detail to go with your full-frame look.
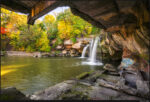
If you take care with your alignment, you can get even better results with fewer images. The image below is a stitch of 15 images, again with the 45mm f/1.8, but due to the better job I did with image spacing and my closer perspective, it yields an image equivalent in depth of field and field of view to a 27mm f/1.1 lens on full frame! As no such lens exists for full frame (that I am aware of), this is a shot that one can not get with even a full frame camera in a single image. This is entering the realm of medium format capabilities. It also is a 126 megapixel image, allowing for a 50″ print at 300 dpi natively.

This technique can be used with pretty much any lens, but you should try and strike a balance between distance to your subject and the number of images you’d need to take. You can use a 400mm lens and take images to stitch to a 24mm field of view, but you’d need an absolutely staggering number of images to do it, and you’d need to make sure you were far enough from your subject to not create big stitching issues due to parallax. I think shooting shots to make the final image about two to four times as wide as the lens you are using to capture the images is a good guide. For instance, I could use my Rokinon 85mm f/1.4 and shoot an area about 4 times wider than its native field of view. This would yield an equivalent field of view and depth of field like a 40mm f/0.7 lens on full frame! These are images that even medium format can’t really capture natively. You’d need to use a large format camera with a relatively wide aperture to get that kind of look with a single shot.
The Drawbacks

So, this is a great tool to use when you need it, but there are certainly some drawbacks. The biggest drawback is that it is only useful when you have time to take multiple images on a static scene. That means that environmental portraiture is extremely difficult to do this with, unless you have a very patient model with limited wind or hair.
Second, it takes time. It takes time to take the shots correctly, time to convert the images, time to stitch the images, and time to finalize the image. Only you can decide whether or not it makes sense to use this technique given your subject and the time you have.
Third, it can be difficult to judge the edges of the image. Stitching distorts the image somewhat, and it can be difficult to make sure you’ve captured everything of the scene that you want to. Practice will help in this department, of course.
Finally, you need a fairly quick computer for this not to be agonizing. My machine is quite fast. I use a Core i5 clocked at 4.2 GHz with 16 GB of RAM and an extremely fast SSD if for some reason I run out of RAM and swap to disk…it can do stitches like these without much trouble. If you have an older machine, especially if you have 2-4GB of RAM or less and a hard disk instead of an SSD, stitches of 20 or so 12-16 megapixel images are going to eat your computer for lunch.
But, if you have the time, the patience and the tools, you can get that large sensor look from your smaller sensor camera.


Leave a Reply