Operation and Menus
When I first received the E-M5 I was first struck by how nice it looked and how solid it felt in hand. The next thing I noticed was how horrible it was to find ANYTHING in the menu. If you are used to Olympus menus, you may be OK, but I formerly owned an Olympus E-P1, and the menus there weren’t great either, but the E-M5 brings it to a new level. Part of the problem is that there are simply SO many options. Nearly everything on the camera can be customized. There are 5 main levels to the menus, and the “Gears” menu has 11 levels of its own. The problem is that while most of the bigger items are located in the first two pages of menus, some notable functions are absolutely buried.
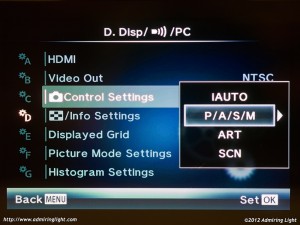
For instance, to activate the Super Control Panel (which brings up a touch sensitive grid of major camera settings) in live view, you need to go to the Gears menu, to item D (display), to Live Control, to the mode section of your choice (P, A, S, M, etc), then change the setting to enable the Super Control Panel. That’s just insane. After a few days with the camera, you start to figure out where most things are and you set up the camera to how you operate, but the initial impression is very negative and leaves you feeling overwhelmed. And, well, I’m an experienced photographer and a registered electrical engineer….if it’s confusing me, it’s probably confusing most people.
The good news is once you program the programmable buttons to your liking, change the dial operation to your preference and get familiar with the camera, you can get a very responsive, well laid out camera that works the way you want it to. For instance, I have programmed Fn1 to switch to manual focus, Fn2 to magnify, which comes in very handy when using legacy glass, such as Olympus OM, Canon FD, Contax Zeiss or any of the other dozens of mounts that can be easily adapted to Micro 4/3. My record button is set for AEL/FEL.
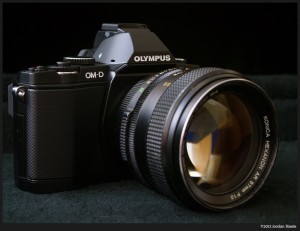
Despite the customization options, there are still a few annoying things. For instance, you can program the arrow buttons to most functions, the Fn2 button to a lot of functions, but the Fn1 button is limited in what you can set to it. Also, you don’t have a choice for all major camera functions to be mapped to a button. For instance, Autoexposure Bracketing can not be assigned to a button, nor is it in the Super Control Panel. The only way to access it is via a menu item. Compare this with the Panasonic GH2’s AEB selection as part of the shooting mode lever and it’s not a contest. Also, infuriatingly, you can’t assign Flash Exposure Compensation to any button. Luckily, FEC is available in the Super Control Panel, so is easily accessed once that feature is enabled.
So now that you’ve read my ranting, you may be thinking that this camera must be a nightmare to handle! Luckily, that is not the case. The endgame is that the camera can be set up (mostly) to your liking, with lots of direct controls and dials. Once you’ve set these things up, it’s really a pleasurable camera to shoot with, and I’ve adapted to it quite well. Hopefully Olympus will allow for some greater flexibility with button assignments with a firmware update in the future. Plan on spending a few days monkeying around with the camera setup, but know that once you’ve done that, you’ll have a very easy to handle machine.
Flash Performance
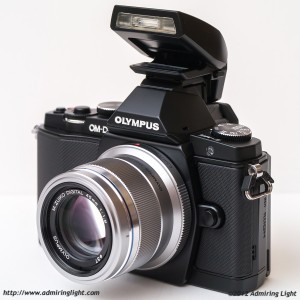
The E-M5 does not have a built in pop-up flash, but it comes with a small hotshoe flash that only faces forward. It’s nice that they included the flash for those ‘must have’ flash shots, and it even comes with a small little case for it. It’s a low-power unit and isn’t particularly useful for more than the odd snapshot, though its low profile actually lets it work relatively well for macro shooting.
When used with an external flash gun, the exposure is very consistent. The interesting thing to note is that it is consistently underexposed. I’m not quite sure why, but when bouncing hotshoe mounted flash, the camera consistently is about a full stop under any other camera I’ve ever owned. When shooting portraits of lighter skinned subjects, I typically need +1 2/3 to +2 of Flash Exposure Compensation to get a proper exposure. Luckily, the exposure is pretty consistent and FEC is adjustable from -3 to +3 stops, so it’s a minor issue…just take note that you’ll need a lot more positive FEC than on other cameras when bouncing flash.
Cool Feature Alert:
One great operational feature that was added to the E-M5 is the addition of a Live Bulb mode. This can be used in both Live Bulb or Live Time mode. These modes are the exact same except that bulb mode works like every bulb mode you know, while time mode opens the shutter on the first shutter press, and closes it when you press the shutter again. This is a great mode that eliminates the need for a cable release for most long exposure shooting (the vibration from the shutter presses will be irrelevant in a very long exposure.)
In these long exposure modes, the rear display will update during the exposure to show you the scene as it develops. This is invaluable for multiple minute exposures. There is nothing more annoying than taking a 5 minute exposure and then realizing you underexposed (or overexposed it) by a few stops and need to shoot the whole thing over again. The live bulb mode will display up to 24 preview images at ISO 200 as the file is exposed. To make sure you don’t run out of images before your exposure is done, you can set the update rate for the images. Set it to 0.5 seconds, and it’ll update for up to a 12 second exposure. Set it to update every 60 seconds and it’ll give you updates for a 24 minute exposure.
Display and Viewfinder
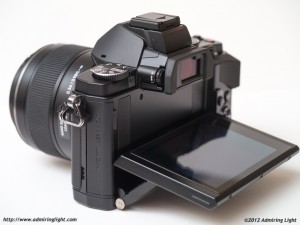
The E-M5 features a 920k dot OLED rear display that is sharp and contrasty. Images reviewed on the screen are clear and crisp and the color is excellent. Unfortunately, due to its OLED makeup, while the viewing angle to see the contrast and detail on the display is good, the color accuracy drops significantly once you start viewing off axis. When viewed from above, the screen gains a green shift to the colors. At first I was worried the white balance on my camera was way off until I looked again straight on. In operational terms, it’s a non-issue as you can still easily compose shots off axis, but it is something to be aware of. The screen is semi-articulated and allows you to lay it down flat to look down onto it for waist level shooting, or it can pivot out at a 45 degree angle to shoot above you. While not as versatile as the fully articulated screens on Panasonic’s G and GH series bodies, this method of articulation makes top down shooting easier and more natural. The screen uses capacitive touch, which enables quick, precise and responsive touch controls. The touch controls aren’t quite as polished as on the latest Panasonic bodies, but they work well and allow for touch shutter release, focus point selection and settings changes. Overall, I’m very pleased with the display and am grateful for the high resolution screen.
The electronic viewfinder in the E-M5 sits right above the lens axis and has a 1.15x magnification and 100% view. The 1.15x magnification (equivalent in physical size to a .58x full frame viewfinder) is smaller than that on Panasonic’s EVFs (which are 1.4x), but in practice I don’t notice that much of a difference. In fact the slightly smaller size makes it a little easier to see the whole view while wearing glasses. The 1.44million dot finder is crisper and clearer than the Pansonic EVFs as it is a true 1.44 million dot finder, rather than the sequential field display used by Panasonic. This is another reason the smaller size doesn’t bother me, since there’s a sharper image that’s just as detailed (if not slightly more). The viewfinder works well even in dim light with minimal lag. One great feature that can be enabled by a menu item is the ability to have clipped highlight areas and shadow areas show up as red and blue live in your viewfinder. This makes setting exposure for a scene so easy, and is a wonderful addition to the capabilities of a good EVF.
Above the viewfinder behind a plastic cover is the E-M5’s accessory port. You can use this port for accessories such as the LED macro light, external audio connector for video or the PenPal which is a bluetooth transmitter for dropping pictures off to your phone, tablet or computer. You can even add the VF-2 external viewfinder, which would allow you to pivot it and use it from the top down, though I can’t see too many people doing this since the VF-2 and the built in EVF are essentially identical.
Next: Performance


Leave a Reply