Admiring Light
Menu
  • Home
  • Review Index
  • Shop Talk
  • Technique and Vision
  • Opinion
  • Portfolio
  • Site Index
  • About
    • Privacy Policy
Menu

Review: Fujifilm X-M1

Posted on August 13, 2013February 6, 2014 by Jordan Steele

Contents

  • 1Body and Ergonomics
  • 2Rear Screen
  • 3Operation and Menus
  • 4Focus Peaking
  • 5Autofocus and Performance
  • 6Flash
  • 7Key Features: Wi-Fi
  • 8In-Camera RAW Conversion
  • 9Film Simulations and Advanced Filters
  • 10Other Items of Note
  • 11Image Quality: Resolution, Dynamic Range and Color
  • 12Noise
  • 13JPEG Quality
  • 14Movie Mode
  • 15Conclusion
  • 16Image Samples

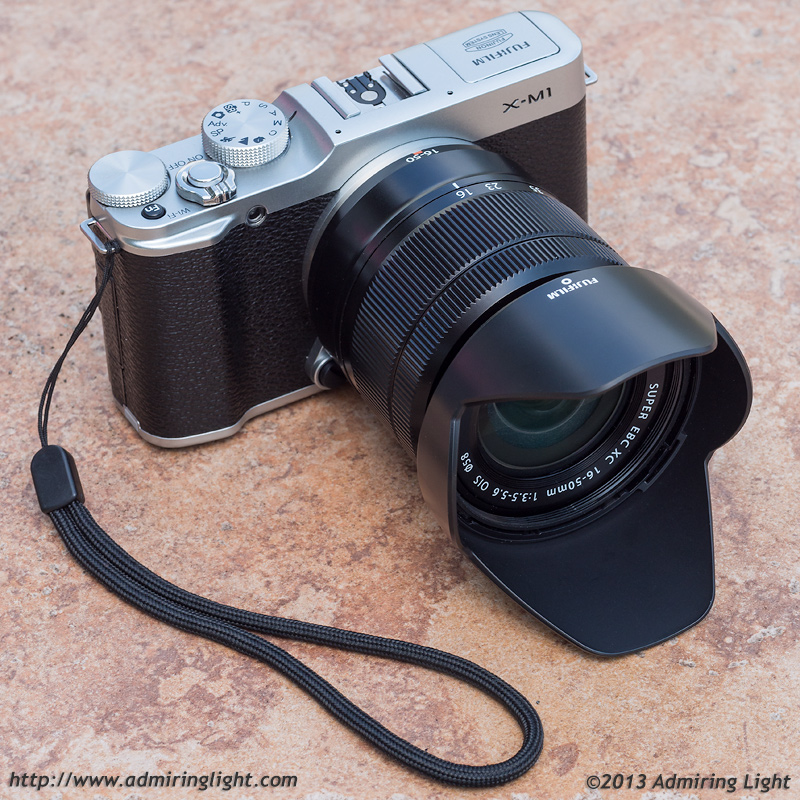
As the Fujifilm X-Series mirrorless system grows, Fuji has seen fit to diversify a bit from what was previously a system that catered entirely to enthusiasts and professionals. Recently, Fuji has released its latest X-Series camera: the X-M1. While the X-Pro 1 and X-E1 were targeted distinctly at the high-end, the X-M1 seeks to court a slightly different demographic. However, it still offers the same excellent sensor as its older brothers, and includes a few improvements on those bodies as well as a few new features. It’s available in three colors: Silver (with black leatherette), Black, or Silver (with brown leatherette). The camera retails for $699 for the body only and $799 in a kit with the new XC 16-50mm f/3.5-5.6 OIS (reviewed here). Is this just a cheap low-end body to court the average photographer, or is it more than that?

Fujifilm X-M1
Fujifilm X-M1 with Fujinon XC 16-50mm f/3.5-5.6 OIS

If you’re not familiar with my reviews, I review from a real world shooting perspective. You won’t find lens charts or resolution numbers here. There are plenty of other sites that cover those. I review products on how they act for me as a photographic tool. I am not a videographer, so my reviews concentrate on the still imaging capabilities of a camera.

Body and Ergonomics

Fujifilm X-M1 with Fujinon 35mm f/1.4

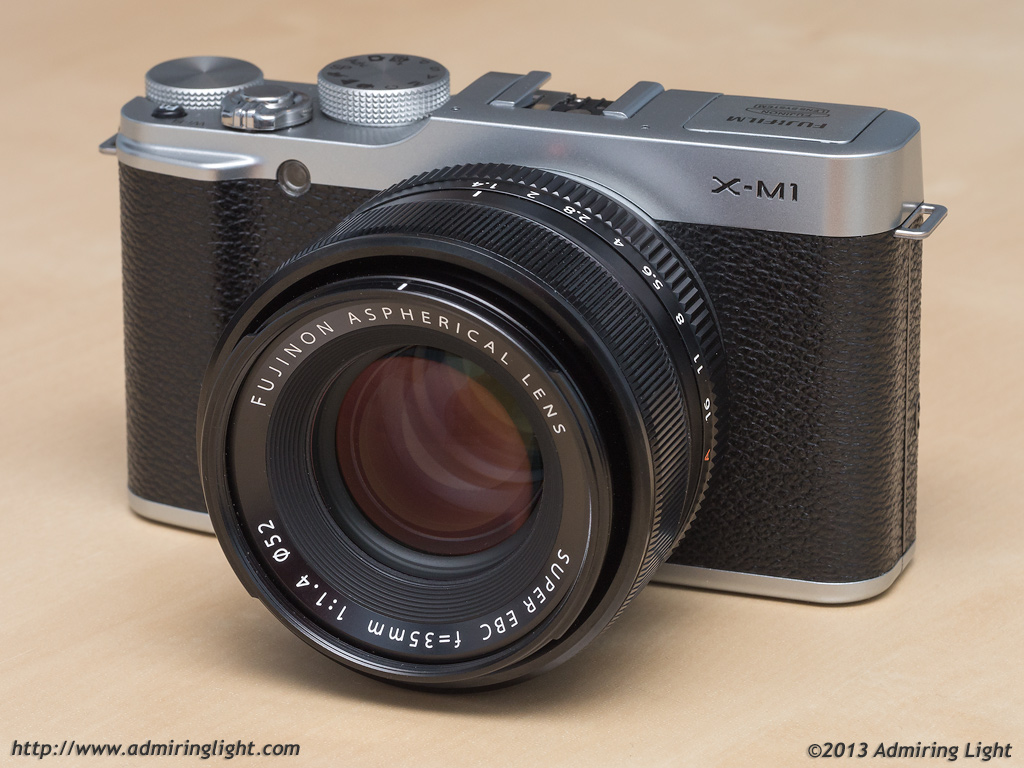
When I first saw the X-M1 in person, I was struck by its graceful design. It is a very attractive camera, a combination of retro and modern. It’s also a very small camera. When the X-Pro 1 was first released, it packed some unique features in a rather large body for a mirrorless camera. The X-E1 that followed last year reduced that size a fair bit. The X-M1 is significantly smaller than both, and is actually about the size of some of the smallest mirrorless cameras in production. It’s almost exactly the same size as the Panasonic GX1 for Micro 4/3. It’s nice to have a Fuji body this small, though the size reduction comes at the expense of a viewfinder.

The second thing that strikes you about the X-M1 is that it feels pretty cheap. The body, aside from the lens mount and the two top dials, is entirely finished with plastic and is extremely lightweight. Due to the choice of a smooth plastic and a very smooth plastic feel on the black leatherette, it feels less than expensive. The good news is that while the materials feel cheap, the actual construction seems quite solid. There is no flexing, the buttons have good tactile feel, the dials operate with positive clicks and without wobbling. Unlike my X-E1, all the seams are properly aligned and everything seems quite tightly assembled.

Fujifilm X-M1 - Rear
Fujifilm X-M1 – Rear

The X-M1, due to its smaller size, features a modified interface from its brother cameras. Fuji has removed the shutter speed dial and replaced it with a standard mode dial like the ones found on nearly every digital camera in existence. The exposure compensation dial has simply become an unmarked command dial that generally still serves as an Exposure compensation dial (in Program, Aperture Priority and Shutter Priority modes), and acts as the shutter speed dial in Manual mode. Also on top of the camera is the shutter release and power switch, along with one programmable function button.

The bottom of the camera has the door for the battery and SD card compartment, and the tripod mount is located off-center of the lens, extremely close to the door. Thus you won’t be able to access the battery or card door if the camera is mounted on a tripod.

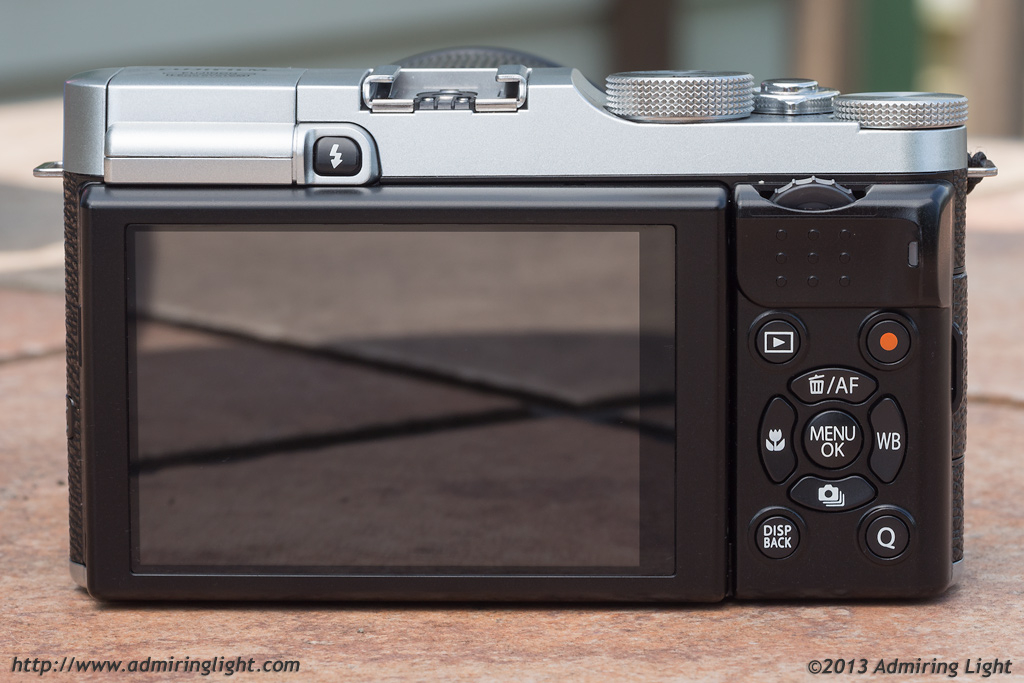
All the rear camera controls except for the flash release have been moved to the right side of the camera, with the four-way controller now taking direct access controls. There is a second command dial that sits vertically behind the thumb rest, and is a particularly brilliant implementation for a rear dial, as it is extremely easy to access and operate, but is positioned in a way that makes it quite difficult to accidentally operate. Like the command dial on the back of the X-Pro 1 and X-E1, the rear dial on the X-M1 can be pushed down to activate magnification of the live view during manual focusing or magnify the image during image review.

While this concentration of controls makes the right side of the camera more crowded, the X-M1 fits comfortably in your hand. The front grip is subtle, but provides a decent hold on the camera, at least with most of the Fuji prime lenses and the 16-50mm kit zoom. There is easy access to all the controls just by using your right thumb. The movie record button (a first on the Fuji X-series mirrorless cameras) sits inside a recessed rim, making it difficult to engage accidentally. Overall, the X-M1 feels good to hold and operate.

Rear Screen

The X-M1's rear tilting LCD.  This position is at about 70% of maximum tilt.  When tilting for shooting low to the ground, you can actually tilt the screen slightly past 90 degrees.
The X-M1’s rear tilting LCD. This position is at about 70% of maximum tilt. When tilting for shooting low to the ground, you can actually tilt the screen slightly past 90 degrees.

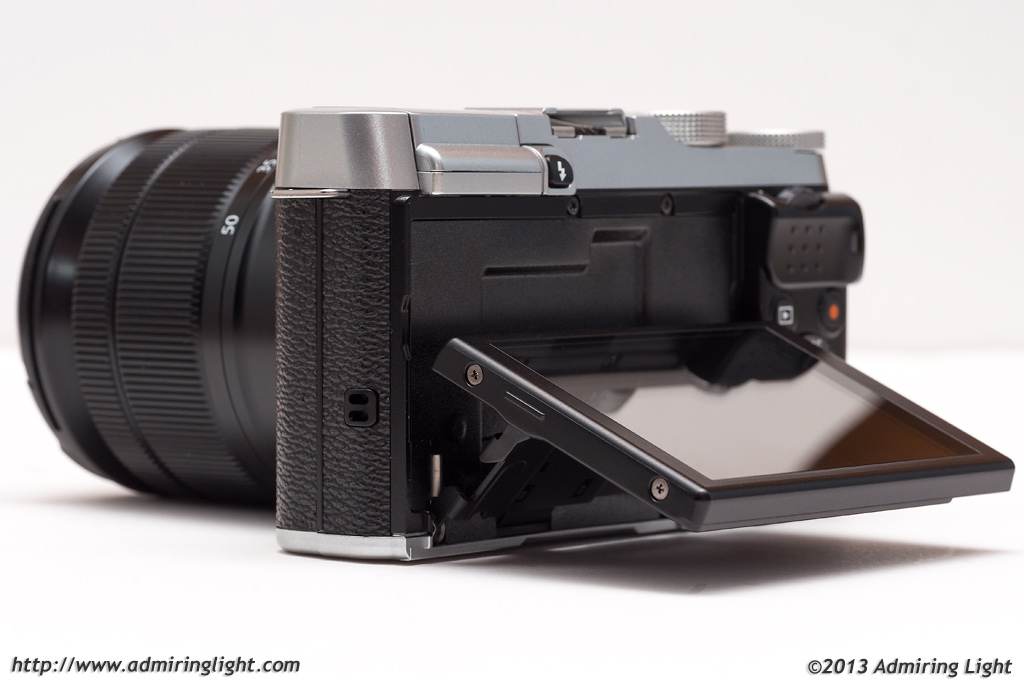
As part of the size reduction of the X-M1, the camera contains no viewfinder. To compensate for this, they’ve added a much higher resolution rear screen to the X-M1, a 920,000 dot LCD panel that can tilt up over 90 degrees and down about 80 degrees. It’s got a wider range of travel than other tilt-only screens I’ve used, such as those on the Olympus OM-D E-M5 or E-P5. The rear screen is bright, clear and sharp, and composing images using the rear screen is quite easy. It took me a little while to get out of bringing the camera to my eye on certain shots, but eventually I became accustomed to it again. The tilting feature is extremely useful for capturing photos at waist level or close to the ground, as well as if you need to hold the camera well above your head.

In bright sunlight, the screen on normal brightness can become a little difficult to see. Fuji includes a setting, however, that boosts the brightness for outdoor shooting in bright sunlight. This works well, allowing you to compose easily even in noon-day sun, at the expense of an accurate image preview. When the screen has this mode engaged, bright areas of the scene appear blown out on the LCD, though they are accurate in the final shot. It’s best to use the on-screen live histogram when shooting with the outdoor brightness setting in order to ensure proper exposure.

Unfortunately, the rear screen is not touch sensitive. Touch capability would have made a lot of sense for a camera like this, as being able to move focus points or use touch shutter is wonderful when you’re not shooting with a viewfinder. I also would have like to have seen the option for a removable external EVF via hot shoe/accessory port. Unfortunately, there is no such option, nor the capability for it in the future.

Continue: Operation and Performance

Pages: 1 2 3 4 5

20 thoughts on “Review: Fujifilm X-M1”

  1. Pingback: My Full X-M1 Review at Admiring Light
  2. carl says:
    August 13, 2013 at 1:25 pm

    A very useful review; thanks.

    One question: for the photographs displayed from the X-M1, did you use any post-processing? And if so, how long did you typically spend on a photograph?

    Reply
    1. Jordan Steele says:
      August 13, 2013 at 2:00 pm

      There is some post processing on all the shots, as they are all from RAW. Many have very minor edits, such as contrast and saturation adjustment, others have a little more work. Since I need to see how RAW files hold up to all sorts of different processing (it’s one of the things that can really separate camera sensors), I simply shoot and process in my normal workflow. I usually spend about 2-3 minutes per image, though a few take a bit longer. Here’s a breakdown of images, starting with the two on the Image Quality page. All images were processed in Lightroom 5.2 Release Candidate and Photoshop CS6.

      – Sunrise over Columbus: Heavy shadow and highlight compression in Lightroom (blacks +36, Shadows +100, Exposure +2/3 stop, highlights around -30. Color and contrast adjustment after RAW processing.
      – Ohio Statehouse: minor color and contrast adjustment after RAW processing.

      On this page:
      – Egret in the Mist: Heavily cropped (this is about a 4.5 MP crop of the full 16MP image), processed in Color Efex Pro 4 with the Infrared Film preset, tweaked to taste.
      – Hayden Falls: Minor color and contrast adjustment after RAW processing.
      – Roots: Pretty heavy editing with Color Efex Pro to enhance color, provide more subtle contrasts and a little glow.
      – Statehouse Rotunda: minor color and contrast adjustment after RAW processing.
      – Girl – Almost straight out of camera – maybe slight additional saturation.
      – Hayden Falls – minor color and contrast adjustment after RAW processing.
      – Lost boat: Black and White conversion in Nik Silver Efex Pro 2 with selective color masking done in Photoshop
      – Bee: Combination of two exposures (one focused on the flower, the other focused on the bee (though the same composition for both exposures)) – minor color and contrast adjustment after RAW processing.
      – Ohio Statehouse: color and contrast adjustment after RAW processing, additional processing in Color Efex for a little ethereal feel.
      – Water Plants: Sunlight filter in Nik Color Efex to give warmth and modulate contrast. I cloned out a few bubbles in the water as well.
      – Boats Under Broad Street: B&W conversion in Nik Silver Efex Pro 2.

      Reply
  3. cosinaphile says:
    August 15, 2013 at 11:44 am

    a very enjoyable review , as an xe1 owner i appreciated that you took time to explain the value of the customizable jpeg engine … its a valuable feature imho….. sadly the finish seems cheap though build is good … i wish a firmware update could unlock the xe1 camera during writing , but it may just be a case of processing power , in which case unlikely.

    Reply
  4. Bill Crelin says:
    August 15, 2013 at 12:50 pm

    Jordan,
    As always, wonderful shots and thorough overview of the new Fuji. I follow your posts over at Fredmiranda as well and to my eye your fuji shots always seem to appear ‘silky’ for want of a better word and the oly photos are quite sharp and acute but not at all in a bad way. Am I reading too much into this or is this perhaps the ‘Fuji look’ folks refer to on occasion ? . Thanks for the time in putting these helpful reviews together

    bc

    Reply
    1. Jordan Steele says:
      August 16, 2013 at 8:07 am

      Yeah, a lot of that is that ‘depth’ that I talk about the Fuji images having. They’re just a little better in color/contrast and smoothness of transitions. Really nice files. The Oly files are generally a little crisper with a sharper contrast cutoff, though both are easily capable of excellent images.

      Reply
  5. Pingback: Review: Fujifilm Fujinon XC 16-50mm f/3.5-5.6 OIS @ Admiring Light
  6. Pingback: Fujifilm X-M1 Camera Review | Daily Camera News
  7. Jacob Freeze says:
    August 19, 2013 at 7:31 am

    These are flat out the best photos I ever saw in a camera review, and that’s mostly the photographer, not the camera, although the M1 is a very fine little machine.

    Reply
    1. Jordan Steele says:
      August 19, 2013 at 11:38 am

      Wow, thanks! I appreciate that!

      Reply
  8. Pingback: Fuji X-M1 at Admiring Light | Camera Reviews
  9. Frank says:
    September 2, 2013 at 3:10 am

    Very nice and detailled review, thanks.
    You mention the “plastic” feel of the camera. Is the top deck plate made of plastic, or metal (what it looks like on the pictures)?
    Thanks.

    Reply
    1. Jordan Steele says:
      September 2, 2013 at 8:16 am

      The entire exterior of the camera, except for the two dials on top and the power switch, is plastic. It’s well assembled plastic, but it’s definitely plastic.

      Reply
  10. Kjell Ossson says:
    September 22, 2013 at 4:51 am

    Just found you site “by accident” and I must say that I really appreciate the Fuji X-reviews I have read so far!

    I would rank you in top along Dpreview and a few others!

    There are enough so called reviewers out there I wouldn´t miss if my computer broke down…… but you´re not one of them!

    Keep up the good work!

    /Kjell
    (from the north of Sweden)

    Reply
    1. Jordan Steele says:
      September 22, 2013 at 8:43 am

      Thanks so much! I appreciate the kind words. Spread the news that the site exists! 🙂

      Reply
  11. Pat Reehal says:
    March 23, 2014 at 1:18 pm

    Jordan this is the most comprehensive and honest review I have read on this most underrated camera. Thank you.
    I love my X100 and when Amazon UK discounted the XM-1 heavily over Christmas it was rude not to buy one.Yes it is plastic and yes it has no viewfinder but by heck it produces such stunning results that I forgive it. It punches seriously above its weight and for the $360 it cost me with the XC 16-50mm I am delighted.

    Your review on the XT-1 is equally informative and, armed with a pump-action Debit card, I bought one last week. The XM-1 is wonderful, the XT-1 is sublime.

    Please continue your excellent work. I have bookmarked your site and recommended it to all of my colleagues who, like me, are all sick of the ‘Merda taurorum animas conturbit’ Brigade!

    Kind regards

    Pat

    Reply
  12. Michael M. says:
    April 3, 2014 at 2:11 pm

    Jordan… Although I am not an X-M1 user (I have an X-E1), I have to agree with the rest of the commenters here that you do have a wonderful way of giving us important technical information, user information, and lastly wonderful photographs. I sort of found your site by accident as I am a recent Fuji convert (I still shoot Nikon for paid work) but I am going to also keep your site bookmarked as a key contributor to the photography knowledge base. Please keep up the good work you are doing, and keep on adding your much higher than average camera/lens review photos to your posts. I especially like your water plants photo above. Really excellent.

    Reply
  13. Tri Rini Nuringtyas says:
    October 17, 2014 at 8:12 am

    I used this camera for almost a year. I really love it. Small and really suitable for me as a street photographer. My question I had already the 27 mm pancakes, kit Lens and the zoom lens. I want to buy mirelens which one is better the 60 mm or 35?

    Thank you

    Reply
  14. boom beach hack tool free download no survey,boom beach hack gratuit android,boom beach ios hack ifunbox,boom beach hack tool for android/ios,boom beach triche diamant,boom beach hack iphone,Boom Beach Free Hack,boom beach hack apk 22.70,boom beach ios ha says:
    October 8, 2015 at 3:21 pm

    En l’utilisant, vous devrez être suffisamment pourvu en or even et hierdoor diamant, grâce notamment
    à un générateur de diamants boom beachfront.

    Reply
  15. Pingback: Fujifilm X-M1 Camera Review - Daily Camera News

Leave a Reply Cancel reply

Your email address will not be published.

This site uses Akismet to reduce spam. Learn how your comment data is processed.

Follow Me:

Follow Us on FacebookFollow Us on RSSFollow Us on InstagramFollow Us on Mastodon

Most Popular Posts

  • "Full Frame Equivalence" and Why It Doesn't Matter (288)
  • Fuji X-Pro 2 vs. Sony A7 II: Noise Comparison (70)
  • Fuji 56mm f/1.2 vs. Panasonic Leica 42.5mm f/1.2 Nocticron (63)
  • Review: Metabones Speed Booster (Canon FD to Fuji X) (56)
  • Review: Olympus OM-D E-M5 (48)

Recent Comments

  • Eric Wojtkun on My Favorite Photos of 2022
  • Jordan Steele on “Full Frame Equivalence” and Why It Doesn’t Matter
  • Leon on “Full Frame Equivalence” and Why It Doesn’t Matter
  • Clarke jones on Review: TTArtisan 50mm f/1.4 ASPH (RF Mount)
  • Anonymous on Sony A7 III vs. A7 II – Noise Comparison

Archives

©2023 Admiring Light | Theme by SuperbThemes
We use cookies to personalize content and ads and to analyze our traffic. We also share information about your use of our site with advertising and analytics partners who may combine it with other information that you’ve provided to them or that they’ve collected from your use of their services. You may consent to the use of cookies or opt out. Accept Reject Read More
Privacy & Cookies Policy

Privacy Overview

This website uses cookies to improve your experience while you navigate through the website. Out of these, the cookies that are categorized as necessary are stored on your browser as they are essential for the working of basic functionalities of the website. We also use third-party cookies that help us analyze and understand how you use this website. These cookies will be stored in your browser only with your consent. You also have the option to opt-out of these cookies. But opting out of some of these cookies may affect your browsing experience.
Necessary
Always Enabled

Necessary cookies are absolutely essential for the website to function properly. This category only includes cookies that ensures basic functionalities and security features of the website. These cookies do not store any personal information.

SAVE & ACCEPT