Admiring Light
Menu
  • Home
  • Review Index
  • Shop Talk
  • Technique and Vision
  • Opinion
  • Portfolio
  • Site Index
  • About
    • Privacy Policy
Menu

Review: Fujifilm X-M1

Posted on August 13, 2013February 6, 2014 by Jordan Steele

Contents

  • 1Body and Ergonomics
  • 2Rear Screen
  • 3Operation and Menus
  • 4Focus Peaking
  • 5Autofocus and Performance
  • 6Flash
  • 7Key Features: Wi-Fi
  • 8In-Camera RAW Conversion
  • 9Film Simulations and Advanced Filters
  • 10Other Items of Note
  • 11Image Quality: Resolution, Dynamic Range and Color
  • 12Noise
  • 13JPEG Quality
  • 14Movie Mode
  • 15Conclusion
  • 16Image Samples

Operation and Menus

For most camera manufacturers, the small and/or low-end cameras in the lineup generally tradeoff some physical control in exchange for the size. Luckily, Fuji seems to buck this trend, and they still provide the majority of the physical controls the larger X cameras have. The Fujifilm X-M1 has the major control functions largely laid out in the same manner on previous X-Series cameras with one big change:

One of the more controversial aspects of the Fujifilm X-M1 is the change from the tried and true control scheme of using an aperture ring and shutter speed dial to select between Program, Aperture Priority, Shutter Priority and Manual modes. Instead, the X-M1 changes just one thing, which moves it in line with most modern cameras as far as typical interface goes: The shutter speed dial has been replaced with a standard Mode dial.

Fujifilm X-M1 - Top Controls
Fujifilm X-M1 – Top Controls

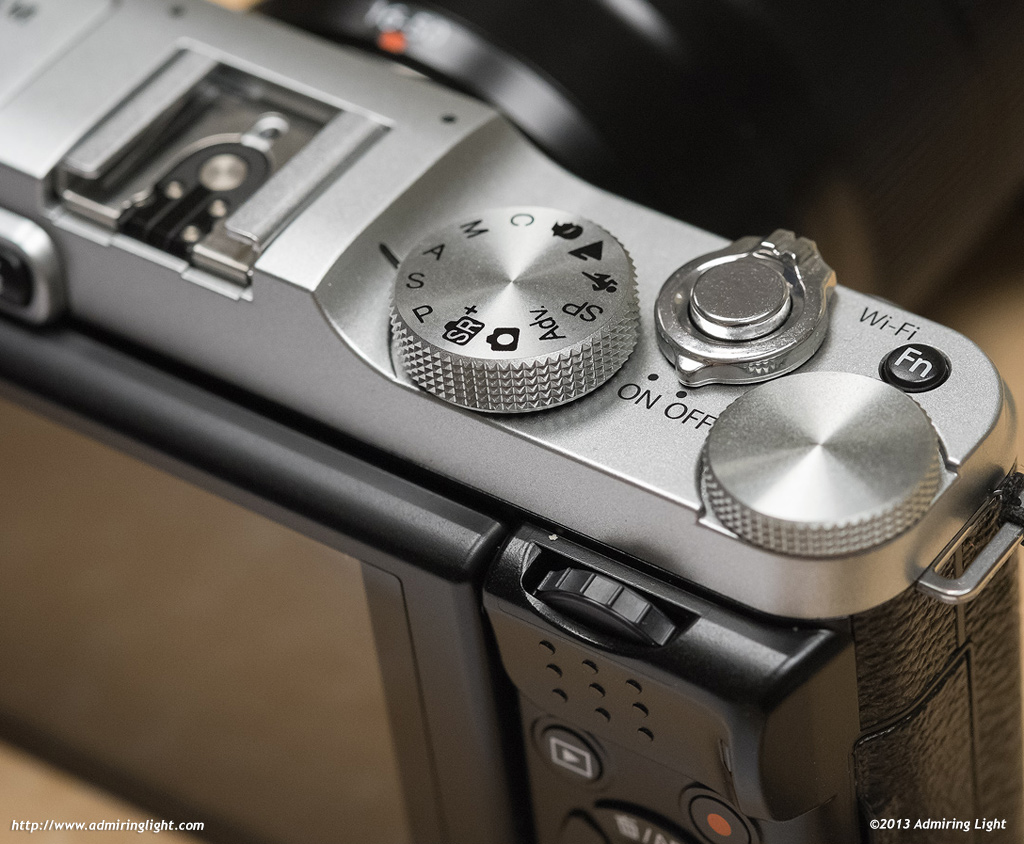
As a result of this change, what has been the dedicated Exposure Compensation dial on previous X-Series cameras becomes simply the top command dial, and sits on the back right edge of the top of the camera. While this change was widely criticized by many when the camera was announced, in reality, it’s not a big change at all. In fact, if you shoot mostly Aperture priority mode with the Fuji R lenses (with an aperture ring), the operation is essentially identical to that of the X-Pro 1 and the X-E1. The aperture ring on the lens will still control aperture, and the top right dial still controls exposure compensation. When using the XC 16-50mm kit lens or the new 27mm pancake, neither of which feature an aperture ring, aperture control moves to the rear command dial.

The Manual and Program modes operate, in my opinion, better on the X-M1 than on the earlier cameras. In Manual mode, the shutter speed operation moves to the top command dial, which is both easier to access than the shutter speed dials on other X cameras, and more functional, as the top command dial just increases shutter speeds in 1/3 stops instead of the full stop increments of the previous X-series cameras. While those other cameras could access the 1/3 stop increments by using the 4-way buttons, the simpler implementation on the X-M1 is far less fiddly than messing around with two separate controls. In Program mode, the program shift function has now been added to the rear command dial, making it easier to do program shift than using the arrow keys on the previous X-Series cameras.

Only in Shutter Priority mode is there a slightly reduced feel to operation, as the shutter speed control moves to the rear command dial. This is easy to operate, but gives you a little less of that ‘old camera’ feel. The big negative consequence to replacing the shutter speed dial with a mode dial is that now you do lose the ability to see your settings at a glance with the camera off. This is a really nice feature on the X-Pro 1 and X-E1, and I missed it sometimes with the X-M1, but overall, this change wasn’t as big a deal to me as I thought it would be when the camera was first announced.

In fact, most of the control changes for the X-M1 are slightly superior to the cameras that came before it. It is much easier to access all the settings quickly on the X-M1, as they have been laid out for one-handed operation. Only in two instances do I feel that the controls have taken a step back. First, the elimination of the dedicated focus control switch, that sits on the front of the X-E1 and X-Pro 1. Now, switching between focus modes must be done through the Q menu or the main menu system. Second, since the autofocus point selection and size button has been moved to the top of the arrow buttons, you can no longer press ‘OK’ to immediately go to the center autofocus point, as OK now confirms the point position. Instead, using the Disp/Back button while moving points will recenter the AF point. This can lead to a little confusion when switching between cameras, as the OK button does different things between the X-M1 and the other X bodies when pressing OK.

The 'Q' Menu on the Fuji X-M1
The ‘Q’ Menu on the Fuji X-M1

The menu system is very similar to its X brothers, and is laid out very logically. A few things that used to be in menus (such as multiple exposure) are now moved to a different mode on the mode dial, but all in all, if you are familiar with the X-E1 or X-Pro 1, you’ll fit right in here.

The X-M1’s Q menu, accessible from a single button push, gives you quick access to JPEG parameters as well as many functions that are somewhat regularly changed. ISO, Focus Mode, Self Timer, File Mode, Film Simulation as well as IS mode (especially needed for the 16-50mm lens, which does not have a physical IS switch).

Overall, I have found the X-M1 to be a quick and easy camera to use. Having two command dials on a camera this small is a relative rarity, especially in this price range, and it makes the X-M1 operate in a decidedly photographer friendly manner, rather than feeling like a dumbed down interface for the casual snapper.

Focus Peaking

X-M1 with Canon FD 50mm f/1.8, Focusing on a Canon AE-1.  The focus peaking out lines the in-focus areas in white
X-M1 with Canon FD 50mm f/1.4, Focusing on a Canon AE-1. The focus peaking outlines the in-focus areas in white

The X-M1 is the first Fujifilm interchangeable lens camera to feature focus peaking out of the box. The feature was added via firmware update to the X-Pro 1 and X-E1 in July, and that carries over to the X-M1 here. With focus peaking enabled, a high contrast white outline surrounds areas of the image that are in focus, thus allow for much faster and accurate manual focus. This is particularly useful when adapting manual focus lenses to the camera. Interestingly enough, while the peaking certainly helps the X-E1 and X-Pro 1, the implementation Fuji has chosen works extremely well on the X-M1. The high-resolution rear screen is perfect for this implementation, and I actually found focusing lenses on the X-M1 easier than manually focusing on the X-E1, even when using the EVF. Fuji has stated they will be adding more colors than white in a future firmware update, which may help the peaking stand out a bit more.

Peaking can be turned on and off very quickly by pressing and holding down the rear command dial, a very nice usability touch. The only down side is that peaking only works when the camera is set to manual focus mode, so that change must be made in the Q menu prior to using the feature.

Autofocus and Performance

The Achilles Heel of the Fujifilm X-Series cameras has historically been its autofocus performance. The original X-Pro 1 had absolutely abysmal autofocus at launch, that was progressively improved over the past two years. The X-E1 started with fair to poor autofocus, with both cameras getting a rather drastic improvement with the release of the latest firmware a few weeks ago.

As you might expect, the X-M1 benefits from these advancements, and the autofocus performance is essentially identical to the X-E1 on firmware version 2.0. That is, it’s acceptable in speed, accurate, and has no real problems locking on in most any lighting situation. It still lags the competition by a noticeable amount in pure speed, being outclassed by the NEX and especially Micro 4/3 in that regard, but the X-M1 is able to find focus quickly enough to be usable for most photographic situations. Of course some of this is lens dependent, with the 60mm f/2.4 being relatively slow, and the 16-50mm kit lens and 14mm f/2.8 being relatively quick. You’re not going to shoot a lot of action with the X-M1, but it is a competent camera with regards to its AF performance.

In general responsiveness, however, the X-M1 improves rather noticeably on the other two X-Series cameras. The X-M1 features the new EXR Processor II, which first debuted in the X100s. This image processor speeds up write times to the card, general image processing tasks such as in-camera RAW conversion and other general tasks. The camera has reduced shutter lag compared to the X-E1, with essentially no delay between pressing the shutter and image capture.

The X-M1's Pop-Up Flash
The X-M1’s Pop-Up Flash

The biggest improvement for my shooting with this faster image processor is that finally, you can magnify the live view while the camera is writing an image to the card. When I use adapted manual focus lenses on my X-E1, I have missed several shots due to the inability to zoom in to get critical focus while the camera is still writing to the card. If you’ve just fired off 3-4 frames, this can be a lengthy delay. With the X-M1, you can magnify at will, without regard to the image buffer. Since the camera writes faster, the buffer also clears much faster.

All of these things combine to make the X-M1 the most responsive X-Series interchangeable lens camera yet.

Flash

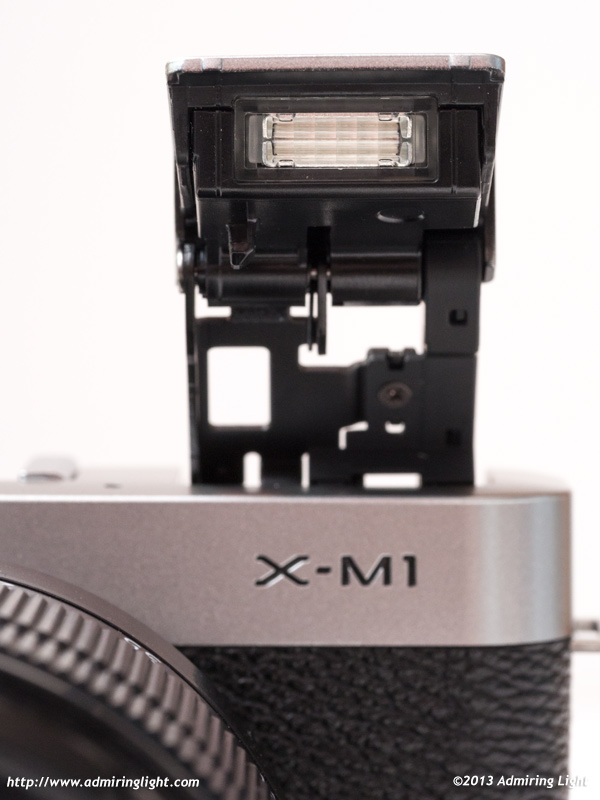
The X-M1 features a pop-up flash that is accessed by simply pressing the button on the rear of the camera. The flash extends up and forward. Like the X-E1, the X-M1’s pop up flash can be tilted back to provide bounce flash, though the limited power means this is only really useful for fast lenses or higher ISOs. Flash exposure is quite accurate. While a pop-up flash is generally not the best for great lighting, it certainly comes in useful in certain situations, so it’s a very nice thing to have.

Continue: Key Features

Pages: 1 2 3 4 5

20 thoughts on “Review: Fujifilm X-M1”

  1. Pingback: My Full X-M1 Review at Admiring Light
  2. carl says:
    August 13, 2013 at 1:25 pm

    A very useful review; thanks.

    One question: for the photographs displayed from the X-M1, did you use any post-processing? And if so, how long did you typically spend on a photograph?

    Reply
    1. Jordan Steele says:
      August 13, 2013 at 2:00 pm

      There is some post processing on all the shots, as they are all from RAW. Many have very minor edits, such as contrast and saturation adjustment, others have a little more work. Since I need to see how RAW files hold up to all sorts of different processing (it’s one of the things that can really separate camera sensors), I simply shoot and process in my normal workflow. I usually spend about 2-3 minutes per image, though a few take a bit longer. Here’s a breakdown of images, starting with the two on the Image Quality page. All images were processed in Lightroom 5.2 Release Candidate and Photoshop CS6.

      – Sunrise over Columbus: Heavy shadow and highlight compression in Lightroom (blacks +36, Shadows +100, Exposure +2/3 stop, highlights around -30. Color and contrast adjustment after RAW processing.
      – Ohio Statehouse: minor color and contrast adjustment after RAW processing.

      On this page:
      – Egret in the Mist: Heavily cropped (this is about a 4.5 MP crop of the full 16MP image), processed in Color Efex Pro 4 with the Infrared Film preset, tweaked to taste.
      – Hayden Falls: Minor color and contrast adjustment after RAW processing.
      – Roots: Pretty heavy editing with Color Efex Pro to enhance color, provide more subtle contrasts and a little glow.
      – Statehouse Rotunda: minor color and contrast adjustment after RAW processing.
      – Girl – Almost straight out of camera – maybe slight additional saturation.
      – Hayden Falls – minor color and contrast adjustment after RAW processing.
      – Lost boat: Black and White conversion in Nik Silver Efex Pro 2 with selective color masking done in Photoshop
      – Bee: Combination of two exposures (one focused on the flower, the other focused on the bee (though the same composition for both exposures)) – minor color and contrast adjustment after RAW processing.
      – Ohio Statehouse: color and contrast adjustment after RAW processing, additional processing in Color Efex for a little ethereal feel.
      – Water Plants: Sunlight filter in Nik Color Efex to give warmth and modulate contrast. I cloned out a few bubbles in the water as well.
      – Boats Under Broad Street: B&W conversion in Nik Silver Efex Pro 2.

      Reply
  3. cosinaphile says:
    August 15, 2013 at 11:44 am

    a very enjoyable review , as an xe1 owner i appreciated that you took time to explain the value of the customizable jpeg engine … its a valuable feature imho….. sadly the finish seems cheap though build is good … i wish a firmware update could unlock the xe1 camera during writing , but it may just be a case of processing power , in which case unlikely.

    Reply
  4. Bill Crelin says:
    August 15, 2013 at 12:50 pm

    Jordan,
    As always, wonderful shots and thorough overview of the new Fuji. I follow your posts over at Fredmiranda as well and to my eye your fuji shots always seem to appear ‘silky’ for want of a better word and the oly photos are quite sharp and acute but not at all in a bad way. Am I reading too much into this or is this perhaps the ‘Fuji look’ folks refer to on occasion ? . Thanks for the time in putting these helpful reviews together

    bc

    Reply
    1. Jordan Steele says:
      August 16, 2013 at 8:07 am

      Yeah, a lot of that is that ‘depth’ that I talk about the Fuji images having. They’re just a little better in color/contrast and smoothness of transitions. Really nice files. The Oly files are generally a little crisper with a sharper contrast cutoff, though both are easily capable of excellent images.

      Reply
  5. Pingback: Review: Fujifilm Fujinon XC 16-50mm f/3.5-5.6 OIS @ Admiring Light
  6. Pingback: Fujifilm X-M1 Camera Review | Daily Camera News
  7. Jacob Freeze says:
    August 19, 2013 at 7:31 am

    These are flat out the best photos I ever saw in a camera review, and that’s mostly the photographer, not the camera, although the M1 is a very fine little machine.

    Reply
    1. Jordan Steele says:
      August 19, 2013 at 11:38 am

      Wow, thanks! I appreciate that!

      Reply
  8. Pingback: Fuji X-M1 at Admiring Light | Camera Reviews
  9. Frank says:
    September 2, 2013 at 3:10 am

    Very nice and detailled review, thanks.
    You mention the “plastic” feel of the camera. Is the top deck plate made of plastic, or metal (what it looks like on the pictures)?
    Thanks.

    Reply
    1. Jordan Steele says:
      September 2, 2013 at 8:16 am

      The entire exterior of the camera, except for the two dials on top and the power switch, is plastic. It’s well assembled plastic, but it’s definitely plastic.

      Reply
  10. Kjell Ossson says:
    September 22, 2013 at 4:51 am

    Just found you site “by accident” and I must say that I really appreciate the Fuji X-reviews I have read so far!

    I would rank you in top along Dpreview and a few others!

    There are enough so called reviewers out there I wouldn´t miss if my computer broke down…… but you´re not one of them!

    Keep up the good work!

    /Kjell
    (from the north of Sweden)

    Reply
    1. Jordan Steele says:
      September 22, 2013 at 8:43 am

      Thanks so much! I appreciate the kind words. Spread the news that the site exists! 🙂

      Reply
  11. Pat Reehal says:
    March 23, 2014 at 1:18 pm

    Jordan this is the most comprehensive and honest review I have read on this most underrated camera. Thank you.
    I love my X100 and when Amazon UK discounted the XM-1 heavily over Christmas it was rude not to buy one.Yes it is plastic and yes it has no viewfinder but by heck it produces such stunning results that I forgive it. It punches seriously above its weight and for the $360 it cost me with the XC 16-50mm I am delighted.

    Your review on the XT-1 is equally informative and, armed with a pump-action Debit card, I bought one last week. The XM-1 is wonderful, the XT-1 is sublime.

    Please continue your excellent work. I have bookmarked your site and recommended it to all of my colleagues who, like me, are all sick of the ‘Merda taurorum animas conturbit’ Brigade!

    Kind regards

    Pat

    Reply
  12. Michael M. says:
    April 3, 2014 at 2:11 pm

    Jordan… Although I am not an X-M1 user (I have an X-E1), I have to agree with the rest of the commenters here that you do have a wonderful way of giving us important technical information, user information, and lastly wonderful photographs. I sort of found your site by accident as I am a recent Fuji convert (I still shoot Nikon for paid work) but I am going to also keep your site bookmarked as a key contributor to the photography knowledge base. Please keep up the good work you are doing, and keep on adding your much higher than average camera/lens review photos to your posts. I especially like your water plants photo above. Really excellent.

    Reply
  13. Tri Rini Nuringtyas says:
    October 17, 2014 at 8:12 am

    I used this camera for almost a year. I really love it. Small and really suitable for me as a street photographer. My question I had already the 27 mm pancakes, kit Lens and the zoom lens. I want to buy mirelens which one is better the 60 mm or 35?

    Thank you

    Reply
  14. boom beach hack tool free download no survey,boom beach hack gratuit android,boom beach ios hack ifunbox,boom beach hack tool for android/ios,boom beach triche diamant,boom beach hack iphone,Boom Beach Free Hack,boom beach hack apk 22.70,boom beach ios ha says:
    October 8, 2015 at 3:21 pm

    En l’utilisant, vous devrez être suffisamment pourvu en or even et hierdoor diamant, grâce notamment
    à un générateur de diamants boom beachfront.

    Reply
  15. Pingback: Fujifilm X-M1 Camera Review - Daily Camera News

Leave a Reply Cancel reply

Your email address will not be published.

This site uses Akismet to reduce spam. Learn how your comment data is processed.

Follow Me:

Follow Us on FacebookFollow Us on RSSFollow Us on InstagramFollow Us on Mastodon

Most Popular Posts

  • "Full Frame Equivalence" and Why It Doesn't Matter (288)
  • Fuji X-Pro 2 vs. Sony A7 II: Noise Comparison (70)
  • Fuji 56mm f/1.2 vs. Panasonic Leica 42.5mm f/1.2 Nocticron (63)
  • Review: Metabones Speed Booster (Canon FD to Fuji X) (56)
  • Review: Olympus OM-D E-M5 (48)

Recent Comments

  • Anonymous on Ready for Launch!
  • Jordan Steele on Canon EOS R8 – First Impressions
  • J Williams on Canon EOS R8 – First Impressions
  • Davide on Review: Tamron 70-180mm f/2.8 Di III VXD
  • Peter on A Tripod in the Sky – DJI Air 2S Review

Archives

©2023 Admiring Light | Theme by SuperbThemes
We use cookies to personalize content and ads and to analyze our traffic. We also share information about your use of our site with advertising and analytics partners who may combine it with other information that you’ve provided to them or that they’ve collected from your use of their services. You may consent to the use of cookies or opt out. Accept Reject Read More
Privacy & Cookies Policy

Privacy Overview

This website uses cookies to improve your experience while you navigate through the website. Out of these, the cookies that are categorized as necessary are stored on your browser as they are essential for the working of basic functionalities of the website. We also use third-party cookies that help us analyze and understand how you use this website. These cookies will be stored in your browser only with your consent. You also have the option to opt-out of these cookies. But opting out of some of these cookies may affect your browsing experience.
Necessary
Always Enabled

Necessary cookies are absolutely essential for the website to function properly. This category only includes cookies that ensures basic functionalities and security features of the website. These cookies do not store any personal information.

SAVE & ACCEPT