High Resolution Mode

The headlining new feature of the Olympus OM-D E-M5 Mark II is the High Resolution Mode (henceforth referred to in this article as HR mode). The HR mode takes advantage of the precise control afforded by the excellent in-body image stabilizing system to precisely shift the sensor to capture significantly more data than is generally available with the 16 megapixel sensor. It does this by taking 8 discrete photos and merging them into a single file. First, the camera takes a shot, then shifts the sensor to the side one pixel, then down, then to the other side. This doesn’t add any direct resolution, but instead shifts the Bayer color filter array around such that red, green and blue values are captured for every pixel location, rather than requiring interpolation. This alone increases detail since color interpolation isn’t required like it is for almost all digital cameras. It then follows by shifting the sensor up and to the side, placing the pixel array exactly halfway between pixels both horizontally and vertically. It then completes the shifting to capture full color information at all of THOSE locations.
The result? A true 64 megapixel RAW file with RGB color information at every one of the 64 megapixels. Given the diffraction effects on the small pixels and the resolution capabilities of the lenses, Olympus estimates that there’s only around 40 megapixels of true data here, and as such the JPEG output of this mode is only 40 MP. If you shoot in RAW, you will get the 64MP RAW file (which is over 100MB), an ‘ORI’ RAW file, which is the RAW capture of the first frame in the sequence, and a 40MP JPEG image. So how well does it work? Pretty darn well.
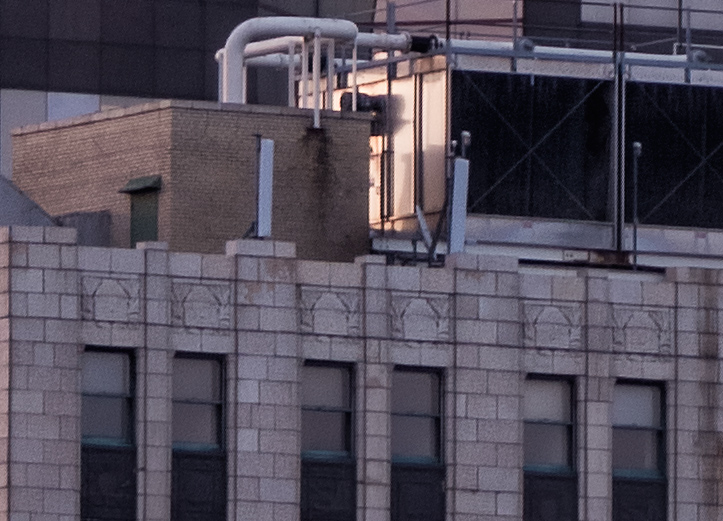
The shot above and to the right was taken in HR mode in RAW, with the Olympus 75-300mm at 75mm. I didn’t think that a lens like this would work very well in this mode, but I was very pleasantly surprised. Below 200mm, it works brilliantly. The 40MP JPEG image produces excellent levels of detail, but the RAW file had even more fine detail. Below is a 100% crop of the final image, showing the level of detail capable in this mode. Note the individual bricks on the mechanical penthouse, then compare the size of the crop to the full image above to get an idea of how much extra detail is capable when using this mode.

I did a head to head test when I first received the camera to test the extra resolution gained by the HR mode, and was similarly impressed. Below are 100% crops using only the out of camera JPEGs, so we’re dealing with 40MP output in this scenario. The image on the right is a 100% crop of the 40MP file, while the image on the left is a 100% crop of the standard 16MP shot, upsized to match the same magnification as the 40MP file. The extra level of detail is astounding. Click to view at full size (the reduced version shown inline is insufficient to see the major differences).

This mode has incredible potential for high-resolution imagery, provided you are using a good lens. But it certainly isn’t going to be useful for a lot of types of shooting. There are three things you need in order to make the HR mode work well: a high quality lens, a rock-solid stable platform, and a scene without motion. This mode requires a very stable tripod with a very stable head, as any vibration in the camera will cause the mode to produce a mushy mess. Macro photography with it is extremely difficult, as even mild air currents or vibrations in the floor of a house can cause enough motion at high magnifications to render the mode useless. Likewise, movement in the scene will result in artifacts, which appear as a diagonal hatch pattern over the areas with motion. This occurs even when shooting longer exposures. You’ll see the first image in the Image Samples collection at the end of the review was taken at 8 seconds in HR mode. To make the shot successful, I had to apply a 1 pixel Gaussian blur to the reflected water and moving sky to eliminate the artifacts. Since these areas were blurred due to motion anyway, it didn’t matter from a subject standpoint, but it did require the extra step. Still, even with the caveats, it’s a mode that can yield wonderful results in many situations.
In-Body Image Stabilization

Olympus has featured in-body image stabilization (IBIS) for a very long time, dating back to the original 4/3 system, though some have worked better than others. The E-M5 Mark II features an improved version of the excellent 5-axis IBIS found in the E-M1. The sensor-shift stabilizer in the E-M5 Mark II turns any lens, even adapted lenses, into image stabilized lenses, and Olympus has the very best IBIS in the industry. The IBIS in the E-M5 II is capable of correcting around 4 stops of hand-shake, which is rather remarkable. This can enable handholding shots at 40mm (80mm equivalent) at a shutter speed of 1/5 second or so. The shot to the right was taken at 1/4 second at 28mm and remains sharp. I didn’t have time to change settings for this shot, as the look lasted only for a second, and I was headed up the stairs. I wasn’t planning on taking a photo, but was relieved to find the shot had come out successfully despite the very slow shutter speed.
On the down side, the E-M5 II’s IBIS is also susceptible to shutter shock like the E-M1. When shutter speeds are between 1/30s and 1/80s, or when using very long lenses like the 75-300mm, the camera can have induced blur from the IBIS system due to the mechanical shutter. With the E-M5 II, there are two options: turn on the provided anti-shock feature, or use ‘silent mode’ which utilizes fully electronic shutter for the shot. Both do a good job of eliminating the shutter shock issue.
The addition of IBIS is extremely valuable for a wide range of shooting applications, from dim light photography at lower ISOs to hand-holding shots at slow shutter speeds to capture motion of the subject while keeping the background sharp.
In-Camera Keystone Correction

Another excellent feature that is new to the E-M5 II was also recently given to E-M1 owners via firmware update. Olympus has made it possible to do in-camera perspective correction, to eliminate keystoning that can occur when tilting the camera up or down, most often when photographing architecture. This, of course, only affects the JPEG output, as RAW captures always remain untouched, but I found it useful even when shooting RAW.
The keystone correction is activated in page 2 of the main menu, and two perspective correction controls appear on-screen, for use with the main dials. Note that it’s a bit tricky to make quick exposure adjustments when using the keystone correction since the main dials are taken over, so it’s easier to get your exposure correct in advance, then switch on the correction. Then all you need to do is move the dials to correct either vertical or horizontal perspective correction. You can also use the four-way buttons to shift the final composition to include what you need from the corrected frame, while a key in the corner shows the area of the corrected frame that will be captured. Unfortunately, you can’t correct both horizontal and vertical perspective simultaneously. The correction works very well, and corrected JPEGs can achieve that nice straight line look right out of camera.
I mentioned that I also found it useful when using RAW, so let me explain. I shoot a lot of city and architecture photos, and since there are (as of this writing) no mirrorless tilt-shift lenses to enable perspective correction optically, I do a lot of keystone correction in post. Normally, these adjustments can be fairly minor, and it’s not hard to compose with this in mind. However, there are times where you’re tilting the camera up significantly. When corrected, these images will lose data at the bottom edge. As a result, you need to figure out how loose the composition needs to be to have the final image still contain everything you need in the final image. This can be challenging with extreme corrections, but using the in-camera correction tool will give you a RAW image that you know can be corrected.
Wi-Fi
Of course, the E-M5 Mark II features Olympus’ full featured Wi-Fi capabilities that have appeared in their cameras from the past two years. Wi-Fi is one of the features I miss most when shooting with my original E-M5, so it’s a welcome addition to the new camera.

Like the E-M1 and E-P5, the E-M5 Mark II has all the standard Wi-Fi features, including remote image transfer, remote shooting and GPS tagging of images. For my own shooting, the transfer of images is the most useful, as I can quickly view high-resolution images on my phone or table, enabling further editing and quick sharing while on the go. I also occasionally use remote shooting to get a good view when the camera is in an awkward position, though this is less needed on the E-M5 II than on many other cameras due to the fully articulating screen.
Wi-Fi is established by scanning a QR code with your phone or tablet (manual setup is available too), then following the on-screen prompts. Setup went smoothly for me, and image transfer in conjunction with the competent RAW editing features on the camera made sharing a breeze. Remote shooting works fairly well also, with most major settings available right from within the mobile app.
Other Features
There are quite a few long-standing Olympus features that are, of course, present on this camera as well. Worth mentioning is the outstanding Live Time and Live Bulb features, which show a live developing preview of the image during long exposures. It’s a feature I use a fair bit on my E-M5 and works just as well on the E-M5 II. Olympus has added a new feature in the same set, which is Live Comp. This allows you to take a reference exposure image, and then let the camera check for new areas of brightness over the course of subsequent exposures. Effectively, it allows you to expose for the background and then do subsequent longer exposures to composite into the frame, such as painting with light, or something as simple as fireworks. It’s nice to see Olympus continue to innovate in this area.


Leave a Reply