Key Features: Wi-Fi
The E-P5 is the first Olympus interchangeable lens camera to feature built-in Wi-Fi. Wi-Fi first started really becoming a must have feature late in 2012, and the majority of new cameras in 2013 are coming with at least some form of Wi-Fi capability. The E-P5 is the second camera I’ve used with Wi-Fi capability (the Panasonic GH3 was the first) and it adds some very nice functionality to an already highly capable camera.

Olympus’ Wi-Fi is usable between the camera and Android and iOS smartphones and tablets using the Olympus Image Share app. The Wi-Fi capabilities allow you to share (JPEG) images from the camera to your mobile device, syncrhonize your camera and smartphone to allow for location information gathering, which is then written back to the camera to geotag all your images (if so desired), as well as provide limited camera control.
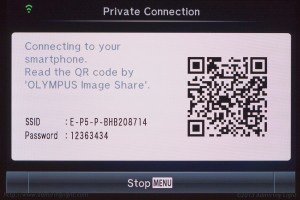
Setting up the Wi-Fi connection is relatively easy. You can go into the Wi-Fi setup either through the menu, or by tapping the Wi-Fi button on the rear screen. This will bring up an SSID and password that you can manually enter to connect, or you can simply scan the QR code with the Image Share app and it’ll do the setup for you. After this, you won’t need to enter the information again.
The Wi-Fi image transfer worked very well, though it would be fantastic if the Olympus software contained a RAW converter to allow for RAW editing on the go with a tablet. However, for the images you like, you can develop JPEGs in camera, though this is tedious to do for a large amount of images.
I was less impressed with the remote control capabilities, primarily because I was spoiled by the excellent control implementation that Panasonic uses on the GH3. Panasonic allows you to completely operate the camera remotely, changing focus points, aperture, exposure compensation, etc. However, when using the remote camera control on the E-P5, you are limited to the camera’s iAuto mode only. I really don’t understand this limitation, and I simply have to chalk it up to a lack of programming time on Olympus’ part. I don’t see any reason this control couldn’t be offered.
Geotagging is, well, geotagging. It works fine, though you’ll need to watch your smartphone battery. I’m not one to really worry about geotagging my photos, but it could certainly come in handy.
Overall, the Wi-Fi implementation is a nice addition to the E-P5. I found myself using the image sharing on a few occasions during my time with the camera. I’d take a shot of family with the E-P5, transfer it to my phone and I could then just quickly post it to Facebook without having to worry about going to my study to transfer images. It’s a feature that is going to become standard on almost every camera over the next few years, and the ease of use and implementation will only improve.
Focus Peaking
The E-P5 is the first Olympus camera to feature focus peaking. It’s been much requested for quite some time in the Micro 4/3 community, and unfortunately, this implementation of focus peaking is pretty poorly done. In good light, it does OK, providing a bright, thick white outline around those things that are in sharpest focus. Unfortunately, the way they are doing peaking is essentially an art filter overlay, and it dramatically slows down the live view refresh rate, making you feel very disconnected to the scene. It’s also very heavy-handed, and so not quite as precise as some other peaking methods. Overall, I found myself turning it off, as it was more of a distraction than it was worth. The good news is, with the VF-4 fitted, I found focus peaking to be completely unnecessary, as the VF-4’s view is so big and sharp that manual focus was a piece of cake, even with large aperture lenses such as my old Konica Hexanon 57mm f/1.2.
In-Body Image Stabilization

The E-P5 inherits the OM-D E-M5’s 5-axis in-body image stabilization (IBIS), which was one of the best features on the OM-D. While all Olympus Pens have had IBIS, this is the first with the more advanced IS system from the OM-D. On the OM-D, I found it capable of providing sharp handheld photos a good three to four stops slower than I would be able to handhold the camera without IS. Luckily, the E-P5 retains this great level of IS performance. I was regularly able to handhold shots a good 3-4 stops slower than otherwise possible, even when only using the rear screen. Having built-in IS like this makes shooting with any lens easier in lower light conditions, and can improve image quality by allowing you to use lower ISOs if you aren’t shooting a moving subject.
One issue that I did have with the E-P5’s IS that I have not experienced with the OM-D is the so-called ‘shutter shock’ issue. This happens at certain shutter speeds, in this case between about 1/50s and 1/80s, where the IBIS registers the vibration from the shutter actuation as movement, and over-corrects with the stabilization, thus inducing blur. On my OM-D, I never noticed it affecting my images in general use (and I’ve been shooting with it for over a year). On the E-P5, when it appeared, it made the images unusable. I’m not sure if it was just the sample I was reviewing or indicative of a more widespread problem (readers…please comment on the article yea or nea with your E-P5). In any case, I learned to try to avoid those shutter speeds with IBIS engaged, either opting for a slower speed at lower ISO if I could, or raising the ISO to get into the 1/100s range or higher.
Other Useful Features
The E-P5, like several of the other more recent Olympus Micro 4/3 cameras, featuers a Live Bulb and Live Time mode. While these are not new features, they are worth mentioning because no other camera maker (that I am aware of) includes such features, and they are incredibly useful. In Live Bulb or Live Time, which are used for long exposures (multiple seconds to minutes), you actually get to see the photo develop over time as the sensor is still recording the image. This is incredibly useful for very long exposures, as a single exposure might be 2 minutes, followed by 2 minutes for the long exposure noise reduction to take a black frame. On most cameras, you just hope that your exposure is right…but often when setting up at first, it won’t be right, and that’s four minutes of light you just lost trying to get your exposure correct.
With Live Bulb and Live Time, you just watch your exposure develop on the LCD, and stop the exposure when it’s to the level you want it to be. If you are wondering, Live Bulb works just like bulb mode on any other camera…the shutter stays open for however long you hold down the shutter release (or remote release). In Live Time, the shutter opens when you press the shutter once, and closes when you press the shutter again. These modes make long exposure night photography much more efficient and enjoyable.


Leave a Reply