Wi-Fi
The X-E2 is the third X-Series camera to feature WiFi (behind the X-M1 and X-A1). The implementation hasn’t changed since those cameras, which means that the WiFi is a little more limited than many other makers, but still works pretty well.
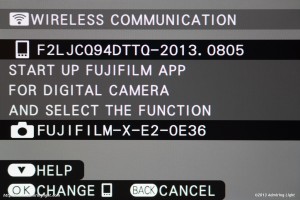
The X-E2 can utilize its built-in WiFi transmitter to transfer images to a mobile device, allow a device to browse the camera card’s contents (and then transfer), geotag images with GPS data from a smartphone and transfer images to your computer over a home WiFi network.
I have come to really enjoy having the ability to transfer images from my camera to my smartphone, and it’s the main feature I use on WiFi enabled cameras. The X-E2’s interface is a little quirky in this regard, but it works well. You simply enable WiFi from image review (by pressing menu then selecting Wireless Communication), select the camera’s WiFi network on your mobile device, then open the Fujifilm app and press Receive and Connect. It works fine, but it’s a fair few steps. It is also baffling when you use multiple mobile devices, such as a phone and a tablet, as the camera will only remember one device at a time and will refuse to connect to the second until you press ‘OK’ on the camera to change mobile device. Despite its quirks, you quickly learn the steps and can transfer your images with ease.
The X-E2 can also take GPS information from your smartphone and transfer it to the camera for use in geotagging your images. This certainly works, but the problem is that it doesn’t continually read your location for each image, but rather gets the GPS data once and adds that to all images until you update it. This is fine if you’re shooting in one location for a while, but isn’t very useful if you are roaming around a city or hiking somewhere.
Unfortunately, Fuji still doesn’t offer any way to remotely control the camera through a mobile device. Olympus, Panasonic and Sony all offer this capability with their WiFi enabled cameras, so it’s a bit of a disappointment to see it left off the X-E2. Hopefully, given Fuji’s excellent reputation for adding features via firmware updates, this capability will be added to the camera in the future.
Focus Peaking and Digital Split Image
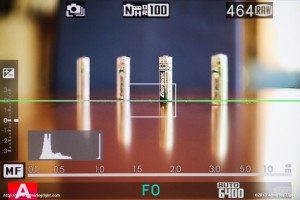
While most people will be using autofocus for the majority of their shooting, there are certainly times when manual focus is preferable. Additionally, one of the great things about mirrorless cameras is their ability to use manual focus lenses from almost any camera system. As such, the manual focus experience of a mirrorless camera is important, and Fuji has been improving that experience steadily over the past year.
This summer, focus peaking was added to the entire Fuji X-System lineup, and it makes another appearance in the X-E2. When focus peaking was added via firmware to the X-E1, it was useful, but not perfectly implemented. The white outline was somewhat difficult to see on the low-res rear screen and it was also very subtle in the viewfinder. Focus peaking has been improved on the X-E2, and the (still only white) outline is much more clearly visible in both the viewfinder and on the rear screen. In most situations, peaking is extremely easy to use and is very precise. I use it for the majority of my manual focusing. You can also magnify the viewfinder in conjunction with peaking to very precisely place your focus point. With the more visible outline on the X-E2, the experience with focus peaking is much improved over previous versions, and it even manages to highlight the in focus areas on relatively low-contrast areas when using very fast lenses, which is better than the performance I’ve experienced on something like the Sony NEX-7.
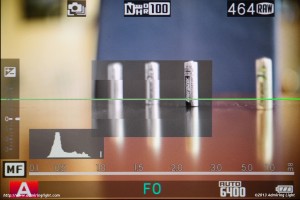
With the addition of phase detection pixels, Fuji also has added their very unique Digital Split Image capability, which first made its debut on the X100s. When digital split image is activated, the central part of the viewfinder turns to monochrome, and is divided into four bands. When the image in the bands is lined up, that part of the image is in focus, just like using a split-prism focus screen in an SLR. You can also magnify this view as well for very precise focusing.
I found the digital split image to work well. I prefer using focus peaking for most manual focus work, as it is easier to see in most circumstances and faster. However, there have been some situations where precise placement with focus peaking was difficult to discern, and the digital split image worked beautifully to nail the focus point. It works best on flat subjects, of course, so shooting a continuous curve or the like is more difficult with this focus aid enabled. It’s a great tool in Fuji’s bag of tricks.
Fuji makes it very easy to switch between these focus aids and the standard view. Simply press and hold the rear wheel for a second or so, and it will switch between Standard, Digital Split Image and Focus Peaking, so you don’t even need to take the camera from your eye to cycle the manual focus options.
In-Camera RAW Conversion
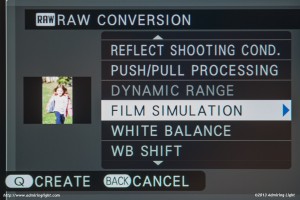
Like the other Fuji X-Series cameras, the X-E2 features some of the best in-camera RAW conversion around. Accessing in-camera RAW conversion is as easy as pressing the Q button while reviewing an image, and it brings you to a list of processing options for the RAW file. You can adjust exposure by pushing or pulling the image, you can change the Film Simulation (more on that below), adjust white balance, highlight and shadow curves, sharpness, noise reduction and so on.
After each adjustment you can choose to preview the final image by pressing Q again, and then OK to save the image, or Back to make further adjustments.
Fuji’s JPEG engine is the best in the business, and the excellent Film Simulations allow for quick changing of JPEG parameters that somewhat mimic certain film looks. There’s standard (Provia), a high saturation Velvia mode, a soft portrait read Astia simulation as well as multiple filters on black and white conversion and my personal favorite, Pro Negative High (Standard is also available). These allow for quick changes of the look of the final image and all are excellently tuned. The high JPEG quality and the ease of custom RAW conversion makes it great for sharing in conjunction with WiFi.



Leave a Reply