Operation and Menus
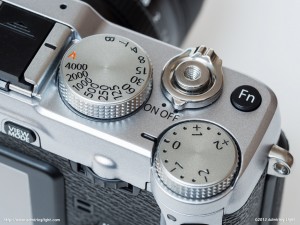
The ‘retro’ look is very ‘in’ nowadays, with the success of the Olympus OM-D being a notable example. Fuji, however, takes the retro theme all the way to the controls. While there are certainly a nice array of digital controls and menus to customize the experience, the X-E1 (and the X system as a whole) uses the same control scheme as those cameras that it apes aesthetically.
Namely, the main controls are an aperture ring that is on each lens and a dedicated shutter speed dial. The shutter speed settings are in one stop increments, but 1/3 stop settings can be accessed if desired by pressing left or right on the 4-way buttons to go faster or slower from the speed on the dial. All aperture rings on all Fuji lenses operate in 1/3 stops. Both the aperture rings and shutter speed dial have an ‘A’ designation to set that parameter to automatic. As a result, there is no need for a mode dial. To use Aperture priority, set the shutter speed dial to ‘A’ and select the aperture you want. Shutter priority works the opposite way. Set both to ‘A’ for program mode and select both parameters for full manual. The one update to this paradigm is the addition of a dedicated exposure compensation dial that is easily accessible by the right thumb.
These dials make operating the Fujifilm X-E1 an absolute joy. All settings are instantly visible at a glance, even when the camera is off. It’s so intuitive, that I’m simply amazed that no other manufacturers have gone back to this paradigm after it first went away in the late 80s.
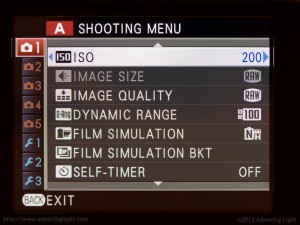
The menus in the X-E1 are well-organized and easy to navigate. There are five sections of shooting parameters and three general camera setup sections. Because the interface is so intuitive, there isn’t a whole lot to customize, but that’s OK. There is one programmable function button that sits right next to the shutter button that can be set to change a number of different parameters, though I’d imagine most shooters will set it to change ISO. Holding that button down will bring you straight to the menu item to set what that button controls…this is a nice touch.
The rear of the camera has a number of controls, with the AFL/AEL button just to the right of the thumb rest and above the Q button, which brings you straight to the camera’s “Quick Menu,” which allows you to change a number of the most needed items, such as JPEG parameters, file quality and format and so on.
The left side of the LCD contains the AF point selection button, which brings up the grid of 35 selectable focus points covering the entire frame. The size of the AF points can be quickly changed by using the secondary dial, which sits just to the left of the thumb rest.
Also on the left is the Drive button, which allows you to switch from single shot, burst, bracketing and contains the switch into video mode. The fact that video is hidden here tells you how much this is a stills oriented camera.
The front of the camera has the focus selection switch, allowing you to quickly switch between single shot and continuous autofocus as well as manual focus without taking your eye from the camera.
Overall, the controls on the Fujifilm X-E1 are simply and fast to operate, and more than any other camera, I love picking up this camera and shooting with it for this reason alone. However, it’s not all roses in operation.
Autofocus and Performance
If there’s one Achilles heel about the Fuji X-E1 it’s the autofocus system. While Fuji has made big strides in this area since the initial release of the X-Pro 1 (which had essentially unusable autofocus that actually locked up the live feed of the sensor during autofocus), the X-E1’s AF is well behind its two major competitors in Micro 4/3 and Sony’s NEX.
The autofocus speed of the X-E1 is fairly decent in good light, though it’s not going to break any records, especially with the 35mm f/1.4. In dim light, AF can range from acceptable to downright awful. With lots of contrast and a fast lens, the AF is OK. When things are a little less contrasty, the AF speed becomes quite slow and will often fail to find focus at all, displaying a red AF box with “AF!” displayed. And by lower contrast, I mean a person’s eyeball that’s in partial shadow. While the camera trains the operator over time (I have learned subconsciously where to focus for optimal results, so over time, the number of AF failures I’ve had has decreased quite a bit), it’s still way, way behind something like the Olympus OM-D E-M5, which can lock nearly instantaneously and super accurately in the situations where the X-E1 throws up its hands. If I’ve been shooting with the X-E1 for a while and I pick up my OM-D, I am blown away by the absolute speed and responsiveness of the Olympus in comparison.
Update, Firmware v2.0: Fujifilm has made great strides in Autofocus speed and low light accuracy with firmware version 2.0. While still not as fast as the autofocus present in modern Micro 4/3 cameras or Sony NEX cameras, it’s not that far behind. Low light focusing has been dramatically improved with this latest firmware version and the camera is now able to lock focus in most any shooting situation. The frustrating AF failures of earlier firmware versions appear to be a thing of the past, and the Fuji X-E1 now sports a quite decent single shot autofocus system.
The continuous autofocus of the X-E1 is also essentially unusable. Instead of acting like typical continuous AF and tracking a subject when pressing the shutter button, it continuously focuses, regardless of whether the shutter is half pressed or not. The speed here makes it more a feature in name than in actually usefulness.
There is a little shutter lag with the X-E1, but it’s not generally a big deal. The camera can shoot 6 frames per second in burst mode, and this works well if you are prefocusing and shooting a series of shots. Don’t count on using the X-E1 as a sports camera in most situations. It’s definitely a more deliberate camera, and performs well in this scope.
Flash
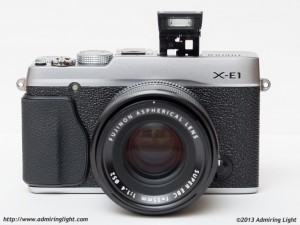
The X-E1 has a very nicely hidden pop-up flash that hides next to the standard ISO hotshoe on top of the camera. A button on the rear of the camera pops the flash up and out of the body. Like all built-in flashes, it’s not particularly powerful, but it does just fine for fill-in work or times when you don’t have an external flash handy. Exposure with the fill-in flash is generally accurate. The mechanism also allows you to hold the flash back to provide for bounce flash in the horizontal position, though you’ll need to up the ISO a bit if you’re using a slower lens when bouncing the built in flash.




Leave a Reply