Review: Fujifilm X-M1

Key Features: Wi-Fi

As I mentioned in my review of the Olympus E-P5, the new must-have feature on digital cameras is Wi-Fi capability, and the X-M1 is no different. It’s the first X-Series camera to feature Wi-Fi connectivity. Unfortunately, the Wi-Fi capabilities are rather limited this time around. You can transfer images to a smartphone or tablet, transfer GPS location data to the camera for geotagging of images, and send images to your computer over your home’s wireless network. These are all very nice features, and they are certainly welcome.

The X-M1's Wi-Fi, searching for a mobile device
The X-M1’s Wi-Fi, searching for a mobile device

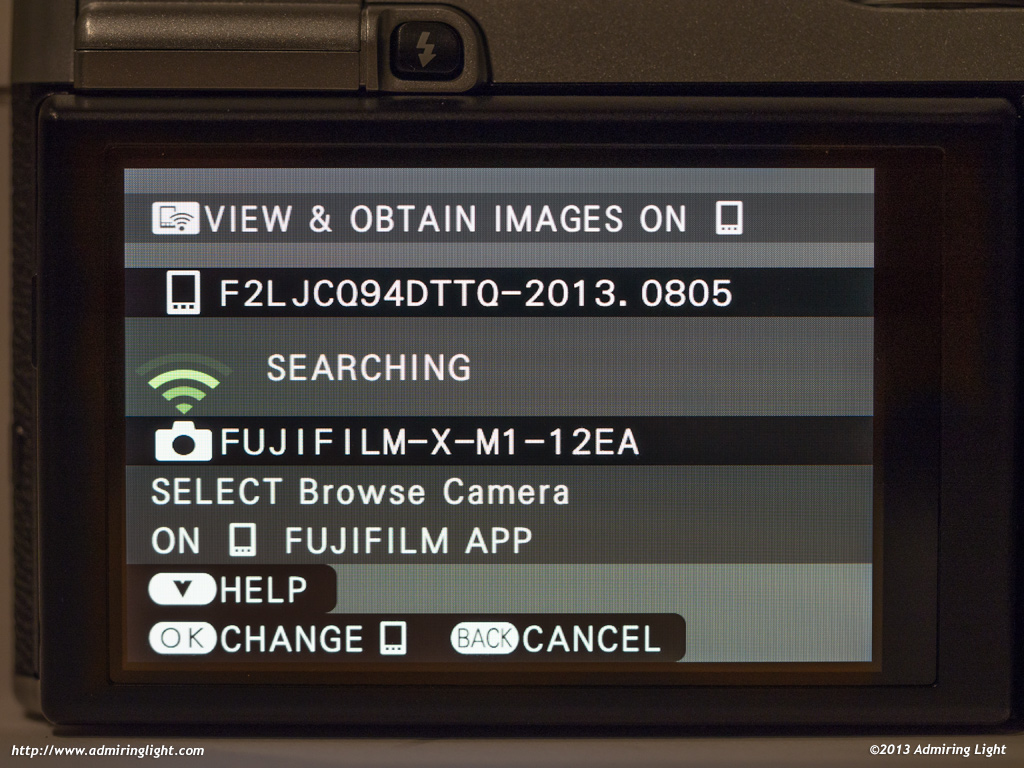
The most used feature for me with any of these Wi-Fi enabled cameras is in transferring images to a mobile device, which allows me to quickly share images with people. The image transfer on the X-M1 works pretty well, though I have encountered some issues here and there. While I have had no problems at all connecting my iPhone 5 to the X-M1 and receiving images through the Fujifilm Camera Application, I have had a little less success with my iPad Mini. I can receive photos fine from the X-M1 when using the “Send Images” commands, but I haven’t been able to browse the camera with my iPad. Anyway, to transfer images to a mobile device, you simply activate the menu by pressing OK while reviewing an image. You can then scroll down to Wireless Transfer and send individual images, multiple images or browse images on your mobile device. The transfer works quite well and is relatively quick. One downside is that you can only transfer JPEG images. On the other hand, Fuji has outstanding RAW conversion capability built into the camera (see that section below).

Geotagging works by manually having the camera request a location from your smartphone. The Fujifilm app then sends the current coordinates to the camera, and that data is used for all photos until you change the location data manually again. While this is helpful by not requiring your smartphone to constantly track location, thus burning battery, it’s also quite imprecise, as all your photos in an area will have the same coordinates, rather than moving with you as you go, unless you stop to feed new coordinates on every shot. It can also be somewhat inaccurate because it doesn’t allow your phone to get a really precise location lock before sending the coordinates…it often takes the quick first coordinates it gets, which can sometimes be off by a few thousand feet. It would be nice to see a map on the application, so you could see your location zero in, then choose when to send the coordinates to the camera.

I played around a bit with the PC Wireless Transfer capability which uses a program on your computer to talk to the camera over your Wi-Fi network. The system works, and you can push images to your computer, but I found that this function doesn’t operate particularly quickly, making it relatively inefficient for sending data. There’s also no way to remotely specify where the files should be stored on the computer, as the storage folder is set on the computer program, rather than on the camera, which makes organizing files difficult remotely. Ultimately, I find it easier to just walk to my computer and offload my card directly.

One thing the X-M1 is lacking that several competitors in the mirrorless space are not is a remote control function, where you can remotely take photos and view a live feed from the camera over the Wi-Fi network. This can be a really useful feature, and I’d love to see Fuji add the capability in a future firmware update.

In-Camera RAW Conversion

Pulling an image 1/3 stop using in-camera RAW conversion

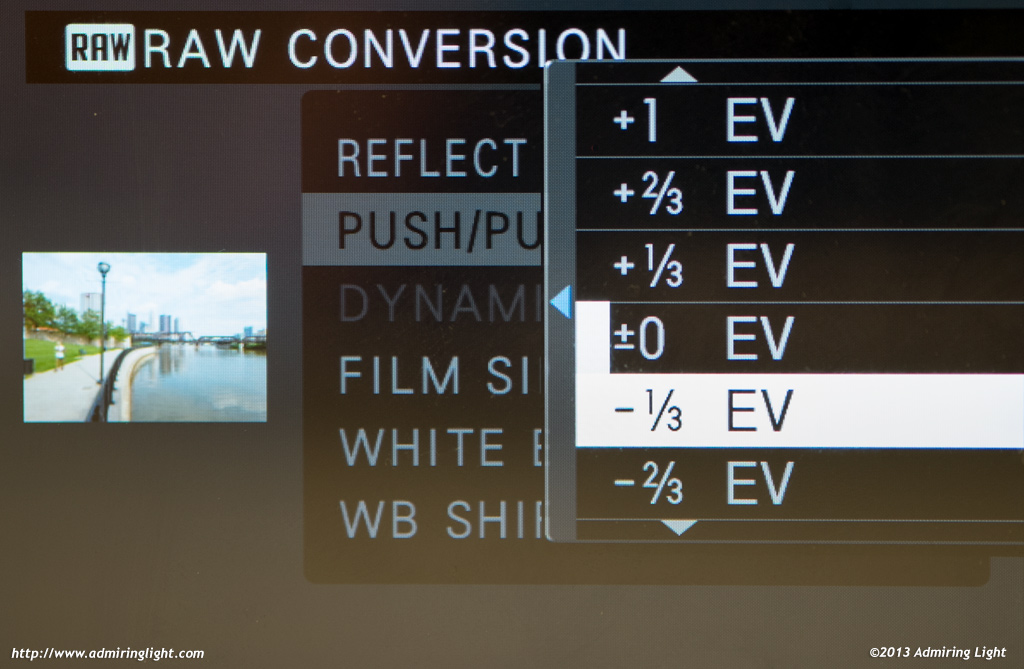
One very useful feature on the Fuji X-M1 that it shares with the other X-Series cameras is the ability to shoot RAW, and at any point, make a JPEG from that RAW file, with whatever shooting parameters you like. For instance, you can shoot color, then go into the camera’s RAW conversion (simply by pressing Menu during review), and do such things as pull the exposure 2/3 of a stop, increase shadow contrast and process in black and white. Select these conditions, press Q and your new JPEG is created. If you like the look, you can confirm, and it will save it, or you can go back and make changes before saving the final image. In any case, the RAW file remains untouched.

When I first used this feature on the X-M1, I was slightly disappointed that Fuji had moved the RAW conversion selection to the second page on the Playback menu, thus making it harder to access. Then I found that they had actually made it easier to access: To go directly to the in-camera RAW conversion, simply press the ‘Q’ button while reviewing an image. In this way, you can very quickly create a JPEG from a RAW using the parameters in use when the image was captured by quickly pressing “Q”, “Q”, “OK”.

The in-camera RAW conversion is even more useful on the X-M1 due to the ability to wirelessly transfer images to a mobile device. I can simply process a good image as a JPEG, even doing some RAW editing, and transfer that to my phone to edit further or upload.

Film Simulations and Advanced Filters


Selective color using the advanced "Partial Color (Yellow)" filter
Selective color using the advanced “Partial Color (Yellow)” filter

Like Fuji’s other X-Cameras, the X-M1 has access to ‘Film Simulation’ modes such as Provia, Velvia and Black and White. In an odd decision, Fuji has not carried over all the film simulations from the X-Pro 1 and X-E1. The Pro Neg simulations are gone, as are the filtered black and white simulations. It’s a very odd omission. The simulations are already developed for the same sensor, so it’s simply a marketing decision. There’s really no need for it, and it’s disappointing.

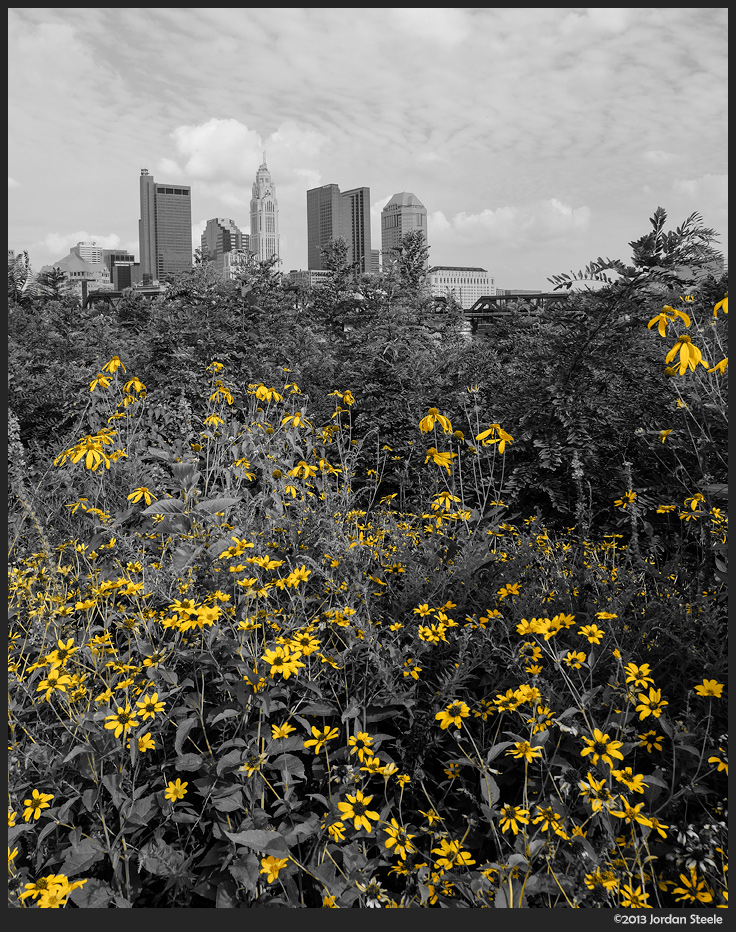
In place of some of the film simulations, however, are new ‘Advanced Filters’ which are only available in Auto mode by selecting the Adv. position on the Mode dial. These include filters like Toy Camera, ‘Miniature’ (a tilt-shift simulation) and multiple selective color modes among others. Many of these produce files that are majorly overprocessed, and serious photographers should really avoid them like the plague. A few may provide the right punch or look for certain situations. Among the choices, the selective color filters have the most appeal to me, though they’re not perfectly implemented. The camera does a good job selecting things of the chosen color, but the range of selection is rather tight and can’t be adjusted, so you have areas that abruptly clip to black and white rather than fading with decreasing saturation. The result can be good in some situations and really jarringly bad in others, depending on the actual colors in the photo.

Other Items of Note

Like the other X-Series cameras, the X-M1 allows you to set the focal length for adapted lenses, which will record that information in the EXIF data of each image. This nice when you use cataloging such as Lightroom, which allows you to sort by metadata, including which lens you used for an image. The X-M1 also retains the expanded dynamic range settings, which give you a little extra highlight headroom by underexposing a higher ISO image and bringing it up after the fact. I tend to avoid that feature as it adds noise, and doesn’t seem to do much in the RAW files.

Some of the same nitpicks I noted in my X-E1 review are still present in the X-M1: namely, that images that have been autorotated to the vertical orientation don’t rotate when you orient the camera in playback, which makes review of vertical images a challenge, especially so because the magnification is less on vertical images than on horizontal images when checking for critical focus on RAW files.

Continue: Image Quality

Comments

20 responses to “Review: Fujifilm X-M1”

  1. […] Just finished my in-depth review of the X-M1. Surprised at how much I liked it, despite the low build feel. Review: Fujifilm X-M1 @ Admiring Light […]

  2. carl Avatar
    carl

    A very useful review; thanks.

    One question: for the photographs displayed from the X-M1, did you use any post-processing? And if so, how long did you typically spend on a photograph?

    1. Jordan Steele Avatar

      There is some post processing on all the shots, as they are all from RAW. Many have very minor edits, such as contrast and saturation adjustment, others have a little more work. Since I need to see how RAW files hold up to all sorts of different processing (it’s one of the things that can really separate camera sensors), I simply shoot and process in my normal workflow. I usually spend about 2-3 minutes per image, though a few take a bit longer. Here’s a breakdown of images, starting with the two on the Image Quality page. All images were processed in Lightroom 5.2 Release Candidate and Photoshop CS6.

      – Sunrise over Columbus: Heavy shadow and highlight compression in Lightroom (blacks +36, Shadows +100, Exposure +2/3 stop, highlights around -30. Color and contrast adjustment after RAW processing.
      – Ohio Statehouse: minor color and contrast adjustment after RAW processing.

      On this page:
      – Egret in the Mist: Heavily cropped (this is about a 4.5 MP crop of the full 16MP image), processed in Color Efex Pro 4 with the Infrared Film preset, tweaked to taste.
      – Hayden Falls: Minor color and contrast adjustment after RAW processing.
      – Roots: Pretty heavy editing with Color Efex Pro to enhance color, provide more subtle contrasts and a little glow.
      – Statehouse Rotunda: minor color and contrast adjustment after RAW processing.
      – Girl – Almost straight out of camera – maybe slight additional saturation.
      – Hayden Falls – minor color and contrast adjustment after RAW processing.
      – Lost boat: Black and White conversion in Nik Silver Efex Pro 2 with selective color masking done in Photoshop
      – Bee: Combination of two exposures (one focused on the flower, the other focused on the bee (though the same composition for both exposures)) – minor color and contrast adjustment after RAW processing.
      – Ohio Statehouse: color and contrast adjustment after RAW processing, additional processing in Color Efex for a little ethereal feel.
      – Water Plants: Sunlight filter in Nik Color Efex to give warmth and modulate contrast. I cloned out a few bubbles in the water as well.
      – Boats Under Broad Street: B&W conversion in Nik Silver Efex Pro 2.

  3. cosinaphile Avatar
    cosinaphile

    a very enjoyable review , as an xe1 owner i appreciated that you took time to explain the value of the customizable jpeg engine … its a valuable feature imho….. sadly the finish seems cheap though build is good … i wish a firmware update could unlock the xe1 camera during writing , but it may just be a case of processing power , in which case unlikely.

  4. Bill Crelin Avatar
    Bill Crelin

    Jordan,
    As always, wonderful shots and thorough overview of the new Fuji. I follow your posts over at Fredmiranda as well and to my eye your fuji shots always seem to appear ‘silky’ for want of a better word and the oly photos are quite sharp and acute but not at all in a bad way. Am I reading too much into this or is this perhaps the ‘Fuji look’ folks refer to on occasion ? . Thanks for the time in putting these helpful reviews together

    bc

    1. Jordan Steele Avatar

      Yeah, a lot of that is that ‘depth’ that I talk about the Fuji images having. They’re just a little better in color/contrast and smoothness of transitions. Really nice files. The Oly files are generally a little crisper with a sharper contrast cutoff, though both are easily capable of excellent images.

  5. […] compact system camera announced back in June, 2013. Admiring Light has posted a full review of the Fujifilm X-M1 mirrorless […]

  6. Jacob Freeze Avatar
    Jacob Freeze

    These are flat out the best photos I ever saw in a camera review, and that’s mostly the photographer, not the camera, although the M1 is a very fine little machine.

    1. Jordan Steele Avatar

      Wow, thanks! I appreciate that!

  7. […] Back to the Fuji X-M1 we go with a new review of the #3 of the current Fuji X-System. This new review is waiting for you to read at Admiring Light. […]

  8. Frank Avatar
    Frank

    Very nice and detailled review, thanks.
    You mention the “plastic” feel of the camera. Is the top deck plate made of plastic, or metal (what it looks like on the pictures)?
    Thanks.

    1. Jordan Steele Avatar

      The entire exterior of the camera, except for the two dials on top and the power switch, is plastic. It’s well assembled plastic, but it’s definitely plastic.

  9. Kjell Ossson Avatar
    Kjell Ossson

    Just found you site “by accident” and I must say that I really appreciate the Fuji X-reviews I have read so far!

    I would rank you in top along Dpreview and a few others!

    There are enough so called reviewers out there I wouldn´t miss if my computer broke down…… but you´re not one of them!

    Keep up the good work!

    /Kjell
    (from the north of Sweden)

    1. Jordan Steele Avatar

      Thanks so much! I appreciate the kind words. Spread the news that the site exists! 🙂

  10. Pat Reehal Avatar
    Pat Reehal

    Jordan this is the most comprehensive and honest review I have read on this most underrated camera. Thank you.
    I love my X100 and when Amazon UK discounted the XM-1 heavily over Christmas it was rude not to buy one.Yes it is plastic and yes it has no viewfinder but by heck it produces such stunning results that I forgive it. It punches seriously above its weight and for the $360 it cost me with the XC 16-50mm I am delighted.

    Your review on the XT-1 is equally informative and, armed with a pump-action Debit card, I bought one last week. The XM-1 is wonderful, the XT-1 is sublime.

    Please continue your excellent work. I have bookmarked your site and recommended it to all of my colleagues who, like me, are all sick of the ‘Merda taurorum animas conturbit’ Brigade!

    Kind regards

    Pat

  11. Michael M. Avatar
    Michael M.

    Jordan… Although I am not an X-M1 user (I have an X-E1), I have to agree with the rest of the commenters here that you do have a wonderful way of giving us important technical information, user information, and lastly wonderful photographs. I sort of found your site by accident as I am a recent Fuji convert (I still shoot Nikon for paid work) but I am going to also keep your site bookmarked as a key contributor to the photography knowledge base. Please keep up the good work you are doing, and keep on adding your much higher than average camera/lens review photos to your posts. I especially like your water plants photo above. Really excellent.

  12. Tri Rini Nuringtyas Avatar
    Tri Rini Nuringtyas

    I used this camera for almost a year. I really love it. Small and really suitable for me as a street photographer. My question I had already the 27 mm pancakes, kit Lens and the zoom lens. I want to buy mirelens which one is better the 60 mm or 35?

    Thank you

  13. […] compact system camera announced back in June, 2013. Admiring Light has posted a full review of the Fujifilm X-M1 mirrorless […]

Leave a Reply

Your email address will not be published. Required fields are marked *

This site uses Akismet to reduce spam. Learn how your comment data is processed.

Search


Categories


Recent Posts


  1. Your article brings back some very fond memories. I had exact setup you describe. The 15-85 lens on the 30D…